It goes without saying that there are numerous types of modern
fishing reels. These can be separated into different categories and then
sub-categories. Freshwater and
saltwater being a starter. The main difference between freshwater and
saltwater is the saltwater reels are generally larger bodied with a larger line
capacity and generally more rust resistance. Within those groups will each be different types of which
could include, single action, level-wind spool type,
open-faced spinning and closed face spinning reels. And then there are
those fishermen who collect the oldies.
Shown in the
LH photo
below is a an old reel probably from the late 1800s named
the California Freespool. This old reel has direct drive, but new enough to
have a clutch
disengage for letting line out. The older ones you pulled the
handle out to disengage.
The drag here is your thumb on the
heavy leather against the spool's line
Here is
another old thumber
Most modern fishing reels are not
only for storing line, as when used for larger fish the friction drag system
is especially important. Those rotating spool type, if used for casting
are normally equipped with ball bearings for smoother operations instead of
just bronze bushings. Generally the more ball bearings the smoother the
operation and the higher the price.
Many of the newer reels that have a drag
system that when referring to this type of reel, is a
mechanical means of applying variable pressure to the turning
reel spool in order to act as a friction brake against it when
a fish is pulling line out. This can be as simple as for the
early reels as a piece of heavy leather rubbing the spooled
line and was "thumbed" and the line out-spool was accomplished
by pulling the crank handle OUT to disengage it from the
spool. Or they can be as sophisticated as a complicated
arrangement of leather, fiber, carbon or
Teflon friction discs
placed around the handle shaft (which is connected to the line spool
by an engagement clutch).
The number of drag washers may vary from 1 to 4 or even 5,
depending on the intended usage of the reel. For freshwater
reels, it would be common to only see 1 or possibly 2 drag washers, whereas a
saltwater reel designed for salmon or halibut, you will encounter
considerable more to compensate for larger/heavier fish.
Some drag discs, many times known as washers can be lubricated while others are not,
depending on the composition. These drag
washers are sandwiched together between brass or stainless steel washers
and under
a manually adjustable spring tension system using the star shaped drag wheel
behind the crank handle for adjustment. There are also versions that use a adjustment,
operated by a lever, which are identified as lever drag reels.
A properly set reel drag allows
larger or powerful fish to be safely brought in and landed, as the drag will "slip"
below the breaking point of the line if the fish makes a sudden run. This in combination with
the flexibility of the rod, puts constant pressure on the fish, tiring it
more quickly. As a rough general rule, the drag should nominally be set at about one-half of the line's
breaking strength. This drag can be adjusted up or down as needed by the
fisherperson while playing a fish, by what is called a star drag wheel or
non some reels a lever activated drag.
The "Star Drag", name is usually associated with the star shaped wheel
located directly behind the crank handle that is used to tighten or loosen
the drag.
In the early reels, the handle was directly connected
to the spool, here if you wanted line to go out the handle would also
turn in reverse, later a clutch disengage system was devised that could also
incorporated a ratchet system allowing the spool/line automatically be
connected to the drag system when fighting a large fish.
This clutch/disengage system, which usually is manually activated by a lever,
(or push button depending on make/model) disengages the spool allowing the line to free-spool
out, as in letting the line out as in trolling or mooching, or when casting.
All reels, except the single action fly/mooching type reels,
need a method of stopping the line from going out when fighting a
fish. On the late early reels a spring loaded ratchet system was used, the later
reels utilized a anti-reverse system
that was essentially a anti-reverse main shaft roller bearing being
utilized.
This mechanism, being comprised of cam operated rollers
inside the bearing housing, automatically activate when the line
starts moving out while the clutch lever is engaged. This system allows
line to spool out separate from the drag system while the handle
remains stationary. This later design is named the Instant
Anti-Reverse, or IAR. It incorporates a one-way clutch type
bearing on the main handle shaft to restrict handle movement to
forward motion only,
by caming the bearing rollers against the inner part of the bearing
housing. The older spring loaded 'dog' or 'pawl'
systems engages into a
cog wheel attached to the handle shaft, while the newer anti-reverse
bearings also have the same result. Some old school knowledgeable
repairmen consider this IAR not as good as the anti-reverse ratchet
dog, however the IAR system usually results in a smoother operating
reel.
The photos of reels shown here is
to give you a sampling, while not trying to promote one brand over another. Some
are ones I purchased many years ago, like the Airex Bach Brown model 5 open
faced spinning reel that I bought new in the spring of 1955 along with a 8' Betts solid
fiberglass steelhead rod. I still have
both, and the
reel's booklet, and bag along with a small round metal grease container for the reel.
As a fisherpersons expands their
horizons, they
may soon learn that "One Size Fits All" does not really apply when it comes to fishing rods
and reels.
Other reels shown here are ones that I have picked up over the years to fill in the gaps
while others happened to follow me home over time to make a friendship with
naked rods I had, that needed such a relationship. I will say that
I do not really have any favorite reels, some however are better than others for
specific purposes. I am still trying to find the perfect reel for my
type of fishing, and I do think I am getting closer, OR manufacturing technology
is getting better after 75 years. I do have some that I use more
than others, however I just do not have the time to spread it around and
therefore some keep hanging on the wall with a forlorn look on them. And
I have found that in recent times,
price does not really mean quality nor longevity.
There are not many reels currently
available (other than the single action reels) that have
the handle connected directly to the spool, most of those that are still alive are
in antique collections.
You may not realize it, but a reel that is well maintained
may well increase your hooked to landed ratio of larger fish such as steelhead
or salmon. If your success declines, you may try a lot of other things to increase your
ratio, first thinking your
hooks are bad, or your rod is not matched to the needs at hand, or possible
you may even try different line, or begin to wonder if it is just you, getting
older.
However you may do yourself a favor and closely inspect your reel's drag washers.
Most of the reels you are using will incorporate a drag system of some kind, if it gets to when when the line is being pulled out,
it is not an SMOOTH even pressure or if
it does so in jerks, your drag washers may need attention, or replaced, maybe
just a good cleaning and re-lubricated. Or you
WILL loose a nice fish (which can cause the fish pull loose or break off) because the
slightly uneven pressure on the
fish (depending on the location of this worn drag in relationship to the
friction discs), giving this drag a slim chance of smooth operation, and if taken advantage of, that fish may be
history. And while you are at it, the spool bearings may need adjustment
or replaced to
help prevent a casting backlash.
Disillusionment :Sometimes one begins to wonder as to is it worth the
money to invest in a higher grade reel as to long term dependability.
My question is just what do you expect the life expectancy of a $180 reel to
be?? In my mind, I would think well over 10 years, but maybe I am being
lulled into thinking that because now automobiles are being made with over
100,000 mile warranties, when years ago a car was worn out with those miles.
Just because the reel is expensive does not mean it will be possible to repair
it down the road in a few years. And do not be swayed by a name brand that
is so much thought of by fishermen that they do not ask a professional reel
repairman for advise before purchasing one. Here I will name names.
I have had 50 year old Penn reels that seem to last forever AND parts are
still available if needed. It seems that the design was outstanding and
they have built newer versions around that. Another reel in this category is the Ambassadeur,
however I have found one minor problem, if you use these for trolling even
slightly heavy tackle (salmon), it may
be impossible to push the clutch release button in unless you slightly reel
in enough to relieve tension on the spool engagement dogs.
Fishing reels seem to fall into the category way different than computers that
need to be replaced every few years because of one or more malfunctions.
However, a salmon fisher friend took a couple of his Shimano Tekota 500LCs
in for professional cleaning/repair. One was a 10 year old reel, it was
returned unrepaired, he being told that some parts (the one he needed,
essentially the IAR bearing) were not available anymore from the factory, and this reel was now only
good for spare parts. I acquired it because I wanted to try to convert my wider 600
into a narrower 500 spool reel and could possibly use these parts to do so. In tearing it apart, I found that the
main crankshaft anti-reverse bearing's needles were gunked up so badly and I
could not tell if it was dried chassis grease of
some kind or rust to where the needles were dry and not able to rotate
(because this bearing was not designed to be readily removable from the
housing). You could hear and feel them complaining when you cranked the
handle. I have no idea of what led to that situation, as the other
smaller outer shaft bearing was fine.
Anyway, no big deal if that is all that is wrong, buy a new bearing, so I looked it up online and found that this bearing was
indeed now obsolete/discontinued.
WOW, he paid near $180 for that reel and now it
is scrap. The odd part that I find here, is that most bearings are not made by the
manufacturer of the product it is used in, (this is so throughout any industry, even vehicles). So I would
not be surprised that this bearing is still being made and used on some item, but without a manufacturers part
number to cross-reference to, it would take a LOT of measuring to possibly
find the right one or a usable replacement. Another thing I found during
this disassembly is that one of the cone shaped drag washer springs was so
collapsed that even if the bearing was available, this spring would have also
need replaced. Why would a company make a spring that was not heat
treated enough to withstand even the lightest treatment (like the drag being
tightened during the off season)? And this owner does not use his
boat - rod/reels a lot, only for a month at the Columbia River Buoy 10 salmon fishing each year.
I have the same reel only a wider version, and I
have never had any issues with it (other than servicing the line counter), and
I probably use mine more than he did.
FAST FORWARD -- I recently
found a bearing company that makes this bearing, BOCA Bearing. And they
have a website catering to fishing reel bearings, also giving cross-reference
numbers. This Shimano factory bearing was #TCT0488, BOCA's
equivalent # is EWC1008 and sells for $15.95. This was my guess all
along as mentioned above, as usually bearings are NOT made by the end product
manufacturer. Now possibly the reason for this factory obsolescence is that the reel housing (handle
side) uses two stainless steel pins to secure this bearing plate in place AND
OVER TIME, IF USED NEAR SALTWATER, these pins can become corroded into the
aluminum housing, making for a very good chance of breaking the housing when
trying to get the old bearing out. Is it possible that the factory is
not willing to admit to a design failure, and not wanting hassle from the
customer, so they just changed the bearing securement on later models and then
listing the old bearing as being obsolete? Or they will only sell it
(new version) as a sub-assembly with a new housing?
I suspect that it can be replaced IF a special fixture was made to really
support that housing as the pins were pushed out.
The moral of the story could be two actually. (1)
Don't be swayed by a lower priced reel being junk, where you could buy
one of these different cheaper model/brand that would still perform to your requirements.
But how do you know about the long term issues unless you personally buy a new
one (different brand) every few years and use them hard. Most of us do
not have the time nor resources to do that kind of a thorough test. And
I am sure that if you ask 100 different fishermen the best brand/model, you
may get 80 different answers. (2) However, if you take good
care of even a less expensive, BUT WELL designed reel, like cleaning and greasing preferably every year, MAYBE they would
last a lot longer. Then just maybe doing your own repairs in the off time, OR
TAKE TO A PROFFESSIONAL you may certainly get better and longer life out of it. It seems that
the more money you spend, the more the idea is that it is a good/should be of higher quality and close
to being indestructible, however the
newer reels have a whole lot more internal parts to go wrong than the ones we
used as kids.
So I guess you either consider taking someone else's advise,
(but advise can only as good as the price you paid for it) or spend
your money and hope for the best down the road. For my type of salmon
fishing, line counter reels are very convenient. I have numerous ones
that for one reason or the other I have/am/was not totally happy with some models. They may be
fine for someone else, but not for me, one has the clicker that is very hard
to put on if your hands are wet. Two other different makes, the line counter resets are in the
way and not protected to where many times you will inadvertently bump this
reset at the wrong time. Another one the counter display window would repeatedly fog
up. Another the counter's clear plastic cover fell out and you can not
just buy this small cover and glue it in yourself, but are forced into buying the whole new
$30 end piece, again a Shimano Tekota.
I have also found that most line-counter reels need MORE ATTENTION than the
non-counter versions. I understand there are a couple of brands out there now with a digital counter, which
may be worthwhile to look at, but I hear that changing the battery is similar
to that of a battery operated wrist watch (not an easy thing).
You will also find in the same manufacturers, may have
different models of the same style, which may use the same parts, they only
change (add ball bearings instead of bronze bushings then add on decorative sideplates)
on the more expensive models. If you are one who trolls or sits on
anchor most of the time, you will get by just fine with the cheaper reel that
has bronze bushings in some of the non critical locations.
In repairing these older reels, don't get disheartened if the parts you
need may be obsolete. As said above, many reels are made in "families",
or numerous reels using the same parts. It may just be that the older
obsolete reel was the forerunner of a newer deluxe model and some of these
parts may interchange. Here I am referring to the Shimano Corsair
casting reel. This basic reel materialized into the modern Calcutta
model. Many screws are the same, even the spool friction cap uses
the same threads (different number) but it can be utilized if the older one is
missing.
Penn is famous for a good basic design and expanding on it for
later reels.
Now here is a Fred Flintstone fishing rod/reel
The Difference Between Cleaning & Maintenance :Cleaning could be just a light washing the reel down with
WARM soapy water, (which should be
done each time it is used anyway). One factory Rep. suggests that you
take it into the shower with you (especially if used in salt water).
The worst thing to do is use it in salt water a day or so and then put it
away until winter if that is when you have time. Salt corrosion, is
going to be your worst enemy and on the newer line counter reels even if
you did not get it wet, but just the salt air can deposit enough on those
delicate parts to make the counters malfunction.
After a good washing and inspecting the reel's normal operation, to
removing a side-plate then inspecting the innards. Sometimes cleaning
could result in needed repairs if problems are found. I have had reels
brought to me that are 40 years old with the appearance of NEVER BEEN
APART. One being a Penn 209. This was indicative of salt corroded cross bars, caked on
grease, seized level wind pawl and broken drag washers. I am sure this
did not all happen at once. All the above is the result of no
maintenance, but a DAMNED good reel design to have survived that long
being neglected and abused and still somewhat functioning. NOTE -- I am not a reel repairman,
but do my own, and for a few friends. I have had no training, just
look at a parts list and start, however some take a lot of head scratching
to understand the engineering and reassembly. But be on the lookout
for those parts that have taken flying lessons.
Here is something you don't really want to see, in
the fishing world it's called a Birds Nest
Backlash
Reel Maintenance :One thing that has been preached to most of us since we
started, is that on any drag system reel, to back off the drag when not in use.
This does two things,
it allows the drag spacer/washers to become relaxed, preventing the
possibility of the washers becoming stuck together and it also relaxes the
strain on the drag washer springs, which may give longer spring tension life
and allow the drag to perform as designed the next time you use the reel.
The one exception here is if you are going to wash your rod and reels off with a
light spray from a garden hose, (AND NEVER FULL POWER) then before and until you have finished
this process, you need to tighten the drag. What this does is help prevent any
water from getting in/on the drag washers, which if left that way for an
extended time, could seize the washers to the plates or allow rust to start in
the main gear that the washers seat into. But after you are finished then
back this star drag off for your storage.
A suggestion, do some of your initial maintenance, on the water or at least
after daily usage. If you are a bait fisherperson, clean it after
each usage. One well known rod/reel repairman recommends that you spray
WD-40 on the reel BEFORE usage, then wipe it off, leaving a light protective
film on the outer parts. Then do it again at the end of the day,
again wiping of the excess. His theory is this gives some protection to
parts that are hard for you to service without a total teardown. And if
you happen to get any on the line, well that may just act as a scent blocker.
Primary maintenance, by this, I mean
that during the season you need to do primary maintenance, at least wash it
off with water (warm soapy water is a good start), especially if you are fishing in
salt water right after you get off the water to prevent cancer from starting
both inside and outside of the reel. Again do not spray high pressure water into the
reel with force as it will also force debris inside, but just enough flow to wash it off is
good. Again when doing this, it is best to set the drag tight so that
any water does not get into the drag washers, however once the wash-down is
complete, then you need to back off the star drag so there is no strain on the
washers during storage time. Many times just washing does not really cut
it as you will find out if you let the reel set for even 2 or 3 months, so
it is good to use warm soapy water AND the use of a paint or tooth brush to try and remove any salt residue.
This salt, (even minimal) grows like a fungus.
Do your secondary (main) reel maintenance in the off season,
remove them all from the rod, check for any dirt/grit or corrosion on the reel
seat and underside parts that you can not see from above or on the rod.
Doing this in the off-season is crucial because if you plan
on fishing within a week or so of the time you tear it down, if you run into problems, you may well have
a non functioning reel for that event. By problems, I mean that very
likely, you not being totally familiar with reel construction, so during your
disassembly, you will have the situation where a you will encounter a jesus
part, (jesus, where did that part disappear to). And these will normally be small
spring loaded parts or E-clips that have attended flying school. Or when you take the
reel
apart, a part that you never saw may part fall out and you did not even know it was in
there to start with. Now it may take you some time to figure out what it is
and where,
or how it fits even if you did find it. And you have to learn how to use
the manufacturers illustrated parts diagrams.
Another thing to
consider is that "out of sight, out of mind" may be prevalent here. Like
most of the newer reels use a plastic cover over the reel handle nut.
Remove this cover, nut and the handle to be able to wash the salt residue from under
it and around the handle shaft hole. This will save you a lot of grief
later on. Removing this cover may also be accompanied by removal of the
small retainer screw on some reels. If these small screws are not
removed periodically and the threads lubricated, they could become corroded into the handle and later
when you really need to take the reel apart, will have the slot stripped or even
more likely the screw twist off in the handle.
Plus if the reel is not
washed off and/or left unattended for some time, the chrome plating
on the metal parts start to get a bad cancer on the surface. The longer you leave it the
worse it gets. Soapy water helps, but to help dissolve the salt
there is the product
Salt Away (which is a mild Phosphoric acid) that is used by boaters to neutralize the salt from their boats or
outboard motor users. Just spray this on, let it set a while and then wash it off,
which does wonders.
For those freshwater anglers,
contaminating a reel with river bank sand certainly does it no good. Even
very fine sand or mud can get inside which chews the gears up and ruins
bearings. Also if
you happen to be using bait, scent, etc. residue off these can / will get onto
and in the reel. When this dries, reels slow down. Most gears
now days are made of nylon which can become worn over time if they are contaminated.
The Swedish Ambassadeur reels still have brass cut gears however.
And just about all of the major brands use brass or even stainless gears for the main drive
gear. If you have a backlash, you could may even have pieces of line sneak inside. Any debris can get imbedded in these gear
teeth, binding things up or at least loosing any smooth operation of the reel
next time you want to use it.
Different reels will require
different types of cleaning. By this I mean a competition bass
fisherman's casting reels will need to be finer tuned than a halibut
fisherman's reel. Kind of like comparing a Chevrolet Corvette to a Ford F350
1 ton flatbed truck. The bass fisherman's requires minimal oiling/grease because
of the more precise machining of his type of reel, while the halibut fisherman
only requires the line to go out and back in with the drag to function reliably.
It can be disheartening to save
your money, purchase a dream boat and of course then a better towing vehicle, lay out
your old favorite tackle, purchase new lures, schedule your vacation only to have your
fishing reel malfunction the first day of this vacation on the biggest fish of
your lifetime because of your negligence. This can be especially
bad if this fish happens to be on the rod your 12 year old daughter is holding
onto. Yes, you may be able to dream something up to explain to her, but
how do your really explain it to yourself? Kind of reminds me of one guy
who buys his hooks at the discount store AND then only when they are on sale
in the off season.
And he then uses his used RUSTY ones the next year. Plus, I will bet that he
never heard of a hook sharpener.
Then there are certain reels that even the
most competent repairman shutters when one is brought in for repairs.
So if you do decide to do your own
repairs, get a exploded parts list or go online and print one off. Another suggestion, if you do
start to take yours apart, do it on a clean kitchen table, a clean
uncluttered floor, no carpet and keep the cat away. LAY OUT EACH
PART AS IT COMES OFF THE REEL on a paper towel with the side down as it comes
off (inside of the reel down on the towel). BE
VERY OBSERVANT. Do not disassemble the whole reel at one time,
but remove the offside sideplate, do repairs to it, then move to the handle
side for the drag system, then move to the levelwind. Take digital
photos of it laid out. DO NOT rely on memory as to where the parts came
from. Then in all probability you may have not completely examined each
part as you took it off, there may be slight differences where if you flop the
part over in assembly, it may not function. This also helps if the reel
you are working on may have had someone inside it before, who may have
replaced it incorrectly, or lost parts but did not have access to new parts,
jerry rigged or so used what was on hand to get it together. You would
be surprised at the number of used reels that I have encountered in this
condition. Some were sold simply because the drag system needed to be
cleaned and re-lubricated.
If you need to order
parts, try to move your paper towels to a secure location without disturbing
the laid out parts.
If you do not intend to go into deep repairs, do not tip or shake the reel when you have it partially
apart, otherwise pieces may fall out with you having no idea their exact
relationship with the others on reassembly. One known here is on most
all of the Penns, one of the four inner sideplate screws is also the
retainer/pivot for the ratchet dog, and the spring just lays in a depression
beside it and is held there when the gear housing is screwed down captivating
this ratchet dog.
You may initially want to fill your
sink with warm soapy water and a small paint brush to remove any debris both
inside and out. When it has dried, start your disassembly.
If you did not get all the gunk off, then use a Que Tip dipped in rubbing
alcohol. The alcohol will dissolve the grease and dry quickly
leaving no little or no residue. When finished you may want to lightly lubricate some internal parts with a
good grade of light oil. Some internal and external parts will need a
protective covering, others like the sensitive line counters will need only a VERY
LIGHT oil.
If you are not using your non
spinning type reels for long distance casting then the gears may need a thicker lubricant,
and if you can not find one, otherwise good old Vaseline has worked for me well
over the years.
Even though WD-40 may seem a good light lubricant, it has
the condition where this light residue becomes hard over time making it not
desirable for internal reel repair.
From this chart below, you
can see the differences in oils normally used on reels
You may want to Google "Shear Thinning" to understand it's
meaning.
Also when you purchase any reel, keep the instruction papers
and parts
listings. There may also be a extra spool, a tube of grease along with a special
wrench used for disassembly included in the box. Many of these original papers
also include a
exploded parts list. If you have acquired a used reel without these listings
or have misplaced yours, here is a website that has most manufacturers parts lists.
CLICK HERE
This website has a very complete factory exploded parts section in a PDF file
form. The files are expandable in size so us blind guys can read the part numbers
and they
MAY have the nomenclature also listed. However I found a couple of my
OLD reels not listed here. Or
CLICK HERE for a link to
another site. Or another
https://www.reelschematic.com/
I originally started to
try to post exploded parts drawings and parts listing in this article, but
have since found the above websites that have these, I have since deleted the ones
I had on here.
Plus I do like to use the factory nomenclature when possible, and without a
factory list, this
would limit me to only select newer reels. This was originally planned to
be a guide to do your own, somewhat yearly cleaning and re-oiling article.
Somewhere along the trail, the fog set in and things kind of got more
complicated than anticipated in that when disassembling some of these newer
reels, it got to where I was not as comfortable as I would have liked and I was
in it beyond the point of just a cleaning. Therefore, you may find a few here,
not showing a complete disassemble on some of the sub-assemblies that would
normally not need to be torn completely apart anyway.
Some brands of reels (usually cheap spinning
reels) may not have
much of a longevity if the design was not real good or they did not sell well and were discontinued
rather quickly,
or the
importer changed brands or the manufacturer went out of
business. Other manufacturers have for years, and still will sell to major retailers under that company's own brand names,
so if
you do some research, look closely you may discover the true manufacturer for
spare parts saving you the hassle of going thru a retail store's not so fishing
gear educated parts department person.
There may be some slight cosmetic differences, but usually the internal parts
are the same and many times even share the same part numbers with the
manufacturer's.
Therefore (in my mind at least) it is best to purchase a
reel from a well known manufacturer who may still have parts on hand after 20
years or so. Fishing reels seem to NOT be like computer monitors that get
thrown away if the color starts fading or lines across the screen. Reels seem to have a nostalgia
very similar to a firearm, that they will live forever because it was one dad or granddad used.
But cheap copies are just that, and may, or may not function reliably even
when new or especially over time, or
a few years down the road, then no one can remember who made them or even
distributed them, much less know where parts may be available from. And
you will find that what level of functioning is acceptable to one person is not to
another.
A suggestion if I may, after you
go thru a reel and do, or have maintenance done on it, keep a record as to the
date this was performed. Also keep a record as to when you spooled it
with new line with the line size / make. Use a felt marking pen or a
piece of masking tape, write the brand and line weight on the under side of the
reel seat. And if you swap ends on the
line after a few years, record that also. If you have more than one of
the same make and model of reel, engrave on the bottom of the reel seat a #1, #2
etc.
As a rule of thumb, for the reels that use a Teflon type or carbon fiber discs in the drag system do not use oil or grease on them,
if they do, it is only a fingerprint of drag grease.
However, for the earlier ones made from a leather, cork/asbestos you may want
to lightly grease, then wipe it off, just leaving a fingerprint smudge of
grease. Go by what the manufacturer
suggests, IF you can find this info.
Under normal conditions, one very
knowledgeable repair person says to do not over lubricate the the level wind
shaft / pawl of freshwater casting reels. Now what is not known to
many, is that the newer high
speed bass casting type narrow spooled reels, the levelwind disconnects when
casting, so that may not be as important on these. However he does recommend packing this area with a light
non hardening grease like Vaseline if the reel is to be used in a harsh saltwater
type environment. His reasoning is also probably that these reels are
not used for casting where distance is a factor, but merely for dropping the
lure overboard and letting the line out as in mooching or downrigger trolling. The
other reason is this grease will help block out the salt water.
Personally I still have a pint of STP oil treatment that I use and put only
1/2 a drop on each side of the worm shaft.
If you have a friend (?) that brings you his reel that is
totally disassembled and in a paper bag, do you help him out or just bid him
farewell? For one, you can be pretty sure that not all of the parts will
be in the bag. Chances are good that it is a model that you have never
seen before. And even with the help of the online schematics (which many
times are woefully lacking in clarity), I will guarantee that you will find parts that
you can not totally identify or that you may have put in backwards, so you
have to go back, then reassemble it numerous times before you get it together
right. Boy would it help to have a live sample to look at here.
And then if your buddy drops a spare part in just to derail you, when you find
out that he has been laughing at you, you had better consider doubling any
price you were considering charging him. Sure, he will say he was
testing your ability, why not just let him have all the fun NEXT time.
On one occasion when this happened
to me on a Ambassadeur 4600 CB where the owner made me a gift of it. OK, it
only took me about 4 hours to figure out the final reassembly and then another hour to track down where one
left over washer
had to go. Then he even put a spare part off something that was not even off a reel in
the paper bag containing these reel parts to confuse me. He had quit fishing but was aware that if he sent it in to
a repair shop to be reassembled that the cost would probably be equal or more than he
could get out of it on his close-out yard sale table.
There are many repair shops that
do reel maintenance and most of these, if in business for any length of time
have to be good at what they do to stay in business. They do provide a valuable service
to the fishermen/women. The price
they charge varies depending on size and version, but the usual cost is about
$25 each for labor for the regular reels with slightly more for the complicated
ones, with replacement parts prices above that. Is this worthwhile? You will have to decide yourself
depending on the reel and YOUR mechanical abilities. For those of you
who require more info or want to learn more of how to do your own repairs
there is a book out there Fishing Reel
Care & Maintenance 101. This business also sells reel
schematics on DVDs for repairing them.
In cleaning most fishing
reels the tools required are a toothbrush, Que tip, rubbing alcohol, light
oil (like 3 in 1) along with a grease like Vaseline plus
Shimano grease or LubriMatic boat
trailer axle grease.
Of course a screwdriver of the right size and a small Crescent wrench, OR
look in the original box and you will find a combo tool to remove the handle. When you finish your repair, it is
advisable to wipe the reel down with a light oil, then pretty well wipe it all
off. Some will use WD-40, but be sure to wipe it off as leaving it
on a hard residue will form. I like to use the firearm maker,
Remington's Rem-Oil, which is Teflon based. Another item I have been using lately is Bo-Shield,
available at West Marine.
I suggest that if you use your
gear anywhere close to saltwater (like an estuary), that SOON after your season ends, that you
tear the reels down. Even if you just remove the spool and allow the
side-plates to dry out would be a benefit. Salt air, if left in/on any
reel is not good for it if let set for a any length of time. And at tear
down time smear Vaseline as shown in the photo below to help seal water out of
the drag washers or gears.
If a reel is used in
saltwater, it is a good idea to use Vaseline on the shaft boss to help
seal saltwater out of of the shaft bearings and drag washer area as indicated by
the red arrow.
Keep Fresh Line on
Your Reels :You should consider inspecting your mainline often. This is not to say to change it
every season, however under certain conditions (especially guides), this may be appropriate, or
even oftener.
Usually you can visually inspect at least the last 5 or 6 feet for nicks or
abrasions.
Sometimes it works best to also feel that section, as your fingers can/will pick up
small imperfections that you may not be able to see. When doing a lot of
fishing, depending on whether it is river or ocean fishing, I may cut off a
few feet of mainline every day, just to be sure what I am relying on to bring
in that trophy, is on good sound line.
You may want to change line for many reasons, or flop ends
to extend the life of usable line. Do not throw away the old spools the
line came on, but
use them to spool the old line back onto, then transfer that to another empty
spool. From there, you can re-spool back onto the original, or even a
different reel with the used end now on the bottom of the reel spool giving
you new unused line at your terminal end.
You can make a reel spooler
by using some 3/8" All-Thread, nuts and washers, a homemade spool adapter, washers and
a electric drill motor.
Here a homemade reel
spooler is in use
Non-Level Wind Reels :In the early days before the level wind
was invented, the line just laid anywhere it wanted on the reel as you cranked
it in, sometimes piling up in one location on the spool. The problem was
that if it built up too much, then it would slip off the mound, and more line
would be added on top, which could create an issue later when you were letting
the line out or casting. Many fishermen during the cranking in got
pretty proficient in guiding this line across the spool with their fingers as
they reeled in..
Level Wind Reels :These are often times called bait-casting reels when made in the freshwater
series. Their larger cousins are designed more for saltwater usage.
They have a traveling line guide in the front of the reel that moves from side to side laying the line
evenly across the spool that is driven by a pawl that rides in spiral slots
cut in a shaft when the crank handle is rotated. They may have a "star drag" spool braking system between
the handle and the spool that allows the fisherman to place a adjustment on the
line tension that can be pulled out like by a large fish. There is
a clutch release lever that disengages the spool from the handle / drag system so
that there is very little drag when casting. There also can be a anti reverse system so that if
a fish is on, you do not have to keep your hand on the crank handle to control it.
There is also usually a clicker on one side that when put on, makes a noise if
the line is being pulled out, or in for that matter.
Some of the true freshwater bait casters will
have 2, up to 5 opposing small pith weights that are mounted on a small cross shaft connected to one
side of the spool. These act like centrifugal balancers that are
supposed to slide outward when the spool is rotating fast, putting very slight tension on a inner ring inside
of the spool, to govern the speed of the spool when casting so that it does not
over rev, which can create a backlash or "birds nest" in the line on the spool
if the spool is traveling faster than the line can go out. This is a
mechanical method of trying to replace the educated thumb on the side of the
spool. Not all thumbs can be taught this delicate technique.
The trout / steelhead reels will usually come apart by removing 3 or 4 sideplate screws. Some have a readily removable sideplate where you
could even change spools with other weight line without disturbing any
settings or loosing parts. The better
casting reels will have small precise ball bearings on the spool spindles and
level wind shafts. The one drawback of level wind reels is that if the
level wind pawl becomes stuck and will not pivot to change directions, it will
strip the pawl off, or even ruin
the shaft. The shaft that this traveling pawl / guide fits over has
spiral grooves cut into the shaft, RH and LH overlapping. The line guide is
driven by a pawl that is loosely fitted in the guide so it can slightly rotate
following the grove in the shaft. The ends of the grooves
are timed so that when the pawl reaches one end, it hesitates in the groove,
then engages the other groove, reversing and making a return trip. A
problem here is usually caused the pawl becoming stuck to where it can not rotate enough
to make the return trip, or by over greasing the shaft with a
a heavy grease that hardens over time, or debris getting collected in the spiral
slots in the shaft.
And the
modern small high speed casting reels now have a distinct following in the
bass fishing fraternity.
These are a different breed of engineering and sometimes there is a fine line
between a genius design engineer and being a full blown fruitcake. Let me tell you these
are DIFFERENT. You old time fishermen can have a problem learning to use one
of these for it's intended purpose. However if your need is just a neat
small star drag Kokanee reel, these could work well (as long as you don't get
carried away with it's other functions).
The one thing that can help
considerably when servicing a level wind reel is to remove the level wind pawl
FIRST. If the reel has been setting for a while with no maintenance
being done, AND IF the pawl is stuck in it's cap,
even if you crank the handle you run a good chance of damaging either the pawl
AND/OR the level wind shaft itself. If you remove the pawl first,
then in your other disassembly, if it is stuck, you can remove and clean things
up, preventing any damage at this time.
In 1972 – Penn introduced the
Leveline Casting Reel series that uses a patented rotating spiral shaft that did
not slow the line down when casting as compared to the other conventional
level wind reels. There is a requirement that the
reel be at least 32" from the first rod line guide for the level wind feature to
work properly. This unique line guide works on a internal cammed
eccentric activated arm that works into a anti-reversing ratchet that the line
spiral guide is attached to. So the line guide actually moves in minute
segments, ratcheting /rotating the spiral cut shaft with the line laying
across a top flat. This spiral cut shaft is cut 180 degrees from one side to the
other, so when the line comes to the end of one side, when the shaft rotates
more the line will lay on the taper to lay the line back across. Since
it uses a ratchet system, IF the line does not track exact, you can manually
rotate the guide shaft to where you want it to catch up. Some of the older surf casters that have not moved up the
the spinning type reels, prefer these reels because of no extra drag of a
conventional level wind. You can also get an aluminum spool for it. It's
part # 29L-200, which is the same spool as the Penn 155 and 200, that will
allow you to make it more controllable on long casting.
If you are taking a
level wind reel apart for repairs, I will guarantee that when it comes time
to reassemble it that you will not have
the level wind cage or guide realigned with the timing of the line when it
came to you. To correct this, observe the direction of the guide
moving across the spool by pulling line out. Now loosen the
level wind pawl nut allowing the pawl to drop down and disengage the worm
shaft. Pull more line off until you mate the line's position going out off the
spool with where the guide is. Tip the reel over and tighten the pawl
cap, (you might have to slightly move the guide a bit to allow the pawl to
engage the shaft grove). Check if it is close, if not then loosen the cap
and
move the guide a bit. If you got it off to where the guide goes one
way and the line was going the other, loosen the cap letting the pawl to
drop down, then remove the pawl, replacing it but rotated slightly to
align with the other "returning" groove, or just pull more line
out until you coincide and time the two.
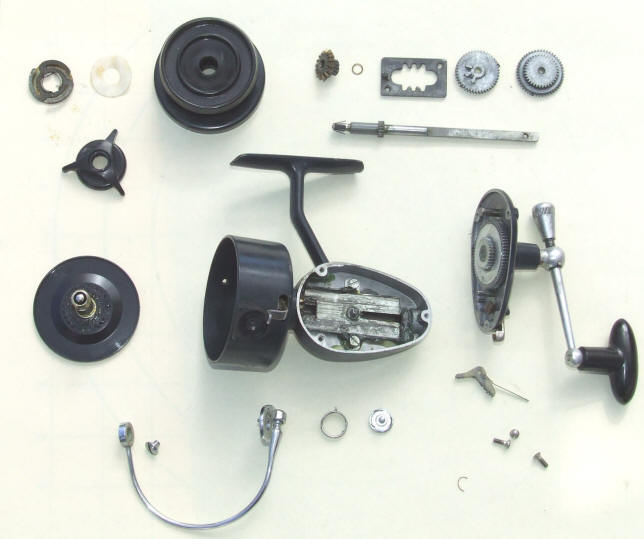
Inside a Level Wind Reel :(Project
#1)
Again it is recommended that you acquire a exploded view of your reel or
print off a computer page if you
intends to tear it apart, however even if you do, have your digital
camera ready and do not spare the clear close-up shots as you disassemble it.
Shown below is a disassembled
Ambassadeur
5000A. There is a large family of these reels, with the 4000
series being the smaller capacity by simply being narrower. This 5000
series being the medium width spool (with a 2 7/16"overall reel width). The
6000 series was a wider higher capacity spool (with a 2 3/4" overall reel
width). There are also the 7000 to 10,000 series which are larger
saltwater versions. I am not going to get into giving a history or
where each model or numbers really fit in the scheme of things as even
my trying to do internet searches, it appears I would have to purchase a
book or two and then that is beyond where I really need to go here.
If the model number was say a 5500, that indicates it has high speed
(5.3-1) gears. A left hand high speed 5000 series would have been 5501.
Suffix letters would have indicated changes from the original version,
like say the 5500-C3. The 3 in this case, designated how many ball
bearings were in the reel. There is also a C4 version and a CB, with
the latter having a thumb clutch/brake. None of these reels have a clicker
mounted on the outer end of the sideplate. There is a
internal clicker of sorts, but it is really a spring held ratchet dog
sliding over the anti-reverse gear. However there are some later versions have a rotating clicker on the off handle
side of the case. All
of the Ambassadeur reels will be serial numbered on the bottom side of
the reel seat.
The older (pre C) reels had
a boxier LH sideplate and could be painted different colors. Initially
the colors could have designated different models/versions, some even being limited
editions. These reels had knurled bearing caps on each sideplate which could be adjusted for spool sideplay or friction to help in
casting.
The newer C3 reels abandoned the boxier LH sideplate and
utilize a rounded sideplate while eliminating that outer bearing adjustment.
The clicker (if there is one) is mounted on the outer sideplate's rim and
rotates on this rim from that position. Some of the newer versions
have the clicker while others do not. And if you are handy with
tools, you could purchase the parts to convert your reel to a clicker
version (if compatible).
First, there are 3 knurled nut heads protruding from the RH side (under
the crank handle), remove these, (they will not come all the way out even
when they are loose as they are captivated inside the housing). From
there you can pull this sideplate/handle/drag off along with the spool which will lift out of the
main housing as seen in the LH photo below. This would be the
initial disassembly where you can inspect parts and make a decision to proceed
farther.
To remove the RH
sidplate you need to remove the handle that is screwed onto the main gear
shaft by a nut on the end. This nut is further secured by a locking
plate and a lock screw. There is
a small C-clip on the end of the shaft, remove it. Unscrew the star
drag wheel, under it is a wafer washer that has to come off.
Remove the handle outward. Take a
look at the shape of it and replace it with the dished part inward.
The RH cover has 2 small screws basically under the handle, remove them and
you can then lift off the outer RH sideplate cover, exposing the complete main
shaft, drag washers, disengage lever and springs. As seen in the middle
photo below, you can now lift off the drag washers, inspect, clean, or
replace them. When you remove any of the drag system, lay them out on
a paper exactly the way you took them off so your reassembly will be right. Some
spacers may stick to a nylon spacer/bushing, recognize this and lay them out
in relationship to how they came off. Inside of this will be a fiber
drag washer which presses against the back brass plate surface.
A note here, if that C clip on the end of the shaft exercised it's
flying previous lesions, a small fishing split ring can be used in it's
place.
It is best to not remove any of the other levers, springs or gear unless
they really need to be.
Slide the spacers and the large
toothed like steel thrust washer off the handle spindle shaft. Behind this
toothed thrust washer will be another but larger fiber drag washer.
Remove it and inspect both drag washers, clean them of any oil/grease.
The gear will usually be made of steel and IF the previous fisherperson
may have gotten the reel good and wet or even dunked, without properly
tearing it apart and drying things out, the gear drag washer wear surfaces
will become rusted. This will not be conducive to a smooth drag, and
it may not function well at all. IF so, then the gear drag surfaces
will need to have the rust scraped off, wire wheeled and even polished.
Even the large toothed like steel thrust washer may need to be polished.
These drag washers can be used dry or by applying a slight amount of Cals
Universal Reel and Star Drag grease www.cals2speed.com , then wiping any excess off , only leaving a just
a finger smearing of grease on the washers.
At this point, you
can see inside at the gears inside the LH sideplate. To disassemble
this, you will now need to unscrew the level wind pawl screwed on cover and
the pawl itself. Now if you remove the 3 small screws from that sideplate you can get the cover off, remove the shaft retainer,
then slide the
gear, shaft and shaft cover out from the main frame as seen in the RH photo
below. Inspect and clean any debris in the gear teeth and the level
wind shaft. When oiling use a good light oil of which many are on the
market, I like to use the Break Free that I use on my firearms. Just a
drop of oil on the shafts is enough.
In reassembling
this, the level wind cover has a plastic bearing on the LH side with a notch
that fits into the cut-out of the main frame. Slide this cover in part
way, then slide the traveling guide over the cover, slide the shaft in all
the way and secure it with the retainer on the side of the main frame.
Now you can insert the pawl in the guide and aligned in to a slot on the
shaft, then install the retainer nut holding the pawl in. Be
sure that the pawl is not bottomed out and putting strain on the shaft.
It has to be close, but loose enough so it will rotate at the ends.
Some of these reels
will have bronze bushings for the spool shaft while others (the more expensive will have ball
bearings. There are knurled bearing caps on each side of this reel.
The RH one also has a thin copper end shaft bearing at the far in side with
a piece of felt that acts as a constant oiler to that bearing so it should
be lightly oiled. When reinstalling it, it needs to be tightened until
it bottoms out. The cap on the LH side has the same copper and felt, but
it also has a indent on one side that can be aligned with numbers from 0 to
9 on a rotatable plate on the outside of the housing and under the cap.
This cap and numbers is for end shaft clearance adjustments. Setting
this cap too tight will result in shorter casts, while setting it looser will
give you excess side movement. On the inner part of the threads that this
cap screws onto is a small O-Ring. This O-Ring is the right size so
that when the cap is screwed on, the O-Ring puts tension on the inside
threads of the cap so that it remains where it was set.
In the center
photo, you can see the small shaft going crosswise of the main shaft with
the 2 pith balls on each end. Many repair stations will not replace
these pith balls as for most fishermen they will never be missed unless you
are very experienced fisherperson.
On these old reels
the shaft bearings are just bronze bushings, if you would like a smoother
casting reel, just replace these bushings with the proper ball bearings.
This information
and
breakdown is basically the same for all of the Abu Garcia
Ambassadeur
reels, with slight exceptions depending on the model.
For a link to another Ambassadeur
step by step repair illustrated article
CLICK HERE. Or this one
CLICK HERE.
Ambassadeur
5000A with the 3 main
shown with the sub-assemblies
Ambassadeur
5000A with the RH sideplate showing the gears & drag parts
Inside a Level Wind Reel :(Project
#2) Here we will be looking at a Penn #9 which is a
smallest of that family of level wind economy reels made by Penn. This
is rather simple in comparison to some of the others. No fancy ball
bearings, just bronze bushings, so it is not designed for casting, but just a
nice little reel where a slightly larger quantity of line is needed over the
regular freshwater casting reel size. The Penn #109 is the same reel
only but is a slightly wider spool sharing the same size and line capacity of the #209. The
#309
was a slightly larger
diameter reel with a higher capacity, but many of the parts, their locations
and procedure is basically the same for all the four models.
The #109 differed from the 209 in that it had direct drive capability by activating a
anti-reverse lever, (where when the spool rotated
so did the crank handle) along with having a spool disengage clutch.
In disassembly there is nothing
secret about this one, unscrew the 4 sideplate screws, pull the RH sideplate off first, then pull the crank /
drag shaft out to get the drag washers out. Next would be remove the LH
sideplate from the base in the same manner.
One thing that I found on the #209 shown below, is that the
main gear was made of steel and over time had rusted on the inner side that
puts tension on the single inner drag washer. The only way I could clean
it up true was to use a piece of window glass and valve grinding compound,
where by lapping the roughness off and then polishing it in a lathe using fine
emery cloth I wasable to restore it's smoothness. The #9 used a brass
gear, so no rust would be present.
To reassemble the drag system with
the hard fiber washer on the shaft 1st, then the gear with the recess for the
rest of the washers pointing out. Now one of the .700" dia. drag washers
which appear to be a thin fiber center with a course fiberglass type fabric
impregnated with a Teflon coating. This is followed by a steel flat
washer, then another drag washer followed by a flat steel washer that has
opposing ears on it. Next is another drag washer and another flat steel
washer then a concave steel spring washer. This is all placed into the
RH sideplate. Penn drag washers are designed for no lubrication to be used
on them.
If you have not disturbed the
clutch system, fine. If you have, then on reassembly, the 2 coil springs go into their
respective holes in the sideplate followed by the pinion gear bridge, the
pinion gear and then the clutch plate on top.
Tip #1
for this reel. (method #1) Rotate the main shaft plate so that the radiused
side is up. There is a anti-reverse dog that goes into the sideplate
that pivots on the rear lower screw. Behind it is a small flat slightly
Vee shaped brass spring. To get these into position, you will need to have the shaft plate as mentioned above, place the
screw with fewer threads all the way to the head up thru it's hole, using
tweezers drop the dog over this protruding screw. Again with tweezers place
the spring behind the dog and also behind the small brass peg protruding from
the sideplate. Rotate the shaft plate to where it is in position and moves
into it's recess on the sideplate. Now you can screw the shaft plate to
the sideplate.
(Method #2) In the
photo below is the assembly of as Penn #209, which is just a slightly
larger reel than the Model #9 and of the dog spring, which in this case is a
small coil spring instead of the Model #9 Vee type. Here it may be
helpful to employ the use of some Vaseline to hold the this spring in position.
And use one of the 4 shaft/gear housing plate screws, (one that is threaded
all the way, as the actual pivot screw is only threaded on the end) but screw
it into the inside of the plate and slip the dog pivot hole onto this slightly
protruding screw to retain it in position. Now place some Vaseline on
the dog and spring. Once you get the gear plate almost in place, use a
small punch to push the outer end of the coil spring in, letting it drop
into the spring recess. You now can press the plate into place,
install the 2 of the other screws, remove the assembly screw and finish the
screw installation.
Here Vaseline was placed to
hold the spring in place on a Penn #209 while the gear housing will
be flopped over & installed
Now you can slide the drag spacer
into the sideplate shaft hole, thread the star drag wheel onto the main
shaft and attach the crank handle.
Place the stainless steel
sideplate covers in position on the sideplates, aligning the holes.
Screw the base plate to the LH sideplate using the shorter screws, attach the
cross bars with the medium length screws leaving the larger one with the slot
for the level wind guide slightly loose for alignment later. Reassemble
the level wind unit, pawl & retainer screw. Slide it into position into
the LH sideplate aligning the shaft's 2 flat sides into it's mating gear.
Tip #2 for
this reel. Rotate the level
wind guide forward to allow you to position the level wind cover in place with
it's 2 small pegs into the 2 small holes in the steel inner plate rings.
Once the cover is in position you can tighten the sideplate screws.
Slide the spool into the LH sideplate letting the shaft gear mesh with the
white Nylon gear in the sideplate.
Now you are ready to slide the RH
sideplate onto the spool shaft and the level wind shaft end. Screw this sideplate on using the medium length screws. Install the LH shaft
tension screw and adjust the side play out of the spool.
Check the spool for free spool
when the clutch lever is deployed, then check the drag. If everything is OK,
you are in fine shape , OTHERWISE do it again. One thing to look at here
is if the handle and spool turn hard, it may not be there that the problem lies.
It could be that you have not gotten the level wind pawl in right with the
pawl cap putting pressure on the pawl at the wrong location on the shaft.
For a internet link to a
illustrated article on Penn reel repair
CLICK HERE.
Penn #9 disassembled
Inside a Level Wind Reel :(Project
#3)Here we will be looking into a Shimano TR
200. The early reels like this one (purchased in 1993) were named Trition 200-G. Later
the name was changed just to TR 200. This reel's little brother, the TR 100 is
the same size body but with a narrower spool equating to lesser line capacity.
This reel is apparently graphite
body / side frame which is precisely molded. It uses basically the same
design as most of these types of reels, EXCEPT everything on the RH side is
mounted on the body's outside end of the main body instead of on the INSIDE of
the sideplate. This makes for a lot easier assembly.
I did not take the main drag shaft
out of the body, (which is held in by a E-clip which is covered by the side of
the spool when assembled). One washer not shown in this photo is a
spacer between the drag gear and the body as a bearing. Nor did I disassemble the level wind unit as it's construction is the same as all the
others other than using a E clip to retain the shaft in the LH sideplate.
On reassembly, with the drag shaft
in place as shown, install the .935" dia. drag washer which has the large
center hole 1st. Next is the flat stainless steel spacer, followed by a
regular small hole drag washer. Now another spacer, but this one has
ears on the outsides. Place these ears inward. Now another drag
washer again followed by a flat steel washer. Next comes a coned disc
spring washer (#TGT0020) with the dome facing out. Another coned
spring washer but with the dome facing in, followed by another spring washer
cone out then the last
dome washer with cone facing in.
It is now time to install the RH
sideplate. You may have to slightly jiggle the clutch lever to get it to
enter the notch on the clutch plate attached to the body. Insert and
tighten the 2 short screws under the handle, then the 4 longer screws
holding the outer of the sideplate to the body.
Now a small steel washer and the
mainshaft ball bearing can be inserted into the shaft / bearing hole of the sideplate,
followed by another small steel washer. Next screw on the drag
wheel. After that comes the crank handle, it's retainer nut and cover with it's
screw.
Install the level wind if you had
removed it. Slide the level wind upper guide tube in the body being sure
to insert the end that has the 2 alignment ears first so they engage the
blind hole and notches in the RH side keeping it from rotating.
Install the pawl along with it's retainer cap. Note that most of these reels come
with a plastic guide pawl cap. However a metal replacement is available for a price
of $2.00. My recommendation is that you replace the fragile plastic cap
with the metal one as this is the one weak part of this reel. There is
supposed to be a SMALL metal spacer between the pawl and the cap which ensures
the pawl engages the worm properly.
Be sure that the small brass
spacer is on the spool's shaft then slide the spool unit into the body and engage
the drive flats into the mating slots of the pinion gear.
Now add the LH sideplate and it's
screws. Thread the shaft end-thrust cap on then adjust it for sideplay.
I like to just be able to feel a very slight spool horizontal movement.
Check your work by working the
clutch lever and adjusting the drag.
Since this drag is very sensitive,
if you experience where at a light drag setting, the drag wheel backing off
because of the motion of a hookset to where you have no resistance and if the line
plays out if a fish is still on, (or gone because you missed him), there is one remedy. Place (1)
7/16" OD x 1/4" ID x 3/32" & (1) 3/8"
OD x 1/4" ID x 1/16" thick Nylon O-Rings in the star drag wheel's outer recess.
There is a recess there, but no where in the parts diagram does it show
anything to go in the recess. Place the thicker O-ring
(7/16" x 1/4" ID) in first and you will have to push it into the
recess after the star wheel is tightened down, then add the 1/16" O-ring as a
filler between the 7/16" and the inside of the handle. This adds just enough slight tension on the wheel
from the shaft threads when set at a low drag
setting to not allow it to back off. These O-rings can usually be
located at a well stocked hardware store in the plumbing section.
Another option would be to use a Okuma Magda Pro #06140001 wafer washer between the wheel
and the handle.
This washer has a smaller diameter hole than the Shimano, but the same flats
dimension. You will just have to open up the diameter a bit with a
needle file.
This reel is probably one of the easiest
to reassemble of all the level winds that I encountered in this doing this article.
Shimano TR 200
showing RH side of body
Shimano TR 200 disassembled
In my experience, this coned disc
spring washer, (#TGT0020) which 4 are used here is defective and
does not have enough spring tension to give reliable pressure on the drag
washers. This washer appears to not have enough heat treatment and after
some constant pressure, collapses. I understand how to heat
treat regular steel, but not stainless steel. So my redneck solution is
to make a upsetting fixture, by drilling a 9/16" hole deep enough in a block
of steel so the drill did not go all the way through. Next drill out the
center just larger than the center hole of the washer (.312"). Now
make a punch out of 1/2" rod, that had a center diameter of .287" or just
large enough for the washer to slip over and relieved enough to allow the
washer to be reformed.
Leave your drill press or milling machine
positioned where you drilled the holes, place the 1/2" punch in the chuck.
Place the washer (cone down) in the hole and pull the handle forcing the
center of the coned washer against the bottom of the partly drilled 9/16"
hole. It does not take much force to change the overall thickness from
.035" to .075".
The problem here is that now you can't get all 4
washers in (not enough room under the handle). So eliminate one washer,
but be sure that the last one on is with the cone inward so that the outer
larger part puts pressure on the outer bearing race. Otherwise it will
bear on the inner race and may partly disable the bearing's usefulness.
Also with this wider stack, you will probably have to only use one drag washer
spring #TGT0021. i have seen these reels use two or only one of these
spacer washers, so maybe depends on the factory assembler?
I have found that this makes this reel more compatible to what drag
settings you may have become accustomed to on other reels.
Here is my upsetting tool for modifying the coned
drag spring washer
Inside a Level Wind Reel :(Project
#4)Here we will be
concentrating on a Penn GTi 310, with notes on the GTi 320. This is like many of a family of reels, where the
GTi 310 is the smallest line capacity with a outside diameter of 2.925, the
GTi 320 the next size up with a outside diameter of 3.140". Both of these reels utilized a round body
with the overall width being the same for each. The GTi 330 is
a
larger diameter round body 3.680" diameter and .225" wider. The GTi 340 the uses the same
width spool with the body is tear drop shaped, moving the level wind forward
giving more room for line. The last two
models being more suitable for salt
water usage because of the larger line capacity. The GTi 340 also has
shoulder harness eyes built into the top of the sideplates.
These reels have a precise
injection molded graphite body with stainless steel sheet metal side caps.
The level wind carriage's upper line guide loops over a crossbar instead of
the earlier models that fits into a slot in the crossbar. They have a
endplay tension knob bearing against the spool's RH shaft to control excess
side play, this knurled knob is located on the RH side above and behind the
crank handle.
All of these utilize the disengage
clutch lever that places the spool into freespool, however these reel do not
automatically re-engage the clutch when you crank the handle. The
difference in the GTi 310 other than a smaller diameter spool is that it has a separate
free spool button on the bottom of the RH sideplate under the crank handle.
When it is forward, or OFF position the reel disengages the anti reverse dog
and functions like all others, but
with the button pulled to the rear in ON position the reel acts as direct
drive whereby the handle rotates backwards when the line is going out.
The
drag system still functions with this in ON. Some moochers prefer this
saying it puts them in more direct contact with the lure/fish. This 310
utilized both the direct drive along with the spool out clutch, giving the fisherman
the best of both worlds if they so desired. This reel was brought about
after Penn dropped the 109 model which had this same style of direct drive
capability.
Tip #1 for
this reel. I have found it
best to install the level line unit first (minus the pawl), then the LH sideplate. Before installing the level wind shaft, smear some
Vaseline into the grooves. Slide the cover in from the RH side, but
before it is all the way thru slip the line guide carriage onto the cover,
then push both all the way into the LH sideplate. Now insert the line
guide post #58 into & thru the RH sideplate, with the carriage in position so
the upper hook of the carriage uprights is retained by this post.
When you install the pawl, don't
put any Vaseline on it or in the cup because if it gets contaminated or
gets cold the pawl may not pivot on a return pass. This can lead to it
seizing up and stripping the shaft. Manually rotate the level
wind gear as you try to tighten the pawl screw so that it goes into the groove
easily. When you think you get it in, rotate the wheel again to ensure
it has engaged. When reinstalling the the level wind shaft end nylon
locking nut do not over tighten it or you will put so much pressure on the
shaft that you will bind it to the point it will not rotate.
Install the spool into the LH
sideplate.
Tip #2 for
this reel. Reinstall the
free spool lever. If you removed the spring activating this plate and
lever, install it BEFORE you tighten the lever completely down otherwise you
will not be able to insert the spring into it's front retainer hole in the
cam.
Place
pinion yoke with the clutch engage notches toward the inside of the reel.
Insert the 2 coil springs into the recess's in the sideplate behind the
eccentric jack plate. Slide the yoke ears under the plate with the
"ears" of the yoke pointing up. Now place the pinion
gear into the yoke's recess, with the narrow side of the gears pointing
outward, which will also have the clutch ears on the shaft showing.
Tip #3 for
this reel. There are 4
saddle screws. Two will not have threads all the way to the head.
These 2 screws go in the lower holes & inside the plate springs. But
first you will need to retain the dog which is under slight spring tension.
Use one of the screws that is fully threaded, insert this into the threaded
eccentric jack hole where the coil spring screw it in just far enough to hold
the dog in place. Hold the plate in place as you insert the screws
that are not threaded all the way. Remove the first screw and thread both
of the others into the RH sideplate. Then thread the other full thread
screws in the eccentric jack other 2 holes.
You might rub the smaller dia.
fiber washer that is behind the main gear with a fingerprint of Vaseline ever
so slightly, just a fingerprint will do . Then the main gear goes onto
the shaft. Assemble the drag washers and steel washers on the main
shaft in the same sequence you took them off. Note - some metal washers
have the hole shaped to lock it onto the shaft, while other washers have ears
the engage the gear's inner recesses. Slide the metal spacer onto
the shaft, then the wafer washer. Now install the stainless metal sideplate over the RH graphite sideplate. Next comes the metal spacer on
the shaft, then the handle and it's retainer screws.
Other GTi 320
Differences. There are some differences in
the 320, and 330 in that the clutch lever is steel instead of graphite, the handle
retainer screw is a larger size head and there is no removable LH sideplate.
On the early 320 models this LH sideplate frame ring is only held in place by one screw situated on the
rear of the plate. The front of this ring has a partial 25 cent
size 1/2 circle made into the ring, this circle has a short projection tab
that goes into a mating recess of the sideplate. Just push the ring
forwards to disengage this tab. This allows you to get to the level wind
outer gear.
The 320 mainshaft is a larger diameter
and therefore the drag washers are larger 1.095" diameter.
These reels are probably the other of
the easiest
to reassemble of all the level winds that I encountered in this doing this article.
Penn GTi 310 disassembled
Small High Speed Bass Type Reels :These reels are a totally different
breed. They usually have a minimum of 5 ball bearings in the design
translating for
smoother spool rotation. They also usually have some sort of internal
breaking system, (maybe even 2 systems) plus a spool tension knob to compensate for this free wheeling
spool to keep it from over-revving and bird-nesting the line when casting. One thing
is that if you are used to the regular level-wind reels, is that these level-winds
disengage on the line outgo (or casting mode) possibly to help remove that resistance
and give more casting distance. They then re-engage when the crank handle is
operated when reeling in. OK, you ask what about the line tracking
on the next retrieve? The spools are so narrow that it seems to be of
little consequences.
The high speed can relate to a crank ratio of over
6 to 1, meaning the spool revolves 6 times for one crank of the handle (double
the retrieve of the older reels).
And these all will have a "pot belly" on the crank handle sideplate
underneath to accommodate the extra large gear used to generate this high speed
retrieve ratio.
They all have a thumb disengage, but MAY not have a
thumb brake, where you may have
to thumb the spool to keep it from unspooling prior to casting. Some
with the thumb disengage is also a thumb brake if you push it far enough.
They do
not hold a lot of line, usually from about 100 to 140 yards of 12# mono. They are
also lightweight, usually being made of graphite for the frame, with many
plastic outer parts, and Nylon and Brass gears.
Instead of being made with a ratchet anti-reverse,
they are made using a anti-reversing roller bearing, which eliminates some
internal parts, but at the same time this then also has no provision for a clicker for you trollers
who may want to use it on a Kokanee rod.
Some of these reels will have some sort of quick access to the
brake system and/or changing spools. This is usually by rotating part of the sideplate
which is opposite the crank handle, which allows it to then be readily removed.
To do this, some require loosening one thumbscrew, while others just by
rotating this whole tight fitting sideplate. The older models that have
screws on that side do not have this
feature. And technology has changed so fast on these small models that,
even on well known brands, replacement parts may not be available if more than
a few years old.
Tip for this reel. It is advised here that you
DO NOT even consider
tearing one of these apart, (especially just to see how it is made) other than to remove the sideplate and spool,
if so equiped. Consider
this, IF IT IS SMALL AND COMPLICATED, THEN THERE WILL BE A LOT OF SMALL PARTS
INSIDE THAT HAVE TO BE REASSEMBLED PRECISLEY, that you may not have seen
before they fell out. How many of you would consider trying to repair your
own wrist
watch?
I did purchase one of these used off e-Bay for a
great price of $18.95 plus $3.45 shipping that was advertised as "Parts Only".
As I had suspected, it had been torn apart by someone who was unfamiliar with
even a simple fishing reel. And to back up my estimation, he advertised it's
problems in non-fishing reel related terms. Upon getting into it, I
found one spring that was laying inside as apparently he could not figure
where it went. The drag washers were lubricated way more than required. The
drag friction springs were in wrong, and the star drag wheel washer was bent
so bad that it had no tension on the wheel at a minimal setting. One
internal part had been filed on, WHY IS ANYONES GUESS ??? And he said the line winding eye
(his words for level-wind)
would disconnect at times (yes, it was designed to do that as mentioned
above). I can truthfully say that this was an eye opener
to me as I had never been inside one of these before, so it took a lot of
assembly/reassembly before I finally figured it out without a parts manual
because I could not identify the exact model to look it up online.
I bought another off e-Bay for $14.99 for parts to
repair one I bought at a gunshow, that needed a better star drag wheel, where
factory parts were unavailable.
In the photo below is shown a Okuma Calera left hand version on the
left, and on the right, the right hand Ambassadeur Black Max mentioned
above. Both of these are low end
Chinese reels retailing in the $50 to $75
range. However do not be swayed by the label on the Ambassadeur that is printed
"Swedish Engineered", but it is actually made in China.
You may now find some of the se costing upwards to $300.
Here are the small High Speed bass type reels in both right &
left hand versions
oAdjusting These High Speed Reels :In the old days of the
Ambassadeurs shown above in this article, used two small sliding pith balls on a shaft
that were supposed to put a slight braking action on the inside of one
side of the reel spool to help eliminate backlashes. This may have
helped some, but not a lot, and the fisherman needed to learn to educate their
thumb against the spool sides to control the spool's speed, (especially
at the end of the cast). Many of us old geezers that worked with
our hands all of our life, have so thick of skin that this thumb braking
was next to impossible, and we just gave up with all the backlashes and
went to spinning outfits.
With the advent of modern bass fishing, the reel
manufacturers began to awake. Smaller and higher speed reels came into
being along with a way better centrifugal breaking system became standard.
Most of these newer systems now use a magnetic type braking system against the
spool's side. These reels were a game changer. And until you
try one that has been adjusted for the lure being used, you will not believe
what is possible. With the spools being narrower along with the level-wind
disengages during casting, eliminating that extra drag and longer casts. You say what
about the level-wind not matching up with where it left off. This does
not seem to be a problem, probably because of the narrow spool.
They do not have a lot of line capacity, but 100 yards of 12# mono is plenty
for this type of fishing, therefore the narrow spool seems to function quite
well.
There will usually be two
adjustment knobs, one (a small knurled knob) on the side that the reel handle
is on. This knob adjusts the endplay on the spool. It needs to be
set so the spool does not have a lot of endplay, but at the same time minimal
friction. The other adjustment will usually be a larger and less
pronounced knob on the opposite side of the reel handle. This will usually
have some reference numbers on the outer edge. Between one or the
other, OR BOTH, of these adjustments you can fine tune the reel for the lure
being used.
The most important thing in setting up these reels, is to properly adjust
the setting of this casting brake. These need to be set for each
different weight of lure you will be using at that time. To set this cast
control devise, tie on your lure and reel it to the tip of your rod.
Tighten the knob on the opposite side of the handle until it's pointer is
midway between the numbers.
Tighten the handle side knob as tight as it will easily go.
Now
hold the rod straight out or in a slightly upward position, push the disengage
lever. The lure will probably not fall, now slowly turn the
reel handle side knob
counter clockwise until the lure starts to fall. Let the lure hit the
ground and watch the spool. The spool should not spin more than one revolution
after the lure hit’s the ground. If it spins more than one revolution,
tighten the cast control knob and repeat the procedure. If the
spool does not spin after the lure hit’s the ground, the cast control could be set slightly too tight.
Loosen the knob and repeat the procedure. If you do it only from the
handle side, your knob movement is very critical, so it may be best to get it close
with the handle side knob and then fine tune it with the cast control knob,
that is why you needed to set it initially in the center of it's range.
Between these two knobs, you should get the braking adjustment close.
NOTE each different
weight lure, you may have to fine-tuned the reel.
Now, DO NOT cast as if you are mad at the rod, but try to flip it,
more of a wrist motion, otherwise you have induced way more motion where the
magnets can not overcome the spool speed. Each cast needs to be
performed in as near the same effort otherwise you will still get
backlashes.
Level Wind Line
Counter Reels :These have come on the market in the last few years. Some are good,
while others just haven't made the grade yet in my book, but newer improved
ones are showing up every year. However do not look only at price
when it comes to dependability.
The line counter is usually a mechanical gear driven
unit that is normally run off the level wind shaft. It uses the same method as
if you manually counted the number of times the level wind guide goes across
and
back then multiply that by a number of feet let out on that particular reel. This system
incorporates a mechanical counter unit that counts the spool revolutions which
in turn measures line based on the spool's diameter. The instruction
that come with these counters
say measure in feet, and are somewhat calibrated at the
factory to be most accurate with a near full spool and monofilament lines.
BULL SHIT. Well they even tell you the diameter of line it is
designed for, but from my experience, I will wager very few will even be close
with a full spool. FAST FORWARD -- I found one that was right on, a Okuma
Convector low profile CV-163D, with a full spool of 14# mono at 50' it reads
51'.
As your spool decreases in the amount of line on it, your counter
will be reading more feet out than is actually let out. So somewhat
close distance may be close, but the farther it gets out, the less it is
somewhat accurate. I measured this on one reel
and the counter said 8' for a full spool which was pretty close to the actual
distance out, while I got about 6 1/2' from a 3/4 full spool.
So on a full spool it would be very close. But no matter, it will give you a known
repetitive reading that you can go back to when you start catching fish, maybe
not the same as your partners however. However it may be best to really
find out instead of guessing how close your reel is, so here is a link to
Calibrating
your Line-Counter reel.
For salmon fishing in estuaries
with divers, or back-trolling in rivers, these reels have shown their worth.
Before the line counters were made, where the fisherperson needed to know how deep
they were fishing, or how far out if in a boat that had more than 3
fisherpersons, to avoid tangles. This equated to knowing the
length of line let out. Some would count the number of complete passes the level wind
guide made across the reel, others would count the number of "pulls" they stripped off the line from the reel itself to as far as you could normally
reach or just past the rear guide (usually about 2') . So if they found by experience that
the fish were at a level that equated to 14
pulls, in essence they they may have stripped 28' of line out. However some fisherperson's pulls did not equal their partners pulls,
many times only 1/2 of the partner's.
Also jiggers or moochers who can see a concentration of fish at a known depth,
can use the reel's counter to place the lure in the strike zone. The
line counter reels now make this into less of a guessing game.
They are also great when you are fishing novices out of your boat for bottomfish, but want them to hit bottom then reel up 3 cranks, but they can
not paying attention or knew when they did initially hit bottom, making for
snagged gear.
Most of these line counters use a set of rotating,
numbered wheels and do read in feet. These reels have the ability for
the user to reset the counter wheels back to zero. Check out your new
prospective purchase before you buy and see that the reset button is in a
protected area, so that it is not accidentally bumped. I have bumped
both the
Okuma Magda Pro and the Okuma made Cabalas reset buttons occasionally, possibly because it is closer to the
handle where the action is,
whereas the Shimano and
Ambassadeur
reels
are on the other side and the button is more protected.
But all three of these make reels perform well and considering the price difference, the Okuma is
very acceptable to most anglers. And the later Okuma reels have a protective wing
ahead of this reset button.
These Okuma reels are made in usually 3 different sizes, the
15 series is the smallest capacity (240 yards of 14# line) with the 20 being
the same diameter but wider (290 yards of 14# or 210 of 20#). The 30
series is a larger diameter and wider yet, with more capacity (340 yards of
20# or 280 yards of 25# line).
The more expensive Okuma Cold Water CW203D series looks to have
incorporated many good things off other brands, (and the newer CW354D Low
Profile is in another world again) like they use the star drag
click adjustments like the Shimano Tekota. Also their line counter reset
is more protected than the others. The things I like about the Cold
Water 203 is there is enough clearance to get a finger behind the clicker to push
it off if your hands are wet, the line counter reset button is located out of
the way. The drag
is very smooth, and as mentioned above, the drag adjustment has a click detent. There
was some line counter reset problems on the early production run, but if your reel has a
lot number of less than 3812 on the reel seal base, send it back and they will
replace the reel. If it is later than than number they will repair it.
And they seems to be built like a tank yet small in size. The CW354D Low
Profile seems to be bullet proof and they are designed as a low profile
casting reel, utilizing a thumb clutch, (no brake, but the thumb on the spool
does this). And the Convector CV354D is basically the same as the cold
water, but with lesser ball bearings at a lesser price, but who of you who are
trolling are going to be more a smoother casting reel?
Abu Garcia's
Ambassadeur5500LC or it's wider brother the 6500LC use a
different outer LH sideplate that essentially converts their old conventional
style reels into line counters. A couple of issues I have with the
new Ambassadeurs is when trolling and you want to let out more line, it is
very hard to push the disengage clutch button while tension is on the line, so
you have to partially crank the handle so you can disengage the clutch.
Also the new rotating clicker button is not sealed well and salt corrosion can
build up under and inside this slider button, seizing it. These
reel's reset button is very well protected, so much some fishermen with
club fingers have to concentrate when trying to reset.
Shimano has done basically the same on
their Tekotas, but does not offer it as a actual aftermarket kit, however the
individual parts are available to make the conversion yourself. There are a
couple of drawbacks I am aware of on the Tekotas, one being the clicker button
is recessed/protected enough and hard enough to move that moving it either way can be a problem at
times if your hand is wet. The other is that the clear plastic counter
cover can exercise it's flying lessons and disappear. This 20 cent
part is not sold separately, requiring you to purchase a new $9.00 sideplate,
rather cheap on their part after paying $180 for the reel. Is Shimano's upper
level management so rich that they do not realize we fisherpersons are the
ones who actually buy the product and can/do get opinionated easily over small
things. Or do they think we are not smart enough to simply glue a piece
of plastic juice bottle back in the recess?
One
drawback on the
Ambassadeur
or Tekota reels is that with the line counter on the outer
end, this makes the reel considerably wider. However with the counter on the
inner side (on most RH reels) it is narrower, but you may tend to bump the reset button more
often. So pick your poison.
Okuma probably makes more models of line counter reels
(including LH models) than most other manufacturers. Their more economy
Magda Pro series, then the next step up would be their Convector series,
with the new 2013 Cold Water in the middle in the bracket and the Catalina at
the top. The Convector series is basically the
Magda Pro series with 3 ball bearings as compared to only 2 on the
Magda Pro series, plus a fancier levelwind guide and a different (enhanced reel
handle sideplate and metal star drag star) and a simpler clutch lever.
Both the Magda Pro and Convector share the same drag and line counter system
if applicable. The Convector also has
more metal trim as compared to the Magda Pro and has a larger spool fiction knob.
In 2016, the Magna Pro series were changed. It seems
that the whole body and ends were redesigned and do not have the protective
outer stainless steel ring. The center body is also changed slightly
along with the counter reset button slid to the side more like the Coldwater
series. I suspect most all the internals will be the same however.
One thing with these Okuma reels that is a plus, is that
most
come with an extra crank handle, as seen in the photo below, so you have a
choice of which one you want to use.
Just because of the lower
price of these reels, don't cut them short, even the economy series functions
quite well for the average fisherperson. The only problem I have had
with them is after a season's usage. The line counter button may not pop back
all the way up, re-engaging the counter. It seems that the internal
plastic parts loose their initial slipperiness , therefore need to be cleaned
and a LIGHT
SLIPPERY grease applied to the cam. This is not isolated to the Okuma
brand as the Shimano reels use basically the same type line-counter and what
works for one also works for the others.
Here the Okuma Convector on the left & the
Magda Pro on the right
Penn has now even came forward with line counter versions
of many different models all the way from their economy model 209LC, upwards
to what appears to be new models made around the line counter, as compared to
the line counter being an add on. And none appear to be expensive.
I was not impressed with the Shakespeare
Tidewater line counter reel that I purchased new in about 2007. The drag
wheel took considerably more of a rotation to get the same drag tension and was a lot harder to
apply than any other reels that I have ever owned. I guess when you get
familiar with one set up it is hard to change. And the line counter window
fogged repeatedly. It was probably a good reel, but not for me. I
donated it to a fishing club's monthly raffle.
The Kokanee fishermen seem to have been
overlooked when it comes to line counter reels until recently, when both Daiwa
and TCIA have came out with smaller reels designed more for or usable in this fishery.
The Daiwa 17LCB Accudepth Plus-B Line
Counter Reel or the TICA KL150LC Samira Kokanee Reel, both now are an option
to look at, with the Daiwa retailing for
near $90 while the TICA closer to $130.
This Daiwa
holds 250 yards of 12# line and is just
slightly smaller body diameter than the old
Ambassadeurs, while the TICA is a tad
bit smaller yet, but more compact because of the placement of the line
counter. The 27 series Diawa is a larger reel holding 360 yards of 14#
line which would be more of a salmon sized reel, however my 17LCB has found a
home on steelhead rods.
The Daiwa has a nicely located and sized clicker,
which is not found on many of the newer smaller reels, and it is made in
Korea, not China. I own three of these, one for pulling Steelhead
plugs and the others on my Kokanee rods. What use I have put them to so
far, they seem to perform quite well.
Daiwa also makes a digital line counter reel,
but you have to get used to it's operation and the information that I get is that replacing the battery is more
complicated like that of a wrist watch as compared to a pen-light.
The TICA KL150LC is
made in both RH and LH versions and the body diameter is slightly smaller than
the Ambassadeurs. It has a lot of features that the others don't, like a
clicker, large thumb clutch release button, click detent star drag wheel, well
protected and waterproof reset counter button, 2 screw removable sideplate,
centrifical ball spool brake and a gear ratio of 5.2 -1 with a line capacity
of 175' of 14# mono. For Chinese made, it appears well designed
and well made. I recently picked up one at a sportsman's show for
$78.75. I am impressed for a small reel that will be used for Kokanee.
Daiwa Accudepth Plus-B
TICA 150LC
Samira
Inside a Line
Counter Reel :(Project
#1)The photo below of a Shimano Tekota 600LC reel is the LH sideplate removed
showing the mechanism of the line counter. The 500 reel is just a narrower
spool than the 600, both using a larger reel seat. There is a narrower yet
Tekota 300 that also has a smaller reel foot.
On this reel, (I suspect), like
many, it appears the factory redesigned the LH sideplate as a bolt on with a added drive gear to the spool shaft to
accommodate the line counter because you can purchase this model with or without
the line counter. I know a fisherman who bought his 500
just before the line counters became available then after fishing on my boat a day,
he
ordered a new line-counter sideplate and the necessary parts to convert his reel,
the cost was about $45.00.
The driving gear off the main spool for the
line counter is the large white gear still attached to the spool's shaft.
The driven gear to the line counter is the small white gear on the upper LH side
of the sideplate. This gear's shaft leads directly into the line counter.
The line counter unit itself is not sold as separate parts, but as a assembly.
I had not had any problems with
this reel after 5 years of use, so I somewhat hesitated to tear into it just
to see what makes it tick. OK, a year later the line counter
started to develop a hiccup. Price of a inner line counter assembly was
only $12.40 plus shipping. And I found that there was
nothing wrong with the old one except that during last year's maintenance, I
lost a small inconspicuous inside nylon thrust bushing off the line counter driveshaft.
The price of the 4 needed factory
original drag washers to do a rebuild job while it was apart adds another
$36.35, however the originals showed no sign of being worn to the point of not
functioning, so now I have spares.
The one thing I did find when
removing this sideplate from the anodized die cast aluminum body, was that the 4 screws holding it on needed to be
removed anyway and the threads cleaned up, possibly with some WD-40 applied to
the threads before reassembly because one was hard to unscrew and all of them
had a salty residue inside the body /on the threads. If left in this
condition, a few years down the road, I may not have been able to readily remove them.
Also as a reminder if you use this one in saltwater I found that salt
corrosion developed under the handle nut and on the main handle shaft so
bad that it took real effort to remove the handle even after soaking this area
with WD40. Shame on me for missing this after putting the boat away for
the season.
Left hand sideplate removed
from a Shimano Tekota 600LC reel
Now let me say
again, it is VERY ADVISABLE to not go to deep into these complicated reels
without having a parts list in front of you. And the owners manual does
not cover how to take it apart, much less reassemble these things. I
will bet that before you are finished, you will need help from a
professional, or do a lot of head scratching, and then possibly to order some of
the small parts or springs that have attended
flying school. I was lucky but really cleaned up the kitchen floor in this
endeavor. It is also advisable even if you have a parts list to take
many GOOD close up digital photos of the sub assemblies as soon as you get
them apart, (no waiting until you have moved something). YOU
WILL NEED THEM LATER. The factory does
recommend that you send it in to a service center once a year for service,
something to think about.
In cleaning these
reels the tools required are a toothbrush, Que tip, rubbing alcohol, light
oil (like 3 in1) along with a grease like Vaseline plus
Shimano or LubriMatic boat
trailer axle grease.
Of course a screwdriver of the right size and a small Crescent wrench, OR look
in the original box and you will find a combo tool. For more info
CLICK HERE
for a link to Shimano's video.
The 3 main drag washers
are large, about .940" in dia. which is good for this size of reel. If
you ordered replacement new washers, and received the black plastic Dartanium
"stock" washers, aftermarket carbon-fiber or carbon-matrix washers, then a little bit of Shimano or Cal's
grease would be recommended. In lubricating these, only a minimal
amount of lubricant should be applied by rubbing on both sides of the washer
(about a fingerprint's worth). I did not have any Shimano grease at
the time I tore this one apart, but
found that LubriMatic boat trailer axle grease also works quite well here.
This grease is a slippery lithium based in greenish blue color.
ATTENTION
-- This reel has a
SMALL spring and plunger located in a hole crossways in the mainshaft that
acts as a clicker when you adjust the drag wheel. If you do not know
about this, or are not paying
attention (even if you pay attention) when removing the star drag wheel, this
SMALL plunger will disappear in thin air.
On the far LH end of the line
counter is a slotted head #545 maintenance cap. It is there for the
purpose of flushing the line counter endplate cavity out with fresh water
after usage. They put it there for a reason, use it to flush the line
counter out. There is a small rectangular hole in the bottom of this
plate, apparently to let any water drain out.
Some Reassembly Tips : On this reel there
are 4 things to especially be aware of.
Tip number 1
is as you unscrew
the star drag handle,
there is a SMALL spring loaded plunger #295 in the exploded views photo that
is a detent clicker for the star drag. If you are not aware of this it
WILL go flying as you unscrew the handle.
Tip number 2,
is on reassembly the yoke plate #381 goes
UNDER the yoke #380.
Tip number 3, the clutch pawl spring #635 which
has a opposing tail on each end, needs to be reinstalled using a set of
tweezers, but beware that it can also develop wings.
Tip number
4, is on the final
reassembly, when it comes time to thread the handle onto the main shaft,
remember the number 1, #295 plunger. It is impossible to put
this plunger into the recess hole in the shaft after the handle is on.
While you had this thing apart, you may have noticed a small hole on the end
of the main shaft that was offset toward one side. Now look closely at
the plunger, it has a slight recessed groove in the approximate center, but
not in the tail. To install this plunger, thread the handle on about
1/2 way, place this detent plunger into the hole in the side of the main
shaft. Now depress the plunger and hold it down. With a long
skinny tool like a ice-pick, reach in thru the rest of the threads of the
handle, into this hole and while the plunger is depressed, you can pick up the plunger's recess with the tip
of the ice-pick, force it inward into the shaft, captivating it. Now
thread the handle all the way in. Pull the ice-pick out and the plunger
will snap captivated into position. You should now be able to feel a slight
click, click as you rotate the star drag wheel.
Tip number
5, If you disassembled the reel,
removed the line counter and were not totally observant, you could have lost
the small inner white plastic bushing on the end of the driveshaft that is
located in a pocket in the housing which stabilizes the worm gear shaft. If this bushing is missing, you will
not have the shaft supported properly and will get erratic reading, or it totally
quit because of the now unsupported shaft end. And this bushing is not
even listed separately from the assembly.
Tip number 6, If
the line counter begins to not count correctly, stops along the way or
not resetting to zero, you can remove it from the sideplate
to inspect it. I have spent more time on this single item than
the whole repair. It seems that the internal plastic parts loose
their new condition slipperiness. What I finally found was that the reset button rocks
the small rotating gears for each of the 3 wheels outward enough to disengage
for the reset. I finally concluded that if you look at the small gears
there are small flats on their sides between the gears. These flats are
locations for two thin brass tension springs that are supposed to hold the
gears in position so that when the reset button is released, this pivoting
shaft with the gears attached, drops back in position for the main driven
gear to start the counter moving.
IF there becomes contamination
EVER SO SLIGHTLY
on the stainless steel shaft/gears there
is just enough resistance between these small gears and the shaft that the gears do not self align with the flat spring's
light pressure.
I had used this reel on saltwater and in brackish bay water where
apparently there was just enough salt in the air to create enough
resistance to keep it from functioning properly. I found that if I
soaked this counter assembly in warm soapy (Joy) water, dried it and when protected the counter wheels with a section of paper,
then
lightly sprayed Rem-Oil on the gears/shaft, (you will note the light
viscosity of Rem-Oil on the chart above) then manually rotated the these
reset gears aggressively while having the reset button held down, that they
would engage so I finally got it to function
again. The one thing you need to be aware of is to time these gears.
By this I mean you will have to look closely to see that the gear's have cog teeth,
every other one either short or long on ONE side. You need to be sure
that these cogs are in the same location (for each counter wheel) when the
spring holds them in place.
Another thing is that the
reset push button has a angled cam on the bottom that pushes the above
mentioned small gear shaft out so the counter wheels can reset.
Again slipperiness disappears on plastic over time, and the small spring
are not enough to re-engage the rear shaft AND raise the push button at
the same time. The only grease I found that solved this problem is
in a old jar of Possness Warren STOS reloading lube.
In the photo below, you will see
the small rotating gears mentioned above on the far top of the unit.
The small brass finger springs lay between these small gears.
Here is the line Shimano counter
assembly
Tip number
7, The
small diameter crossbar that is below the level wind fits into each
sideplate. This is inserted thru the hole in the LH sideplate when the
LH cover is removed. The RH end has a smaller diameter that goes into
that sideplate. One of the LH sideplate screws hold this crossbar in
place with the inner end of the screw being a close fit against the end of
this crossbar. If when reassembly, the RH end slips out of it's hole, you
don't see the problem, tighten this screw the crossbar will buckle as the
screw acts as a jack and pushes it against the RH sideplate.
Tip number 8,
In
disassembling
this reel's level wind, you need to remove an E-clip on the inside end of
the main shaft and the LH end of the level wind shaft in order to remove
the level wind shaft. You may get by without doing this by just
unscrewing the pawl cap and then removing the pawl. BUT in order to
remove the pawl cap you will have to remove the LH sideplate and then remove
the small diameter crossbar that lays below the level wind shaft as this
blocks screwdriver access to the cap. Note that there
is a small thin spacer washer between the pawl and the cap that can crawl
away then hide if you are not careful. Removing this
cap will allow
you to inspect the pawl and clean it. Getting the pawl out is
accomplished by threading one of the smaller screws into the inner pawl
threaded bottom hole then pulling both out. You can then
inspect the shaft, smear some Vaseline in on and into the shaft's grooves.
Now you can insert the pawl in the guide & the spacer #521 below it,
align the pawl in to a slot on the
shaft, then install the retainer nut holding the pawl in. Be
sure that the pawl is in a slot, not bottomed out or putting strain on the
shaft. The nut has to be tight so it will not loosen, but yet the pawl
has to be loose enough so it will rotate at the ends.
This is one reel that a person without
excellent eyesight, is all thumbs, and may not be that observant when you take
it apart, should consider taking it to a repair service
center when maintenance is needed as I will guarantee that you will loose
the plunger or a couple of small springs, or spacers. It has a
lot of features which demand small parts (even the large parts for that
matter) be installed in the proper sequence.
Shimano Tekota 600LC with
RH sideplate removed
Shimano Tekota 600LC drag
parts showing the parts in order from the left to the right. The
right being outside
One fisherman who uses the Tekota
series reel extensively says "the total secret with the 500 and 600 LC's is to
take out the auto re-engagement dog. If you start reeling while line is
still going out the reel will automatically go back into gear, then the free
spool lever will stop working. Either never reel to reengage, or take the
dog out". This is what he says, however since I have never had a problem
with mine
in 7 years,
maybe I'm not reengaging.
Inside a Line
Counter Reel :(Project
#2)Here we will be working with the Okuma Magda Pro MA 20DX line
counter reel. There are 3 sizes of this family of reels, with the #15
being the smallest, the #20 in the middle & the #30 the largest. It is
obvious that they copied many other good things from existing reels, and they
also have some innovative ideas of their own. The line counter assembly
is the same for all three models. Plus some very precision
injection molded plastic parts, all leading to a what
appears to be a precision reel at a modest price.
In this photo, the RH sideplate
has had the main shaft removed to show the drag system, but some of the
internal metal parts have been placed back into position to show where they
go. One very interesting thing about this line counter is that it is
driven off the RH end of the level wind shaft off a set of bevel gears. The
mating bevel gear (which transmits the power to the actual line counter) is
vertical with a worm gear on the other end, which then leads into the line
counter. The line counter itself just slides into it's cover as a unit.
The 2 drag washers appear to be a
Nylon fiber of 1.020" dia. with light fingerprint of drag washer grease. There is another washer on
the inside of the drag shaft between the anti-reverse ratchet and the main drag
gear. On this shaft is a ball bearing that is a slide fit inside the sideplate. When the star drag lever is turn in, (or out) this bearing is
between the lever bushing and the drag washers, but self aligning inside the sideplate.
In reassembly, the main shaft
needs the .860" dia. fiber washer first, then the gear with the recess for the
drag washers pointing outward. Followed by the large dia. hole 1.020"
dia. fiber washer, the thin steel plate, another 1.020 dia fiber washer , but
with a smaller hole, then the eared steel washer with the ears pointing
inward, followed by another of the small dia. holed fiber washer, then the
thicker steel washer. This then goes in to the RH sideplate. Now
the the main shaft inner brass plate can be screwed to the inner of the
sideplate using the larger headed screw (NOTE that the exploded drawing shows
a E-Clip retainer instead of this screw) for the rear and secured by the flat
washer under the large headed screw. Be sure that the anti-reverse
ratchet (RED ARROW) is in position on it's stud of the sideplate and the brass stepped
bushing is in it's proper place. You will probably have to loosen the
screw at the top of the clutch lever's shaft, part #804 to be able to get all
the parts back in their respective locations. This part will probably
have to to be moved outward slightly to ensure that the rear screw will
tighten down enough.
Next comes the 2 small thin
washers and the concave steel spring washers, with the two placed so the inner
radiuses are on the outside of each. Now the brass spacer followed by
the ball bearing into the sideplate shaft hole. The thin concave washer
goes on under the star drag wheel before wheel is threaded onto the shaft.
You will notice this wheel has arrows on the spokes with the words "loosen"
and
"tighten". Finally the handle threads on with the brass nut holding it in place
and the
plastic nut cover secured by it's small screw.
You can now re-install the line
counter assembly. The only problem I have had with them is after a
seasons usage the line counter button may not pop back all the way up,
re-engaging the counter. I don't like to repeat myself, but what I found
on the Shimano Tekota's also applies here. I have spent more time on this single item than
the whole repair. What I finally found was that the reset button rocks
the small rotating gears for each of the 3 wheels outward enough to disengage
for the reset. It seems that the internal plastic parts loose
their new condition slipperyness. I finally concluded that if you look at the small gears
there are small flats on their sides between the gears. These flats are
locations for two thin brass tension springs that are supposed to hold the
gears in position so that when the reset button is released, this pivoting
shaft with the gears attached, drops back in position for the main driven
gear to start the counter moving.
IF there becomes contamination (usually salt corrosion)
EVER SO SLIGHTLY
on the stainless steel shaft/gears there
is just enough resistance between these small gears and the shaft that the gears do not self align with the flat spring's
light pressure.
I had used this reel on saltwater and in brackish bay water where
apparently there was just enough salt in the air to create enough
resistance to keep it from functioning properly. I found that if I
soaked this counter assembly in warm soapy (Joy) water, dried it and when protected the counter wheels with a section of paper,
then
lightly sprayed Rem-Oil on the gears/shaft, (you will note the light
viscosity of Rem-Oil on the chart above) then manually rotated the these
reset gears aggressively while having the reset button held down, that they
would engage so I got it to function
again. The one thing you need to be aware of is to time these gears.
By this I mean you will have to look closely to see that the gear's have cog teeth,
every other one either short or long on ONE side. You need to be sure
that these cogs are in the same location (for each counter wheel) when the
spring holds them in place.
Now assemble the level wind cover
and shaft, slide it into the main body from the RH side only far enough to allow
the line guide to be slid over the shaft and cover, then push it in all the way.
-Note- it will go in from the LH side but your gears will be on the wrong
side. You will have to rotate the cover to index it into a notch allowing it to
slide all the way in, leaving the bevel gear exposed as that is what drives
the line counter.
Next would be slide the body onto
it's mating studs of the RH sideplate. The bevel gear will pretty much
self align into its mate in the sideplate. Insert the 4 screws in the
sideplate then tighten them down.
Slide the spool unit into the body
from the LH side. Place gear #705 onto the level wind shaft that is
protruding on the LH side. Be sure that the gear #707 is on the shaft
outward from the other gear that is attached to the spool. Slide the LH
sidplate onto the body and tighten the last 4 screws.
Now you can go back, reinstall the
level wind pawl and it's retainer cap. You may also have to adjust the RH
spool tension nut to remove any excess side play of the shaft or loosen it if
it is too tight.
If you can crank the handle
more than one sixth of a turn, you have the anti-reverse pawl not in
correctly. The trick to getting the pawl in, is to slide the spring’s
round tail over the plastic peg in the sideplate, (while attached to the pawl)
pushing it (the spring's end loop) down a bit to have it stay on the plastic
peg. Now push the pawl down and forward, holding it there trying to align
it with the hole underneath. You might have to use a nail or something to go
thru the pawl’s hole to get it pretty well aligned with the plastic sideplate’s hole, then put pressure on the pawl to hold it there while
installing the pivot pin. Note farther below, there is a slight
difference in the location of the pawl pin #211 between the 15 and 20 size
than the larger 30 size. The smaller sizes as shown in the photo below
are located in the forward part, while the 30 size is located in the rear.
Insert the pawl pivot
pin #211, (red arrow in the photo below) this is the round brass double ended
part (not counting the large center head)
with the dual diameter end down into the pawl, wriggling it until you get the
smaller end to go into the hollow boss in the plastic housing.
This will retain it until you get the rest of the parts assembled.
In use, the
smaller end goes into the plastic sideplate, while the larger part of the dual
pin is the actual pivot for the pawl. The large head holds it in place
once the lower brass plate #207 is installed. The upper, or exposed
small protrusion above the large head of this pin is secured by the lower brass
plate when it is screwed down. The 15/20 series seem to be more of a
problem reassembling during the above operation, kind of like needing an extra
hand to be sure anti-reverse pawl stays in place as you slide on the
cover plate.
This 20 series reel is basically the same as
the Cabelas DM 20. The Cabelas reel has a shinier body, no LH sideplate
stainless steel outer protecting ring like the Okuma, and with
some of the sideplate screw heads gold plated instead of just being stainless.
However after a while the gold plating seems to disappear.
I have
exploded this photo below more than normal because I will bet IF you do decide to repair
this reel, you will be looking at this photo more than once because the
exploded drawings are not that clear as to location. And, I may add that this one was
the most adventuresome reels of all I have undertaken for this article.
Okuma Magda Pro MA 20DX disassembled
I have also discovered that internally these
smaller size reels (15 & 20s) are slightly different as for the location of the
ant-reverse pawl #201 and the clutch slider #804 construction is
slightly different, however the principal in use is the same. Also
since my reels date back to from 2005 to 2015, that I have noticed slight
internal changes, like the #207 holder plate may be replaced from being
made of brass to plastic on the later ones. I suspect when ordering parts they would
need the lot number etched on the bottom of the reel seat to ID the proper
parts needed for these parts.
Now I discovered a situation that can afflict these
models, and that is if you have the clutch lever #802 that may not snap
back enough to re-engage when you crank the handle. This could be
because the reel was probably used around salt water and the clutch cam
shaft #800 has salt corrosion between it and the sideplate. Since
the sideplate is plastic it can't corrode so the shaft does. At
first you think this shaft unit is black plastic, NO, black painted
aluminum (at least on my 2005 reel) which corrodes under the paint,
creating enough resistance so that when the re-engage peg (made integral)
on the drive gear #701 trips the slider plate #804 that there is not
enough free-play for the return spring # 801 to snap it over center and
forward to re-engage.
And by looking at the parts list that by changing the
drive gear #701 you can convert it from an auto trip #17010078, like we
are covering here, to a manual trip by using part #17010079 instead. The
difference is that the auto trip has a peg that forces the slider up
tripping it to re-engage. I assume that the manual trip simply does
not have this peg or protrusion. Or you could simply grind it off.
The Okuma Magda Pro 15 & 20s RH sideplate assembly
with the clutch engaged
The Okuma Magda Pro 30 RH sideplate
assembly with the clutch disengaged
Left Hand
Line Counter Reels ;Okuma
is notorious for making Left Hand reels, the above models being one. It appears
they designed the LH first as it seems to be better laid out and more
compact. The LH line counter head lays over the spool and away from being
accidently bumped and reset accidently. Many parts seem to
interchange between the two versions. Even the line counter unit
itself is
the same.
One weak thing here is the line counter, after some use near salt water,
it seems to have the reset button fail to return back to it's UP position,
which does not allow the gears to re-engage. These line counter
unit assemblies are not made to be opened up and worked on.
Also
these reset buttons are just plastic and have to have clearance around
them to function. For a time, the factory within the last year (2012) made this
button smaller and added a rubber hat that goes over the plastic button,
giving the same overall size as the previous buttons. This hat apparently
sealed the whole line counter unit better than the previous open hole.
Okuma Magda Pro MA 30DLX (LH) & MA 30DX (RH)
These are good inexpensive line
counter reels for the average fisherman, however the counter window may fog
up if used in inclement weather or the counter reset may get finicky.
I recommend you then remove endplate that the line-counter is located on,
remove the 3 small screws holding the line-counter cover on, then remove
the counter. The usual problem will be the reset button will
stick down (not pop back up). Wash it off with warm soapy
water, rewash it then lightly oil (with Rem-Oil) it while protecting the
numbered wheels. Work the button numerous times even if you have to
initially pull it back up manually.
After a lot of trial and error of pushing this reset button,
and lubricating it with Rem-Oil, the light indexing springs do not have
enough power to move the button back. I then cleaned the exposed
(inside) sliding parts and found a old bottle of special reloading case
lube (STOS) that did the job. I have been able to salvage all
these counter units that I
have had this happen to. One good thing is that Okuma uses the same
basic line counter unit on all 3 sizes of this model of reels, but the
bevel gears are different (smaller to match the diameter of the spool) on
the MA15 and MA20 sizes.
Red-Neck Line Counter :Instead
of counting PULLS, OR Level-wind travel times to determine your line out distance, here is
another rather simple trick. Just paint a mark on the side of your
reel spool, even using "White Out", which will give you a more accurate
method. just count the revolutions, or if you really need to know
distance, measure how much line goes out per revolution. Many times
this will be near 6" depending on the reel/spool size.
Here you can see the white mark on the spool
side
Open Faced Spinning
Reels :It
can get confusing as to whether these reels are RH or LH. When RH reel is mentioned
in reference to open faced spinning reels, it really
has the handle on the left side and is designed to be held in the right hand.
The originator of this type of reel, the Mitchell 300 RH was introduced
in 1947 as a RH reel while later the model 301 was introduced as a LH reel.
These reels used some of the same basic parts, but different bodies and sideplates. The later reels manufactured by many different makers, (last
20 years or so) have interchangeable handles where the handle and the shaft can go in
from either the RH or LH side.
In operation, the lure needs to be
hanging about 12" from the rod tip, flip the bail open, (wire that goes over the
front of the spool) until it locks at the same time holding the line close to
the reel against the rod's fore handle with your forefinger. Bring the rod rearward
and as you cast
forward, release the line from your fingertip right after the apex of the cast. To reel in, you crank the
handle or manually move the bail back into position and keep cranking.
There can be front adjustment drags or rear
adjustment models. About all, even the economy newer ones have a small lever or button
on the rear where it can be easily moved to disconnect the anti-reverse dog of the
reel. This will allow you to let the reel wind backwards or let out line
without flopping the bail open. Usually the drag washers are minimal in these reels are not
designed to withstand a
lot of wear.
If you fish enough, the line will
eventually twist because of the bail rotating around while laying the line
again and again on the
spool in a rotating fashion which is different that what the line does when
casting. Therefore line on these reels needs
to be changed more often than other reels. Also when spooling new line
on, some manufacturers say to spool 1/2 of it onto the spool from the top of
the line package spool and then turn it over and do the rest letting the line come
off the bottom. This helps minimize the overall line twist.
Spare spools are sometimes
supplied with these higher quality reels so the owner can preload different
line weights.
Since the drag washers are
minimal on most of these reels as they are normally not designed for heavy usage they
may become less efficient over time. The heavier duty saltwater reels
will have way better drags than a trout rod and do need to be cleaned and
greased occasionally. However if the fisherperson is only
fishing for panfish or trout sized fish, the drag will probably never be used
as designed anyway.
If you have ever fished with a
guide for steelhead where they use these spinning reels, you WILL be told to
to NOT close the bail by cranking the handle. It appears on many modern
reels that is a design feature that the engineers failed to think about and with
constant usage this way, things either wear out or break sooner.
For those of us who grew up in the Mitchell 300 era, this was the only WAY to
close the bail. My how times have changed.
In more recent times, this type of reels are generally
rated in quality by how many ball bearings are used when building them.
Six is not uncommon as compared to the older Mitchells that only had bronze
bushings. However the old Mitchells have one thing over the new ball
bearing reels, the new reels are not tolerant at all about being laid on sandy
beaches, where debris seems to gravitate into these precise bearings.
Shimano FX 2000
(rear drag)
Shimano Sedona 4000FB
(front drag)
Inside Open Faced Spinning
Reels:(Project reel #1)One of the reels I used for this was the old
Mitchell 400 series. This reel was one of the fore-runners of the
modern open faced spinning reels. The 400 is simply a high speed version of
the old 300. So basically some of the gears will be slightly different
for the slower retrieve 300. These were not made to be changed from LH
to RH use as most of the new reels are.
To access a Mitchell reel museum
website
CLICK HERE
To remove the reel spool and brake
system, push the small center chromed button while at the same time, pull the spool
forward.
If you need to remove the crank
handle, do so before you take the sideplate off because it has LH threads and
once the sideplate is off, you have nothing but the pot metal gears to hold
onto when trying the back this handle off the shaft. With the sideplate
off, you will see the some of the gears still in the sideplate. Also
will be the anti-reverse lever and it's plastic dog which has a small flat
spring to put tension on it. Also a bronze bevel gear may fall off, that
came from a peg in the front of the sideplate housing. This bevel gear
mates with another bevel gear that is attached to the rotating bail housing.
In the main body you will see a
gear with 3 teeth on the underside which engages the slider plate. This
slider is what moves the shaft in and out, laying the line on the spool evenly.
Internally in the bail body is a
automatic bail trip. The bail has a loosely fitted small roller line
wear guide in the base part. The bail is held in place by a shoulder
screw on each end. Under the large end where the bail pivots is a coil
spring that activates the bail. This spring is about 1/2" in overall
diameter and has a 90 degree tail outward that rests in a slot at the bail's
base. The other end of the spring also has a 90 degree bend, but this is
upward, fitting into a very small hole in the bail's base.
To reassemble, place the spool
shaft in first with the flat of the rear 1/2 facing out, followed by the
slider plate. Note that in the photo below this slider is shown 180
degrees wrong as the peg goes to the rear and is also shown flopped to show the
peg. On the rear inside of this shaft is a small peg. This peg
goes into a corresponding hole in the rear of the center spool shaft.
The slider plate rides on the flat of the body between 2 opposing screw heads
as guides. Now the odd gear with the "3 feet" goes on the shaft
protruding from the body. Move the slide as far forward as it will go
and
the place this odd gear's feet in so they mesh in the forward notches of the
slider.
Place the dual diameter gear on
the rear shaft in the sideplate as shown in one of the photos below.
Then also place the bronze bevel gear on front peg of the sideplate. But
before you leave the bevel gear there, there may have been 2 small brass shim
washers that should be under the bevel gear.
Now comes the sideplate being
reattached to the body with the 3 screws you took out.
Now comes the bail and spring
reassembly. This may take 2 or 3 tries to get the spring in the right
position. Tighten both bail retainer screws. When it is
right it should be free to be pushed and snapped to the lock open notch.
The spool base is part of the
spool assembly. The drag system is minimal on this reel, being only one
thin Nylon washer and a pressure plate. This Nylon drag washer is .875"
dia. and is placed in the spool drag cavity first, followed by a 3 tailed
circular tension spring which mates to one flat side of the spool base to keep
it from rotating. Finally the 3 pronged adjustment knob goes on the
front of the spool. This all then can be installed onto the spindle
shaft by just pushing it on until it snaps in place.
Mitchell 400 reel
disassembled
Mitchell 400 showing
anti-reverse dog in bottom right rear of housing
Mitchell 400 showing gear
placement in sideplate
Inside Open Faced Spinning
Reels:(Project reel #2)The reel I chose for this was the Shimano Sedona 4000FB. These reels are
either RH or LH retrieve, unscrew the cap on the opposite side of the handle
and
pull the handle out of the body. Unscrew the drag nut on the front of
the spool and remove the spool off the front. Remove the 3 sideplate
screws, lift the sideplate off. The drive gear ball bearing may
slide out of the sideplate. There is now a semi-circled plate at the front of this plate that
is tucked under. It has to come out before the main gear can be lifted
out.
With the reel in the position
shown above, there are 2 small screws holding in the cover on top of the
rotating section behind the line guide roller. By removing these you can
access bail the trip. However be aware that there is a spring loaded
plunger and spring base (for the bail trip lever) here that has a mind of it's own as to were it wants to
fly to if you are un prepared.
In operation, the spool remains
stationary, with the bail assembly rotating around the outside laying the line
onto the spool. As the crank handle is rotated, it rotates both the bail
assembly thru a worm gear and also the driven gear attached to the spool shaft's
gear on it's periphery which in turn moves the spool in and out, laying the line
evenly across the spool. Other makes do not attach this shaft directly
to the inner gear, but allow it to ride in a elliptical slot in the gear,
creating the same result.
The drag system on this reel has 3
drag washers .700" dia. which are apparently made of a medium hard felt that seems to
be impregnated with a silicone. These washers and their
corresponding metal washers are retained inside the reel spool by a polygon
snap ring. The drag adjustment nut knob which holds the spool in place
is adjusted by tightening it in, which puts pressure on the drag washer
system. There is a small spring clicker inside this knob which acts as a
detent to not allow the knob to inadvertently back out.
These newer reels have a way
better bail spring system than most of the older ones, which was a common
failure. The ones on this model are the more efficient spring loaded
plunger type.
As shipped from the factory the
main shaft and gears are packed in a Vaseline type grease.
The more money you pay, the more ball
bearings you get in a reel. These allow the reel to rotate easier,
giving you more casting distance for less effort. The reel torn apart
here has 4 ball bearings, making it one of the better reels. Some of the
cheap reels have no ball bearings, but just bronze bushings.
Shimano Sedona 4000FB
with the main components disassembled
Shimano Sedona 4000FB
spool & drag
Here is a bit of information that I snatched off one of
the fishing forums. The anti reverse was failing to engage on my little
Shimano Sahara 1000fd. It's fairly new and extremely well
maintained. To anyone with this same problem. And you can't afford a new
part. Here is the fix.
Take the anti reverse part off the reel.
There is 2 screws holding it together, take the top off and you will see a
metal washer holding 6 rollers which are held in place by 6 springs.
Take the washer off and then you will be able to remove each spring.
Then gently straighten the top of the spring out and reinstall. I did
this to all 6 springs and put it back together. Making sure you put the
springs back in the proper position/side of the roller.
It now has
instant engagement. Before it would take about 10 rotations of the
handle before it would engage."
Closed Faced
Spinning Reels:
These will normally be the economy type found on entry level (kids outfits
that are easy to cast).
However there are some nice old reels still around. These reels work
great for trolling for trout, because you have a thumb operated lever that controls the
amount of line going out as compared to a open faced spinning reel where you
have to deal with either allowing it to turn backwards or open the bail and
allow line to spool off while keeping it from tangling.
They will have a thumb operated
push button at the rear. This usually does 2 things, it disengages the
rewinding system while at the same time pushes the spool (which has a rubber
face) forward bumping the
forward enclosed end, preventing the line from moving as long as you hold the
button down. Upon casting, the fisherperson
releases the button just after the apex of the cast allowing the line and
lure to be expelled forward by the sweeping motion of the rod.
They will usually have a drag
system built into the design with a drag wheel immediately inward of the handle.
There may also be a clicker lever on the reel also. The reel handle will
only turn one direction, (bringing the line in). The inner spool cover
has a dog that protrudes upon cranking catching the line, which revolves laying the line on the spool. The reel's front cover will be
attached by either threads or a notched locking system.
On the Shapespeare 1766 shown
below the words "Push Button" are on the reel below the model number.
The older makes shown here had the
bodies cast of a aluminum pot metal, while the newer reels will be made of a
plastic or nylon type material. Zebco originated and was a economy manufacturer of
these reels for
many years.
Early Japanese, Jorgensen Admiral X 82
Shakespeare 1766
model EE
Inside Closed Faced
Spinning Reels:Shown below is the above Shakespeare 1766 reel disassembled. This reel
had not been used for 40 years and has probably never been apart.
Plus it was
probably about time for a line re-spool job anyway.
The spool
cover is a quick disconnect rotating thread exposing the spool cover and the
rubber line stop / brake / line spooler on the front. This brake unit is
secured by a single screw into the shaft. Beneath the brake is the
stationary line spool that has 2 rear protruding pegs that engage notches in
the body and is retained by a spring on the front. Inside the brake
unit is a plastic lever that activates a polished metal line spooler peg that
moves in during casting and then back out to pick up the line to spool it upon the
first crank of the handle.
The
sideplate is held on by 3 small screws. Under it is the main gear that
is attached to the handle / drag shaft that drives a smaller gear that is
attached to the rotating brake / spooling shaft. This shaft has a outer
spring inside the body and is activated forward and rear by the large brake lever
on the rear. When the brake lever is pushed, it captivates the line
against the inner part of the spool cover, which allows the fisherperson to
hold the line in position during the casting movement and release it by the
lever at the proper time.
The drag
system is a single fiber washer between the shoulder of the main gear, a steel
washer and the inside of the reel body. The star drag lever threads onto
the shaft and when tightened, pushes a bushing inward putting pressure on this
drag unit.
Shakespeare 1766
model EE disassembled
Single Action Reels : These reels are pretty straightforward and very easy to clean / maintain.
Another name that has been popping up recently that associates with this type
is center pin type. For the freshwater fisherman they are known as fly
reels. In saltwater,
especially in the west coast of Canada, they are known as "knuckle buster
mooching reels". Some of these traditional reels (and it
seems a high cost) use the name center pin many do not have a drag and are madewith an oversized spool lip that lets
you palm the rim for added resistance when fish make a strong run.
Some
fisherpersons like
reels like this old fly reels, (which most freshwater fly reels are
representative of) shown on the left below have readily removable spools
so that the fisherperson can change pre-spooled line on the stream bank.
Most have a clicker, and some like the Canadian moocher on the right also have a drag system
as seen in the center of the spool.
Heddon 300 fly reel
Canadian saltwater mooching reel
Then if you step back in
time for the old time salmon trollers, who used these large single action
reels spooled with monel nickel steel type solid line. Then the rod may
have been permanently attached to the boat, and with big fish on, it was "Come
or Bleed". One brand of these reels was Pfleuger Pakrons.
These were LARGE by comparison even to most saltwater reels.
They were single action, but equipt with a ratchet type drag system where the
outgoing line had no resistance if from the handle, but outgoing off the spool
the drag kicked in.
They were made from
approximately 1920 until 1960s. They were made in two sizes, the
smaller model 3178 and
the larger model 3180. The SPOOL diameter of the 3178 is 4 3/4",
with the 3180s at 5 1/4".
These were originally made of brass and nickel
plated, where the later ones were made of aluminum and hard anodized in black
color. They are direct drive, but do have a clutch drag system
with the earlier 1 1/4" dia. drag knob having four 5/16" round balls equally
spaced around the outer periphery, where the later versions, the balls
were omitted but the periphery was knurled. There was also
a very generous clicker. The dual handles are wood painted black. They can be converted from RH to LH rotation on the infeed
for use with the reel on the underside of the rod.
Initially they were designed to be
used with single strand wire line (Monel) in conjunction with a 6' HEAVY
split bamboo rod for deep trolling. Many used a large disposable
sinker, that was released when the fish hit.
And were sometimes known as "Meat Rods". However those modern fishermen
who have found that these reels can, with the right rod and modern tackle can
be used with downrigger braid line quite easily.And at
times they can be fished equal to, or more effectively that downriggers.
The reason here is if you are trying to stay NEAR the bottom, it is a lot
easier to accomplish with these reels, if a uneven bottom, than if using a downrigger.
The larger model 3180s can
be repurposed to be used as planer board reels at a modest cost off eBay. The
convertible crank rotation is a benefit here.
OLD Pflueger Pakron trolling reels, 3180 on
left & 3178 on the right
These large OLD trolling reels
are pretty simple. A internal 3 dog ratchet is sandwiched between fiber
clutch washers. The anti reverse is different in that 3 dog system being
not symmetrical (and one side of the dogs tapered), with a sliding pin
horizontal the center of the shaft located at the ratchet. It
seems that the way it is designed, one dog pushes the drive pin so that it is
always engaged into the backside of the dog, at any 1/3rd rotation of the
spool. This steel drive pin's length is critical for operation. What I
have found is 3/32" (.094)"
diameter and .302" overall length. Ones that have been there
forever and now do not engage have had the ends worn off on one side.
The ends need to be square, but the corners deburred.
The ratchet can be
flopped over for LH operation. For RH operation there is an word "UP"
stamped into one side of the ratchet.
In operation, the
drag does not engage when using the crank handle to let line out.
Seen in the photo below, from left to right, (1) Drag tension spring. (2) Drag
retainer washer (brass). (3) Fiber drag washer. (4) Ratchet.
(5) Fiber drag washer. And (6) above, is the drive pin.
Pflueger Pakron anti reverse and drag system
In reassembling,
the threaded boss that encases the drag system has a horizontal hole mating
the cross hole in the shaft that the drive pin resides in. This
pin can only get into the shaft by aligning the outer hole with the shaft
hole. Therefore when disassembling, the pin has to be removed
before the side-plate can come off.
The shafts on each end
are hollow, allowing for lubricating oil to get into the shaft bushings.
As seen below on
the right, is a healthy clicker. The drag adjustment on the
early models had four 5/16" balls located around the perimeter of the
knob, apparently for better gripping power.
Pflueger Pakron model, 3178 exploded view
Another old Pflueger reel is the
#3128 Taxi, which is a 4 1/2" diameter, similar to the Pakron, but it mounts
horizontal on the rod and were sometimes called a sidewinder. They
have two agate lined line guide for either RH or LH use, and a lever operated
drag.
Pflueger Taxi model, 3128 front view
Pflueger Taxi model, 3128 read view
Cane Pole Reels : Then there are the very economical single action reels.
This model is all plastic, made by Berkley in the early 1970s. There is a
simple friction drag under the off side knob. The spool looks very
similar to
one used for possibly an 1/8# spool for
line, as the open side provides a driver for the crank handle. The were
advertised as a cane pole reel.
Berkley 500 single
action reel
Berkley 500
Berkley 500
Inside Single Action Reels:These single action reels are so
simple that it is kind of embarrassing to show this one apart. You will however
notice the 2 clickers, (permanent, can't release them) and this make has a screw
head knob activated drag shoe that puts tension on the inner rim of the spool by tightening
the shoe. This model was probably one of the first "made in Japan"
(cheap reels) before
they became known for products like this.
Heddon 300 disassembled
Saltwater Type
Reels:Now the word "saltwater" being used here may be misleading a bit, but to me
they typically will be larger than their freshwater cousins and will have a
minimum spool capacity of 250 yards of 25# monofilament line.
With the advent of the "spectra"
type no stretch lines that have a smaller diameter ratio to breaking strength,
somewhat smaller reels are now being used for saltwater because of the now
greater line capacity on the smaller reel. However do not be duped into
believing that the smaller diameter line is that much better. What can
happen is that if you get a big fish on that is running but at the exact instant
that the level wind's line guide reaches the side of the spool, if the fish
pulls hard or you react with more pressure on the rod, the line will cut into
the edge and be buried deep in the spool's side under many wraps of line.
Since it is the new spectra type line, I will bet that you will never be able
to untangle it. You will have to cut ALL of the line off the spool.
(Been there, done that). The solution is to not go so light a test line, so
instead of using 20# go up to 40, 50 or even 65#, which somewhat defeats the
smaller dia. benefits.
These were originally non level wind styles, even the handle was geared directly
to the main spool shaft on some early reels. Some you could pull the handle straight out to
disengage it allowing the line to go out without the handle moving. And of
course no drag system except maybe a piece of heavy leather that could be
pivoted up from the rear, bearing onto the line on the spool which could be
"thumbed". Things improved and about
late 1940s a star drag system was common. In those days level winds were
not that reliable as when the line guide's pawl stuck, about the only thing to do
while on the water with a fish on was to cut the looped wire guide with side
cutters.
Many
of the newer reels are pretty much made of injection molded graphite and stainless steel, which cuts down on
maintenance, especially the outer surfaces. Penn being a forerunner in these
saltwater reels has not made many internal changes for very long time, so if you
have an old Penn, new replacement internal parts are probably still available. The
outer cosmetics may have changed, but most internals are still the same
including the newer drag washers.
On the Penn Senator in the RH
photo below, you will see a rod mounting clamp that helps take the strain off
the reel seat of the rod when fighting a heavy fish. Also the ring eyes
on the top rear are for attaching snaps from a fighting harness that goes over
your shoulders. This relieves much strain from your arms.
The Ocean City saltwater reel on
the left below has a unique clutch lever that folds outward. In use,
when you make the first crank of the handle after this lever has been
activated, the handle bumps the lever moving it back to the ON position.
Information available indicates that this company went out of business about
WWII.
The Penn Senator is only about 20
years old, has been used for halibut but still in excellent shape. The
newer versions are very similar.
long obsolete Ocean City
#112
Penn Senator 6/0
#114H
The Shimano TR 200 below on the left is a nice all around sized heavy
steelhead and or light salmon reel. It is made of a graphite casting
and boasts a
smooth ball bearing drag. It's little brother the TR 100 G is the same size
only a narrower spool to accommodate less line.
The Penn GTI 310 shown on
the right below has proven to be a workhorse reel. The whole 300
series is very similar to this smallest of the series. The 320 is just
wider, holding more line than the 310. The 330 is larger diameter with
more line yet, then the 340 and a 345 (LH) with more line yet.
These 340 series have a teardrop shape with the level wind section
protruding slightly farther forward. The 340 and 345 also have
ring eyes on the top rear are for attaching snaps from a fighting harness
similar to the Penn Senators.
These 300 series all have a cast graphite body that is strong and very precise.
Shimano TR 200
Penn GTI 310
Inside Saltwater Spool
Reels:
(Project #1) These reels shown are a little simpler to take apart, but reassembling the
drag gear and clutch unit takes a little time. The Penn 310 GTI shown
apart below has a pretty straight-forward design, with
few reassembly secrets however. The factory nomenclature takes a bit
of getting used to however.
Again, when you
take a reel apart, lay the parts out in a sequence of disassembly and with
the inner side down. Do this on a clean table, preferably on a white
sheet of paper.
Penn supplies a
special wrench with all their new reels that saves plier marks on the
handle retaining nut.
When removing the
RH sideplate, take only the 4 outer screws #32 out, then pry this sideplate
off. The 4 bridge screws closer to the center hold the clutch plate
assembly together. It is easier to simply remove the whole sideplate
assembly & then you can see the placement of these internal parts before
they may be disturbed.
Tip the reel
upside down, unscrew the pawl cover screw #48 and the pawl #47.
The level wind
shaft (worm) #42 can be removed by unscrewing the aircraft locking nut on
the shaft end. The shaft and cover can then be pulled out from the
gear end. Note that there are white nylon bearings on each end that
have a slight protrusion that slides into the opening of the cove to index
it. Now the line guide carriage #46 can be slid off the cover.
When reassembling, be careful to not over tighten the shaft nut
.
The 5 drag washers
are made of a rough fiber and appear to not be lubricated. They are
about .800" dia.
Penn drag washers
for this reel apparently are designed for no lubrication to be used.
Penn 310 GTI all apart
except drag unit
Penn 310 GTI drag parts
There are
3
things to be aware of, number 1, is the pinion gear #13 can fall
out of the pinion yoke #12 if you move the RH sideplate around, so observe it early on.
Be sure it is back in position before you start your reassembly.
Number 2, this reel has a small
free spool button on the underneath RH side that
overrides the anti-reverse. There is a small brass lever called the
dog #15 that has a
notch in it that goes over a small coil dog spring #14 that is attached in the
bridge assembly plate, part #3. This lever will get slid out of position when
disassembled when you remove the inner spaced upper bridge screws #17
which acts as it's pivot. To reassemble it, you will need to observe the
RH photo below. Slide all the metal parts associated with this
internal section into position, locate the other #17 upper bridge screw (the
ones with only a few threads in the end) and get it started into bridge assembly
plate, part #3. Now you will need to use a ice pick type tool to come in
from the inside facing bridge assembly plate, locate the hole in the dog
lever. You may have to jockey it around to find the hole. Once
this is located slide the ice pick into the dog's hole to secure it.
Then install the other #17 screw. It is advisable to not totally tighten
these screws until you have also installed the lower bridge screws #16.
Number 3,
now you will probably have the eccentric spring's tail #20 out position.
This can be seen in the LH photo below. The tail needs to go into a Vee
part of the housing casting to put proper tension on the eccentric lever #21.
To do this, rotate the lever to the left, place the ice pick inside the
spring's coil, try to move it out and to the left as far as it can go.
Then with a small flat pointed screwdriver force the spring's tail inward and
down until the tail is caught in the Vee notch. Now you can tighten the
bridge screws, check to see if the eccentric lever and the free spool (direct
drive) works.
For a
internet link to a illustrated article on Penn reel repair
CLICK HERE.
Penn 310 GTI clutch
spring placement
Penn 310 GTI free spool
disengage
Inside Saltwater Spool
Reels:
(Project #2) Illustrated below is the Ocean
City 112. This reel has a unique clutch system. It is basically
the same as the Penn reels, BUT on this unit the clutch lever instead of rotating
and
retracting this plate utilizing a cam, this lever pivots outward.
This model uses the common
components of it's
time, with the endplates being screwed onto the standoff posts between.
The top rear crossbar has a radiused bend in the middle to accommodate a
fisherman's thumb if desired. The reel seat is also screwed onto the
endplates. All the exposed metal parts are made of chrome plated brass.
The clicker operates into a brass
circular spring that when pressed in ward the springs snap over a wider
section, holding the clicker in place.
The handle is threaded onto the
shaft using the same threads as the star drag wheel. Its retainer nut is
held in place by a combination wrench and retainer that is secured by it's
captivated screw on the balance end.
The drag system uses 3 washers
made of what appears to be leather and are .710" in dia. These washers are
apparently saturated with a medium weight oil and is then wiped dry. There
are 2 round brass washers and 1 brass eared washer, all pushed into the gear by
a metal spacer activated by the star drag wheel. On the inside of
the gear is a hard fiber washer that bears against the anti-reverse ratchet
which is under the gear plate. The gear plate is screwed to the sideplate.
The clutch system is basically
like the Penns utilizing 2 opposing springs under the clutch plate which
retract the driven gear from the crank handle, disengaging it from the 4
square notches. The clutch lever is placed in a location where the first
complete crank of the handle will knock the lever into the off position.
Ocean City 112 disassembled
Ocean City 112 clutch lever
in the on position, notice the shadow of the lever
Saltwater Spinning
Reels:These reels are basically a freshwater reel on steroids. So the repairs
will be very similar to their freshwater cousins. The Shimano Sedona
6000 (now discontinued) is basically an overgrown brother of the 4000 disassembled in the
freshwater section above.
One suggestion, if you
happen to use any of these in surf fishing, bank fishing for catfish or
sturgeon, be sure to wash them off and
remove the spool inspecting for sand before putting them away.
Diamond Super 100 of
the 1955 era
Mitchell 306 mid sized saltwater reel
Shimano Sedona 6000FB
Shakespeare Alpha Bigwater
reel
Observations :Some newer reels may have a Anti-reversing ball bearing
instead of a ratcheting system. These bearings need to
be kept clean and VERY lightly oiled if (especially if used on cold weather), otherwise any
grease becomes slow to react and the reel drag/crank handle
has no
connection to the spool, you simply have free spool until it warms up.
Carbontex®
drag washers can be installed dry OR with a LIGHT coating of Cal’s Universal
Reel and Drag grease. This is the only grease we recommend. It can be
used on the drags and everywhere else in the reel grease is desired. The
majority of anglers prefer the greased drag system. All old grease
should be cleaned out of the reel before re-greasing with Cal’s grease.
A LIGHT coating of Cal’s grease on the Carbontex® is recommended if you are
likely to get your reels very wet, it will help waterproof the drag system.
Very light means you should be able to leave a finger print in the grease on
the surface of the drag. When it comes to
drags more grease is NOT better!