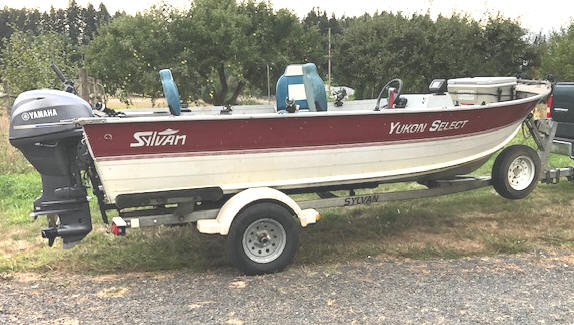
16' Sylvan Aluminum Boat
|
|
Breathing New
Life in a 30 Year Old 16' Sylvan Aluminum Boat
|
I thought I would never sell my 2005 18' North River Mariner boat, which in I
purchased used in 2009, where I had taken a basic bare boat and over the years
(16) that I owned it, I had made it into a real fishing machine.
However with health issues creeping up on me, (bad lower back issues, COPD and
wet Macular Degeneration) along with where I had only gotten this boat's bottom
wet once in over 3 years basically because of my low back issues. All
this, and my age (89), my priorities have changed considerably, along with the
fact that about all my fishing partners have passed away, OR the younger ones
own their own boats. My son is so busy in his small family business
that he can't take much time off, and the grandsons are scattered. I have
tried to introduce younger people into my style of fishing, but they also have a
life that oftentimes interferes with fishing. Therefore, I very OFTEN fish
alone, (at the dismay of my adult kids). However I am pretty darned safety
cautious, and have seen to many stupid things done in my day. And on any of my boats, I have about all the safety
provisions there, in place, and they are all OPERATIVE.
I am sure that a smaller/lighter
boat would be easier to handle alone at launch/recovery time for this old
GEEZER, yep, even now have done it a few times .
I might add that for an old Geezer I am quite active, (well - as much as my
medical disabilities allow).
Now instead of ocean fishing being one of my prime spots, my sights
have shifted toward Puget Sound, or the local bays, / tidewater, lower river sections in the fall for
returning salmon. And possibly some crabbing. This change is mainly due to the salmon seem to have
moved out into DEEPER/COLDER ocean water which means longer runs offshore (like
25 + miles one way) and if it gets rough in the afternoon on the way back in, not so good on my
low back issues, as compared to 5-8 miles on smoother water in the bays and even less on
the rivers. This farther run is partly
because of water temperature, and feeding habits where the salmon follow the bait,
created some by commercial herring/sardine seining near-shore.
Then with my North River boat (which is not really a offshore boat) I have had to closely
watch the weather and timing with the tides, (Ideally go out in the morning on low and come back on
high), which cuts down on fishing time on the water, as
compared to if It was a larger Deep Vee rougher water boat.
These newer locations (but not foreign to me however) and will include the lower Columbia
River
(buoy 10), Columbia River upriver to Woodland area, the Willapa Bay, the lower Chehalis, and southern
Puget Sound, and then closer to home, possibly some sections of the Cowlitz River. Then also this smaller boat
would also be more conducive to lake fishing if I really get desperate for a
boat ride.
Enter Boat # 28 ;
(For a link explaining this
number CLICK HERE).
Maybe I should add here before we go to far here, is that I have owned, made and fished
out if so many boats in my lifetime years,
starting at age 10 (with a 7 1/2' dugout cedar tub that I made), therefore I understand quite well the needs for, and am able to
visualize what could be used to improve usage or comfort in boating
design/rigging. I am probably considerably different than most fishermen in that if a product or accessory
is not available, I have the ability to fabricate it (or know someone who does),
as in my previous life I was a plant maintenance man and machinist. Then in my 20 plus years
of retirement, I still own a pretty well equipped machine and carpenter shop. While other
boaters or fishermen accept how a boat is built, or rigged, I am able to design and fabricate
helpful improvements.
After doing a lot of looking for used boats, I had pretty much settled on a 16'
Smoker Craft Alaskan model. I have a friend who has fished one of these
alongside of me in the bays for years, so I was pretty well aware of what they were. These older boats are riveted, (not welded), but
are a lot better than older riveted aluminum Hewescraft boats I have owned in
the past. These joints between the sides and bottom appear to have a sandwiched in thin mastic seal
between them, along with a LOT of very close LARGE HEADED rivets, and
these hulls appear be made of a bit thicker material than the older Hewescraft.
Smokercraft's CEO, who owns Sylvan has said, if Boeing rivets it's airplane wings, that
is good enough for us. They claim rivets allow for slight movement of
the hull, where welds can crack, especially on thinner material normally used on smaller
boats.
Looking at numerous boats online and relatively close to my residence
(100 miles), I also found some Sylvans pop
up, (more than Smoker Crafts). Well it just happens that they are both made by the same company. My guess is
the Smoker Craft is the flagship line while the Sylvan being more of the utility
version, but the basic hull design appears pretty much the same (just a
different floor-plan on some). Of the
four
available near me, I selected an older 1994 Sylvan Yukon Select version, which has 81" beam with
21" freeboard, (quite a bit for a 16' boat with a fuel tank under the floor) and with an open floor plan (no cross seats).
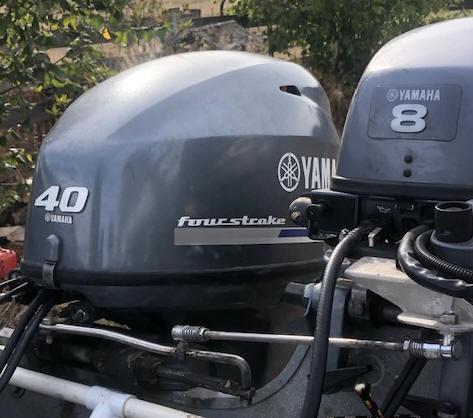
This boat was
powered by a 2012 40hp Yamaha and a T series (high thrust) 8hp Yamaha 4 stroke
outboard motors. This was an older boat than the others that I had looked
at, however
appeared to be used but not really abused, with no dents or leaks. But
with all things considered, (including the galvanized trailer), what swayed
me more than anything was that it had a couple of newer, well known to be reliable motors,
than the other offerings. I had bought a new and owned a Yamaha T8 for15 years (currently with 391 hours), which I just swapped onto this
new to me
boat, as I knew what condition it was in. Along with the fact that (1) I
was pushing a time frame to get this new boat to me on the water, chasing fall
Coho salmon. (2) Then on this T8 motor that was on this boat, it had a extra long shaft, which
would be a detriment if back trolling shallow river tail-outs. However the
deeper saltwater it would be no
problem, maybe even a benefit in transferring it to my North River.
I may miss the convertible top cabin of the North River if the weather turns
sour, however in my older years, in all possibility, I will not be on the water
much under those conditions anyway. But then that is what rain gear was
made for.
I later did minor work on this other T8 that I removed, and placed it onto my
North River, replacing my own, then put it up for sale (the North River).
Anchor System ; This boat was
obviously originally set up for Columbia River
spring/fall Chinook and sturgeon fishing, evidenced by the Columbia
River type anchor system installed on it. This entails a rocker type anchor
securely mounted in a holder on the bow. The latest owner
apparently had little interest in this type of fishing, (being an Asian)
as he targeted crappie at night on the lower
Snake River, or an occasional crab outing on the lower Columbia River.
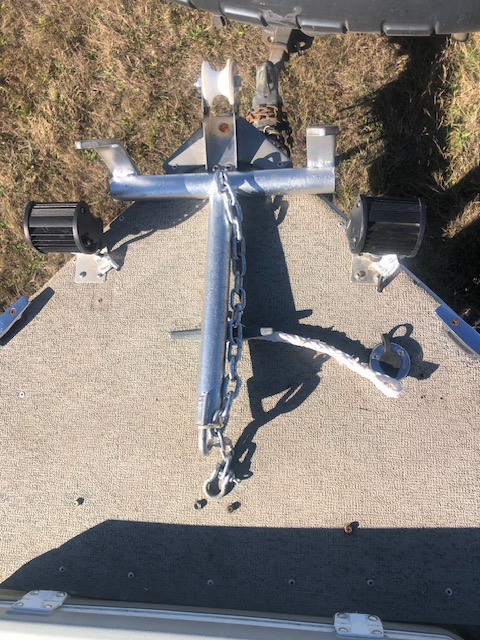
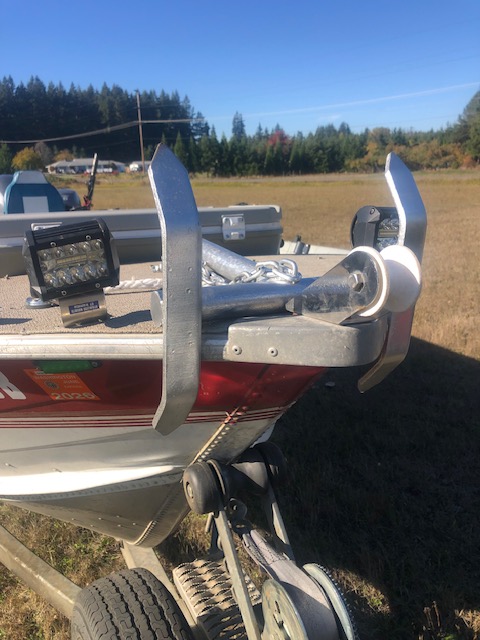
| Here you see the Columbia River anchor from above | Here you see the Columbia River anchor from the front, also visible are the bow/docking lights |
 |
 |
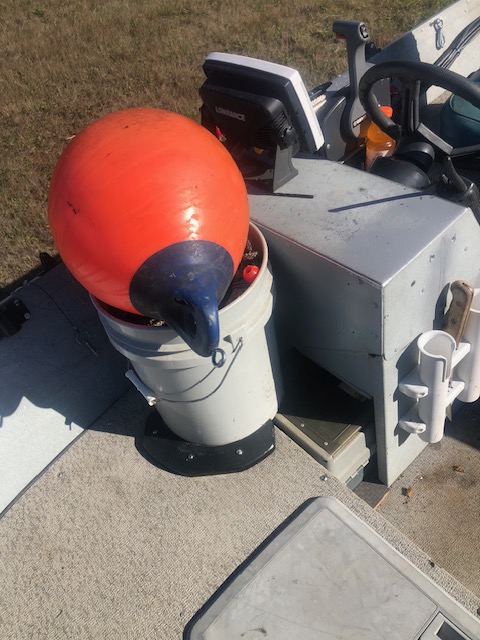
These Columbia River anchor systems (which this one entailed an18# rocker type
anchor) consisted of 140 feet of 3/8" anchor line which was contained in a 5
gallon plastic bucket. Since this takes up considerable room along with the 15" puller float, this long
of a line will not be utilized
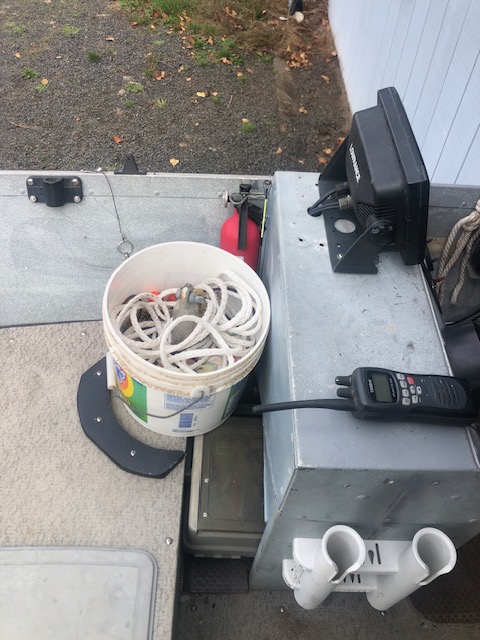
very often, I have replaced it by a 3 gallon bucket which contains 75 feet of 7/16"
nylon rappelling line and a 15# mushroom anchor. On these systems, the anchor itself is not attached
to the line until
it is decided which type of fishing will be done that day, so an simple exchange
of buckets which works quite well here. As my anticipated usage will not be using the
float anchor puller possibly 95% of the time.
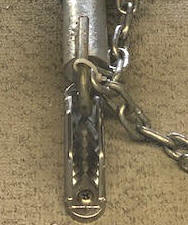
Here the anchor line IS NOT attached to anything permenent)
but to the bow using a wedge type chock cleat on top of the bow deck, (as it needs to be a able to break
away if fighting a fish or avoiding large debris). The anchor line is
coiled in a plastic line bucket, (with a small bumper buoy on the free end for
retrieval once thrown off the bow). To make it neat. easy
and quick, I had to mount this chock behind the mooring cleat and was lucky
enough to find an enact fit being tall
enough so to not have the force of the anchor pull the line out of the cleat under
strain.
It however was necessary to better reinforce the bow deck from underneath.
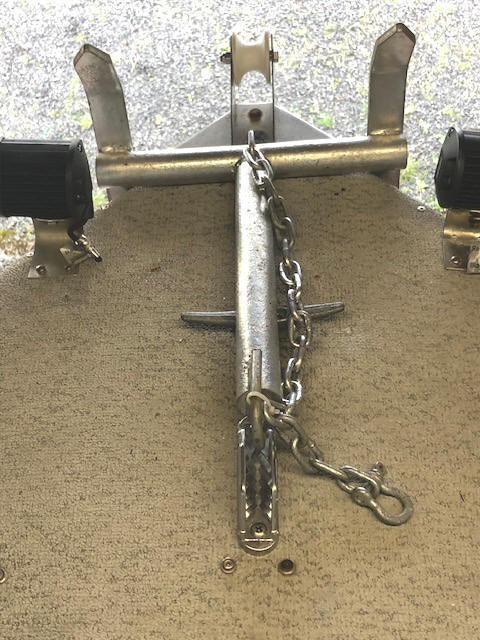
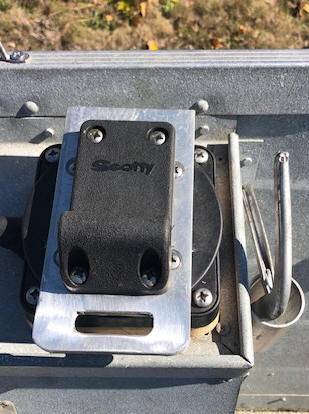
| Here you see the anchor cleat described above | Here you see the anchor cleat closer up |
 |
 |
|
Here you see the large anchor line bucket
with the retrieval float |
Here you see the small anchor line bucket |
 |
 |
Again this boat was structurally sound, however maybe needing
a refresher paint job somewhere down the road.
It also came with a fitted canvas cover (which I may use) but the a Bimini top (I probably will never use). The Bimini tops I have been exposed to are not conducive to the type of fishing that I do, especially if they are extended, mainly they hinder usage unless folded back, but then why have them installed anyway if the bulk of your fishing is where they bare not needed? As they are not conducive to boarding the boat or fishing from the sides. They are essentially sun shades and not very useful in stormy weather.
Seating / Storage;
The two side seats were mounted on 3/4" plywood lids of the aluminum storage box
bases underneath, however the
wooden lids had deteriorated slightly to
where the hinge screws were loose. To make matters worse regular steel
nuts were used on the stainless bolts, which the nuts were so rusted that they had to be cut off with a Dremel
tool. The aluminum sliding rail for the seats were dinged, loose and corroded which
needed cleaning and a slight amount of grease added in the slider slot.
Then to retain these seats from sliding off the end of the rails and into the
deck of the boat, I drilled a
hole in the rail (on each side of the seat) and dropped a round headed screw in as a stop.
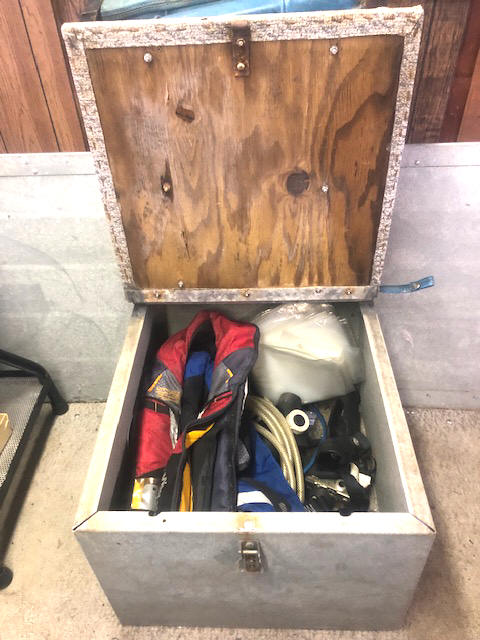
There is a moderate amount of storage under the side seats, with
plenty of room here for a large plastic waterproof toolbox and another with the
USCG safety components, plus a First Aid Kit and a few spare parts on the
Starboard skipper's side. On the Port side, I will use it for
storage of personal inflatable life vests, extra rod holders and
large plastic fish bags, even a spare prop. This box can also large enough
to accommodate fishing partners small tackle
bags, rain coats or lunch bags.
| Here you see the underside of the skippers seat with the waterproof safety & toolbox storage underneath | Here, the Port seat storage |
 |
 |
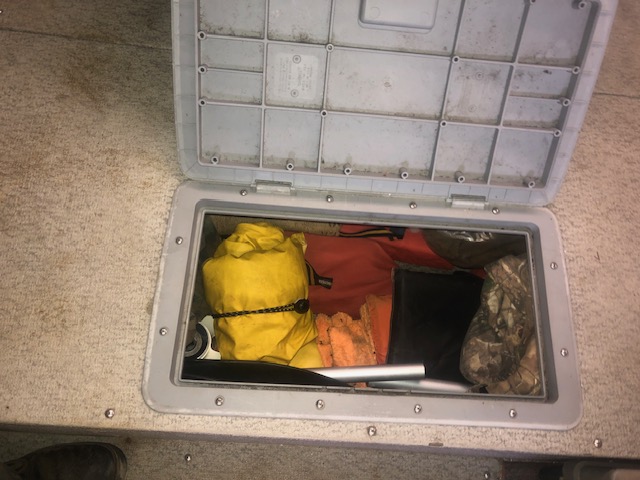
There is lots
of storage in the bow semi raised area
where a live-well could have occupied in the flagship line. This area has lots of
full width storage 16" deep at the keel and 23" forward/aft with a plastic cover and an actual opening of 9 1/2" X 19". Here are
stored extra life preservers, rain
gear, wool blankets, a couple of coats, collapsible paddles, etc.
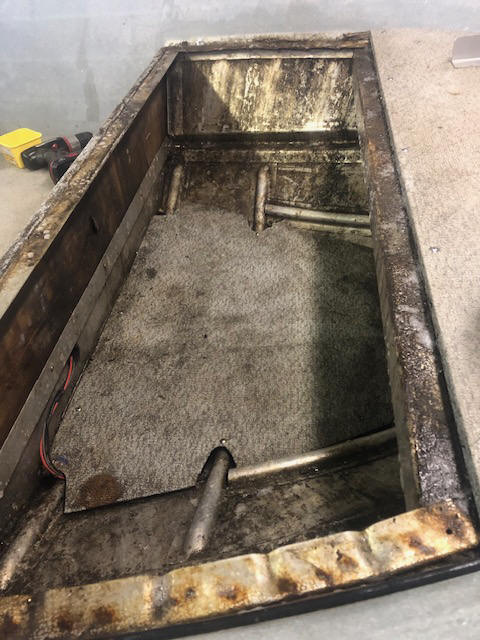
Update on this storage -- IT WAS NOT ANYWHERE NEAR BEING WATER
RESISTANT. When I took the boat/motor to the marine mechanic to install
the power trim tilt relays and associated hardware, it was near Christmas time and it
RAINED RATHER HARD for a number of days. I did not put the fitted
cover on (never even thought about it). Everything inside this
storage that was not in garbage bags got SOAKED badly. So maybe I had
better investigate and see if there was some solution. I removing
that semi forward deck, it was obvious along with being very messy from 30+
years of neglect. The plywood deck was even soaked, needing a
good drying out. About the only way to really clean it was to
pressure wash it, which I did, along with under the side seat storage boxes and
the whole deck while at it. However this was done in the middle of
February, therefore it took a lot of time to dry out. The photo on the right below looks considerably better than
viewing it in person.
| Here you see the storage in the location of what would have been a live-well | Here you see what was under the deck |
 |
 |
Farther forward there is minimal bow storage, but mostly for the removable front bow navigation light.
At the rear sides, about
7" wide by 3
1/2' forward of transom inward and up near the gunnel, is a aluminum protrusion inward
side panel that also houses
rear side flotation, here the top cover has a
shallow 1" lip for a somewhat universal temporary catchall tray, and where
downrigger bases can be mounted in the forward section. This tray can also be the
location to keep the boat hook, mini gaff hook etc.
As a note here, USCG
requires any boat 19' and shorter has to have full floatation. There is
flotation foam in the floor and both of these rear side panels also, which were probably needed to
have it meet these specs.
Catch Alls ;
I seem to have an affliction for "Catch All" provisions on my boats, which it had none real close to the fishing area that I like for
use of temporary fishing
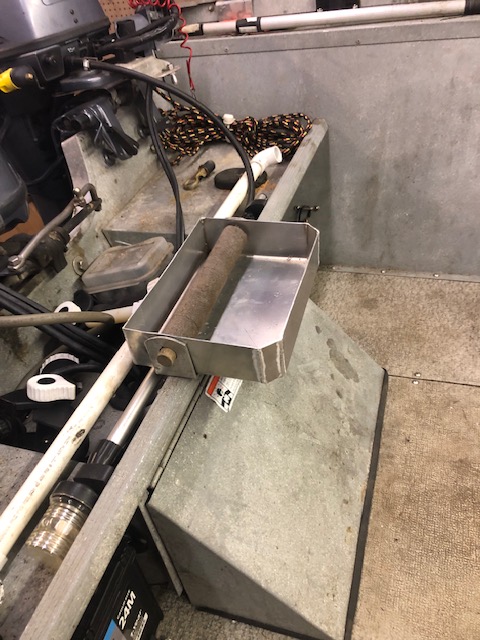
gear type storage (changing terminal tackle, sinkers, etc.). However at the rear, I had already added a leader spool holder centered on the
forward lip of the splash well. This spool base now also forms a base for a 2 1/2" deep
by 7" X 10" wide 1/16" thick aluminum tray.
This tray sets in/on the leader spool base and is held in place by the 3/4"
wood dowel of the 1 1/2" dia. pipe insulation leader/hook foam. It (the tray) protrudes forward about
5" but
does not interfere with anything because directly below it is the forward
sloping door for entrance into the bilge that's footprint is forward of the
tray's front edge. This is not a true rectangular box, but the front two
corners have a1" wide 45 degree corner strip so that it does not have a sharp front corner in
case someone falls on it.
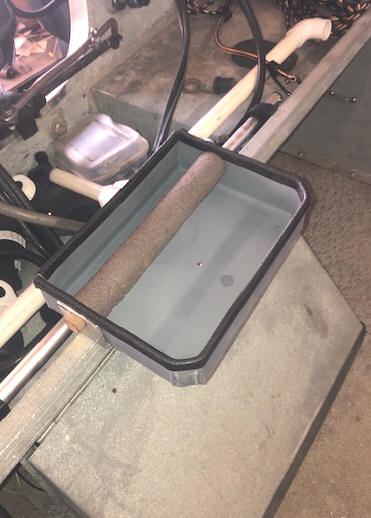
This tray was a challenge to bend, using only a carpenters square, sharpie felt pen, wood cutting bandsaw, large 6" machinists vise, a large rubber mallet and a pair of pliers. Then when formed, the other challenge was to get the holes for the retainer dowel aligned almost perfectly with the side holes in the base, as I wanted this tray as snug as possible. This was accomplished by placing it in desired location, using a sharpie felt pen to copy/draw the base hole, hand drill a 3/8" hole in the center, then using a Dremel tool and small cutter to remove most of the hole. Then install the tray and using a medium 1/2 round file, enlarge this hole to match the base hole, which took a lot of trial and error. Once finished, I had the corners TIG welded, and then rubber edge molding installed on the upper edges for a protective edging.
|
Here you see the unfinished leader spool/catchall tray |
Here you see the finished leader spool/catchall tray with the edge molding installed |
 |
 |
In the photos above if you are wondering what the white 3/4" PVC
pipe is, it has a Tee about in the center with 8" long downward protrusion, which fits into a Starboard rear rod holder and is a platform to support a salmon landing
net (providing an uncluttered support area) for when I am fishing solo and doing my own netting.
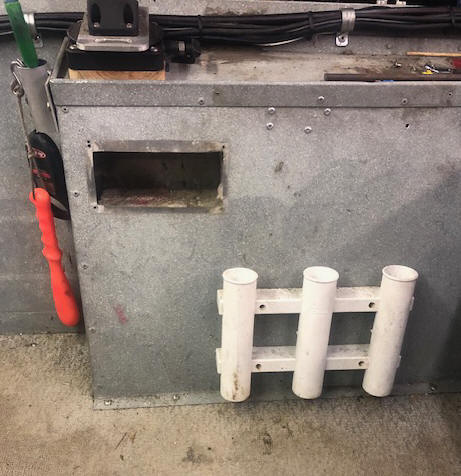
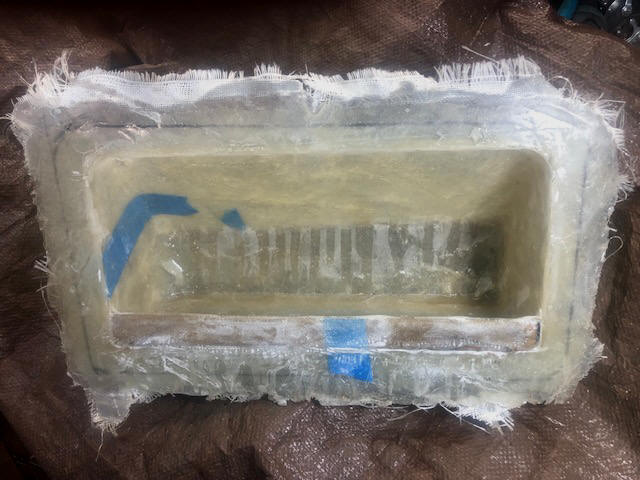
Side Storage ; One of the last major additions done on this fishing machine, I made a wooden male pattern to be used in making fiberglass rear side storage pockets/trays. There was a large hole on the Starboard rear panel that the old instrument panel used to call home. I had looked for a manufactured pocket storage units, but none were the size that I could use (to LARGE), OR not within my budget. Why not just make a fiberglass storage insert to provide more storage AND cover up this hole in the side panel, killing two birds with one stone. These pockets are 14" long, 5" deep and 6 1/2" tall. They have a 1" front lip. While making one, might as well make a second one for the other side also. These will provide space for my scent bottle container and possibly my tether. I can also use these for keeping the fillet knife, hook sharpening file, hand wipe rag storage among other things that I am sure will crawl into them. In the RH photo below you are looking at the outer fiberglass cloth overlaid still on the male mold. This side will be later become the inner side of this tray.
| Here you see the old hole where the old instrument panel was | Here you see the new fiberglass side storage tray being made over the wood pattern, tapered on the inside rear |
 |
 |
In the LH photo below, you see the fiberglass tray removed from the mold and the
3/4" wooden lip in place. This fiberglass is now only 2-3 layers thick.
There was another 2 or 3 more layers of fiberglass and resin added, but on the
inside, and then the outer lip trimmed as marked.
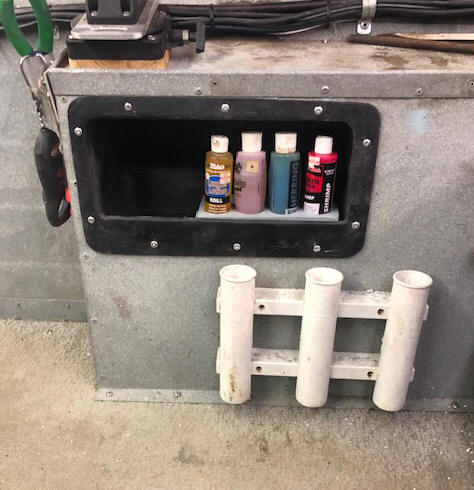
The RH photo shows the finished tray in place (pop riveted) onto the boat.
The floatation foam was trimmed to fit, glued in place and reinstalled before
the tray was installed.
| Here you see the new side storage tray removed from the mold & the front lip in place | Here you see the finished tray & scent bottle container installed |
 |
 |
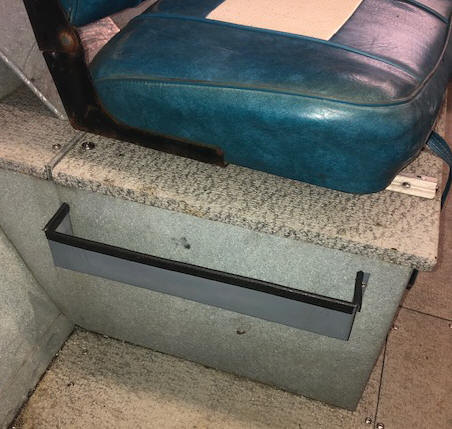
Then after I got catchall storages for me, maybe had better consider my passengers. So on the passenger (Port side) on the upper rear seat base, I made and installed a 2" X 2" X 14" aluminum tray which was pop rived to the rear of the aluminum seat box. This tray is out of the way but should provide enough catchall storage the guy in that seat to keep small tackle off the floor. Then while making trays, I also made another small 1" tray to go beside the skippers seat shelf between the seat and hull. Again both of these are fitted with rubber edge molding" to cover up any sharp edges.
| Here you see the port seat tray | Here you see the smaller skippers tray |
 |
 |
Side Moorage Cleats ; It also DID NOT have any side mooring cleats amidships or
on the stern. Which the middle ones are
critical for when fishing solo, like when leaving the boat tied up to the dock while
parking/retrieving the trailer. Here, I
also use the rear cleat that is offside of the trolling motor to secure the fish
bleeding rope.
Then when I was up under the bow deck to rewire the navigation and docking bow lights I found something rather disturbing, the large center bow mooring cleat did not have any backing plates under the plywood, NOR did they have any nuts on it's retainer bolts either. The front side cleats were installed with just wood screws, (non stainless) as they are so close to the gunnel that there is no way to get nuts on any bolts there. Obviously not to be used for using tied to moorage and left for any length of time, but maybe Okay for securing bumpers.
| Here you see it underway |
 |
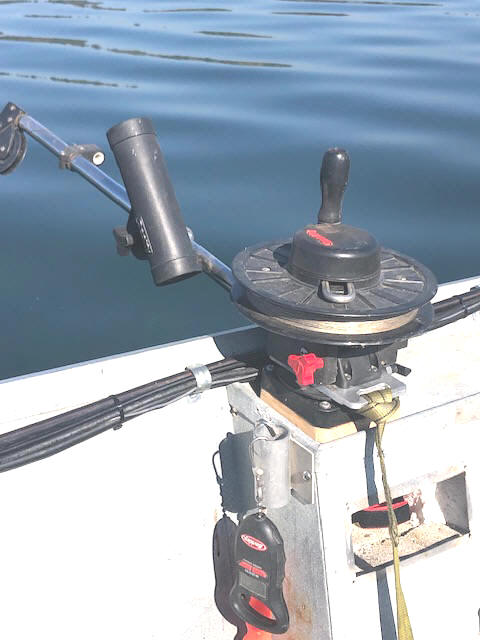
Motors ; Normally, I sit on a swivel chair at the rear to steer
the trolling motor using it's tiller, just something I have done for many years,
because my main motor was a 75hp and I used the 8hp for trolling
(I also like to see where I am going, not where I have been).
However it could be beneficial to steer the smaller
trolling motor from the helm. This was accomplished by welding a 3/8" stainless
steel nut to the main motor's cable linkage bar as seen in the photo below.
This connector rod has a quick disconnect tie bar to be connected from the 8hp to the 40hp,
which will also allow either motor to be raised without removing the tie bar.
And this connector rod can readily be disconnected from both. This system will
probably be used primarily for trout fishing.
And after fishing it for a few times, I found out that for a lot of salmon trolling,
(faster speed than for trout) this 40 hp motor idles
down quite well, so it can also be used for trolling if conditions are deemed right.
I have also installed hour meters on both motors, which will help me keep track of run time, and for oil changes. These are the simple little black box with a wire running to be wrapped around a spark plug wire.
Guess what, if you are thinking about doing any of your own maintenance, even
changing the spark plugs on the 40 hp, you will need a special 18mm thin wall deep socket, and I
suggest it being a 3/8" drive. You will also need a short 2" extension,
along with
a universal joint, especially to access for the bottom plug. A suggestion is when
replacing these spark plugs, start them in the threads by hand to ensure you DO NOT get them
cross-threaded. Then the bottom plug has a tendency to fall out of
the socket upon removal of you are not careful (because of the universal joint) and is about impossible to retrieve by hand, where a
long handled magnet or a fingered pickup tool which is a great help. And if you are thinking of checking
compression, these spark plug threads are 12mm (more the size of motorcycles), not the
more standard 14mm.
Then the propeller shaft nut is 22mm (or 7/8"), why not use
this socket the same
3/8 drive, and use the 3/8" ratchet needed for the spark plugs? Here a
regular socket is Okay, not needing a deep socket as normally required on some
motors. Then under the prop nut is a fiber washer about 5/16" thick
that has splines to match the prop hub (12 splines), Behind this fiber
washer and under the prop nut is a stainless steel flat washer.
Sometimes this washer remembers it's early days a a track runner and remember it
is round. In case you cannot find it, the hole size is minimal of .650"
with the outside diameter 1.400" diameter.
The T8 trolling motor is not afflicted with this disease, and a lot
easier to access under the cowling with more normal tools.
Power Tilt ;
One thing that I was strongly considering later on in this endeavor was, was to add a
power tilt conversion to the 40 hp motor. This motor currently was manual
tilt, but was designed so that the nitrogen shock (that lets it down slower, or
locks it in any position) can easily be replaced with a power unit. And if I am to run shallower river
water, it may be VERY BENEFICIAL to be able to be able to lift the lower unit up at times
by simply
pushing a button. Then when about all the other modifications were
finished, I did purchase and installed a new electric hydraulic tilt unit.
However I took it to a marine repair shop for the final electricals as this non power tilt motor
needed electrical up/down relays, so I just let them supply and finish that
installation (at a parts price shock-BOAT).
The 8hp already has this as it was designed with it's own power tilt.
| Here you see a tie bar from the main motor's steering cable system to the trolling motor | |
 |
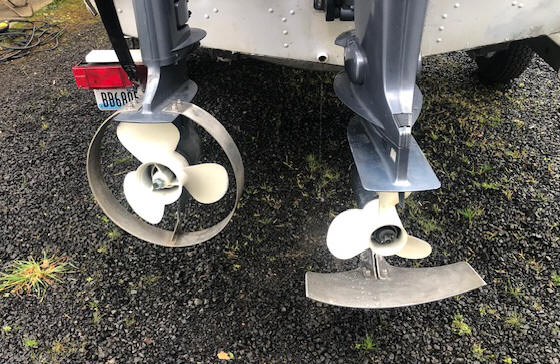
Prop Guards ; Looking at the chewed up prop on the motor (and the 2 spares that the previous owner gifted me), made me consider some kind of prop guard. I may never run the same water as the previous owner, BUT I do not want this motor to revert back to her violent past. I had my welder friend weld up the bad prop dings, and I refinished the surfaces and repainted them, one to use, and the others as a spare.
And the
areas that I plan on frequenting can have sand/gravel bars and possibly even logs. Okay,
online I saw the Hydro-Shield product which looked interesting. I had the
ability, so I somewhat copied this idea, but made
mine out of 3/16" aluminum instead of a composite. However this type of guard only attaches to
the skeg, not both the skeg AND the anti-cavitation plate as others do. This 40 hp motor
has in it's past probably had a couple of the latter prop guards installed as
evidenced by all the holes. So before going to far, I had my welder
friend weld up the existing 3 holes in the skeg, but not the other 6 on the cavitation
plate, where I simply plugged them with Bondo and sanded that down to blend in
with the surrounding surface and repainted. The ones on the skeg were the primary ones, as with me adding 3 more (which
would be nearly impossible to locate the new guard into accurately) it would look like
Swiss cheese and would be weakened considerably.
This type of guard is different in that, YES it does protect the prop, but also
helps getting on a plane faster, prevent porpoising on rippling water and with these these
lighter/shallow bottom boats (in my case a 12 degree bottom) helps preventing slipping on
corners at a higher speed that might also be beneficial. I also believe it provides a more
directed thrust of the prop, being advantageous in more ways than one.
In using only photos off thre internet of this product to
give me estimated dimensions, I forgot to add in the total OAL because I was
looking topside of an arced part. Thereby making it to short, like 12
5/16" for this wings. Okay, after a trip or two and not seeing much
improvment, I had anther couple of wings made, (one spare) only this time 15 1/2"
tip to tip for the arced wing. Now I will use the smaller set to
install on the 1990 15 hp Johnson on the 14' StarCraft aluminum boat that I will
sell.
I also have a hoop type prop guard on the T8 trolling motor,
which I made years ago, copying a commercially made Macs brand unit, and made of stainless steel,
which works quite well in keeping fishing line and downrigger wire out of the prop. I
actually believe it gives a better directional thrust also.
In the photo below you see on the left, the hoop type on the Yamaha T8 and on the right, and the combo guard and stabilizer unit on the Yamaha 40 hp.
| Here you see the prop guards described above |
 |
Fuel Tank ; This boat has a 17 gallon fiberglass under the floor fuel tank. Apparently this
boat was not designed for a second trolling motor, as it was not
plumbed for it's own fuel line, where they shared a common fuel line, and the
only way it could be ran was to disconnect the fuel line from the larger motor
and use it on the smaller motor. That may be OKAY for trout or
crappie fishing, but on larger faster moving water that I plan on exploring, if $hit happens, the
almost immediate usage of
the second motor can be a life saver. Hence, it is now plumbed one
fuel line off the tank outlet for each motor.
However there is no main water/fuel separator (not a lot of room there, but it
has a
fuel filter on the 40 hp.
In my quest to get the fuel gauge operational, I decided that
maybe a 1/4' or 3/8" pipe plug at the rear near the fittings/gauge sender would
be a beneficial thing to use for a wooden dowel test to help determine more
accurately the actual content in the tank in relationship to the gauge reading. Guess what, there was
already a fitting there that I can use, however probably not there for the
intended purpose that I will use it for.
Electric
Trolling Motor ; Then I just happen to have an older Minn Kota 45# thrust electric trolling
motor that I purchased years ago, that can be mounted on the Starboard side on the transom and yet be able to clear
the transducer. This should be helpful on a day somewhere in the future (like back-trolling
for Steelhead/drifting/casting spinners for river Coho). Here I run an extra 12 Volt marine battery for it's power as to not drain
my main power battery, leaving me stranded. This battery is secured
under the port splash tray by a bungee cord.
| Here you see the electric trolling motor |
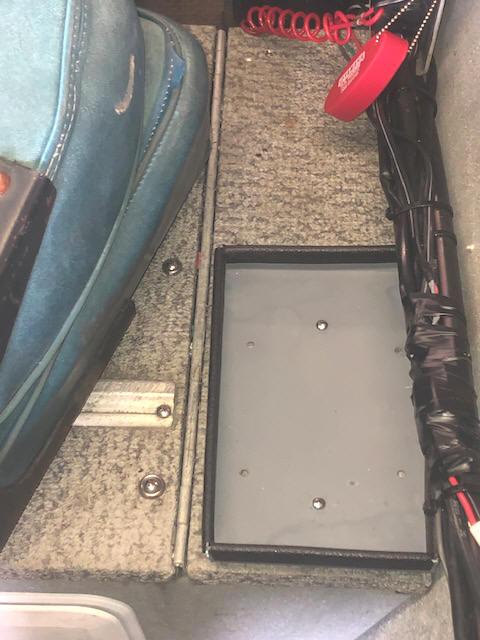
Batteries ; The under the rear splash well on the Starboard side is where the marine battery is located. here I installed a strip of aluminum angle in front of the battery as a securement for this battery.
However space is limited (partly because of
the rod rack on the side in front of the battery) where this series 27
battery that came with the boat is too long to fit sideways under this well.
Therefore this battery had to be inserted lengthwise, taking up room forward of
this opening. Hence I purchased a series 24 shorter battery which can now be slid
in sideways. I will retain the series 27 battery for usage with the Minn
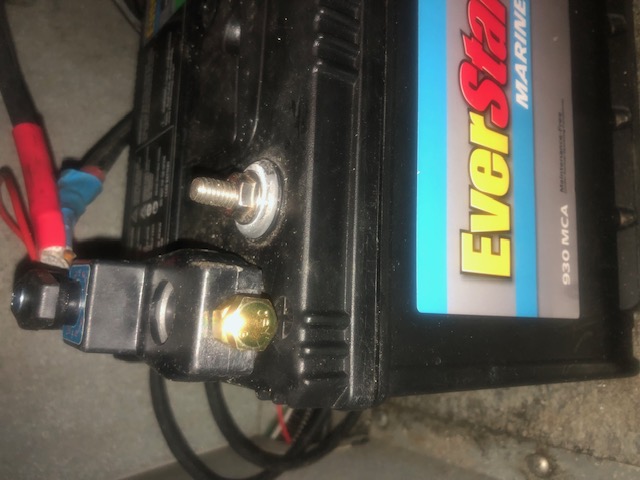
Kota electric trolling motor. I have also installed a main
battery disconnect switch purchased on eBay that was labeled as (car power main switch)
and installed it on this main battery positive terminal,
and with it pointing to the rear, tucked in pretty tight under the
splash pan making it hard to see and/or decipher what it is. And this switch's knob works backwards to what you would think,
another detriment to the unknowing.
|
Here
you see the shut off switch on the battery |
 |
There is a similar space on the Port side, but it is not as usable because the fuel tank filler hose and vent line takes up a lot of usable space there. In the center between these is a 20" wide hinged lid giving access to the bilge pump, fuel tank fittings and drain plug areas, but with no provision for lifting this lid, so I simply added a knob on the Port side, and a stick to prop it open.
| Here you see the battery compartment | Here the fuel line Tee to both motors with the fuel tank sender in the foreground with the bilge pump buried to the left of the center brace | Here you see the port compartment showing the fuel filler/ventlines |
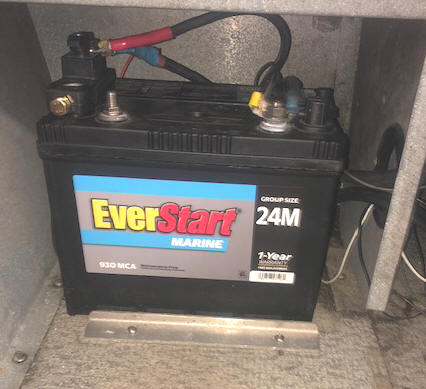 |
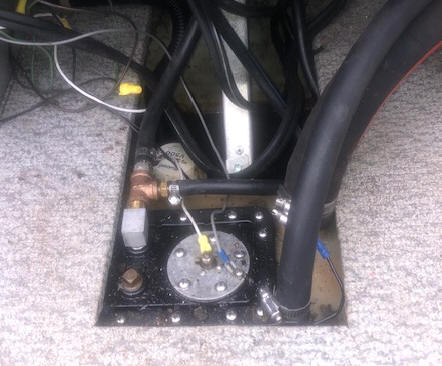 |
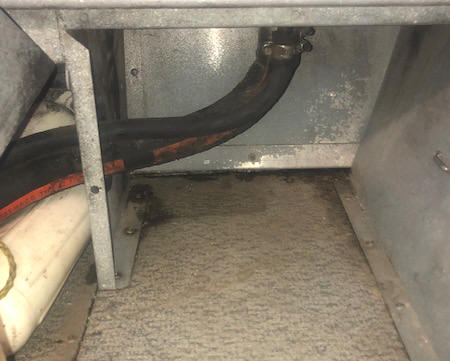 |
Bilge Pump ;
In my
rewiring in the battery area for the bilge pump and fuel gauge, the
bilge pump was not attached to anything other that it's outlet hose, it
was just laying there on it's side in the bilge. Okay, while I was
there doing the rewiring, I might as well pull the pump out and make a
mounting bracket for it. When I got it out, there was a LOT of debris
in the bilge there, like sand, rocks, a conduit strap, bolts, nuts, a
glass fuse, and a unidentifiable small coin (probably a 1943 zinc
penny).
This pump motor can be rotated, allowing it to separate from the pump
body, giving access to the pump itself. WOW, lots of sand, so much that
my guess the pump, if it was operative, would possibly not have enough
force to even get any water overboard. And of course since it was so
old that the twist lock plastic retainer prongs broke off during
disassembly, which I did not notice until time to reinstall it. Good
old Duct Tape to the rescue again.
As
a side note, there is 6 1/2" between the bottom and the floor, so if any water was showing
above the floor, we would
be sluggish to respond and unable to get it up on a plane.
Since there is no wash-down pump on this boat, nor no
real room to install one, therefore I use a 1 gallon painters plastic bucket,
which I tie about 2' of 5/16" Nylon line with a large loop in the outer end as a
hand hold, which helps for dipping water and no loosing the bucket. This
bucket
can be stored in the rear movable seat tray which secures it out of the
way, yet readily available.
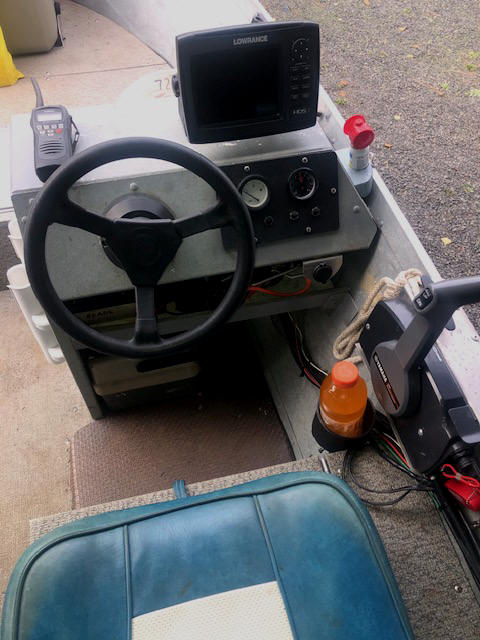
Console ; When I first got this boat and with extra more accessible small storage in mind, and as I was installing a new instrument panel on the center side console, I hatched the idea of adding a inner shelf up under this console and down about 5" from its lower dash lip. However with the steering gearbox input cable, needing to have the shelf bottom cut out to accommodate this cable, it became obvious that a single bottom piece would be impossible to fit in, so I cut it in two, and with careful fitting after making cardboard templates made it fit. This shelf is not permanently installed just in case the steering cable may need to be replaced. This shelf is pretty well protected by the upper part of the console and will provide storage for the boat and trailer registration, a spare key, battery voltage tester, binoculars, flash light, sling shot and lead balls, fishing regs, cell phone, candy bars (I managed to get 20 KitKat snack size chocolate candy bars in a bulk seasoning plastic jar).
This registration/key container is simply a plastic Skippers cocktail
sauce jar with the lid screwed up under the inside of the console, making it waterproof, compact
and out of the way.
The fire extinguisher was relocated to the front starboard
corner of the console, out of the way but ready.
Then in the new vertical dual rod rack on the inner side
of the console,
in between the holders was a built-in knife holder, where I store my heavy duty
fillet knife. This is not the normal fillet knife, but a stainless steel
butcher knife with a blade of 10", as when filleting salmon, we cut all the rib bones off the
backbone, and then later fillet these bones out, therefore you need a sturdier
knife than a normal fillet knife.
| Here you see the console from inside with the self just showing |
Here you see
the console from outside, note the small Freon horn on the outside of the console |
 |
 |
One thing to remember on boat building/rebuilding, NOTHING is square or level, however possibly parallel to the floor.
Electrical Wiring - Or Lack Of ; I quickly found (at least one) of a previous owner's mechanical/electrical inability was less than minimal. As almost all the wiring needs to be completely redone, because it all (other than the motor itself) from the rear side mounted instrument panel to the battery had been cut off under the splash-well near the transom. Originally this boat had a small switch/instrument panel on the starboard rear side panel. However as mentioned above, all the wiring was cut off under the splash well. This panel was an exact copy of a friend's Smoker Craft of near the same year and size as this boat, which both had 4 rocker switches with circuit breakers, power from the panel/gas gauge, bilge pump, lights, live well (however this boat has no live well).
I tired to trace out the cut wiring but finally just gave up as it seemed that possibly some of the switches or resets may have been defective or shorted out and on3e fed power to all, that may be why they just cut them all. This then gave me the opportunity, AND incentive to make a new instrument panel, and moving it forward into the console's dash.
When I took delivery of it, the bilge pump was activated by 2 alligator clamps
onto the battery. The economy sonar was also using another set of
alligator clamps for it's power. Not something I wanted to keep, as
permanent wiring is preferable.
OKAY, time for a complete rewiring job. Here I used the old gas
gauge, added a tachometer and 4 new toggle switches. To facilitate pulling new
wiring from the rear battery area to the console, I drilled a
1/2" hole at the very rear of the starboard side floatation panel and managed to run
a long welding rod fish-tape with a slight bend on the lower end down behind the
foam, and
managed to get it out the hole
below where the original wires had went through. Great, now I was
able to pull 4 new wires inside that side panel from the battery area, up along the Starboard gunnel
with the rest of the controls up and into the console. From this, I
was able to run a positive and a ground wire (negative) to the new panel, while the other
two wires were for the gas gauge and bilge pumps. The tachometer would then be wired into the
Yamaha harness at the throttle/shifting control.
Update on the fuel gauge, Initially this old gauge did not work on
the new instrument panel. Okay, I ordered a new gauge and matching sender
unit. But I could not get it to read anywhere near the full tank that it
was.
I tried so many things, but finally gave up and reverted back to the old system.
The only difference this time was I also grounded the gauge itself because of the
plastic panel (as the new gauge instructions showed). The old gauge's wiring
had one ground wire that was cut, which (unknown to me) must have went to the to this gauge
ground (mounting bolt). It now works. What I found on the newer system, it was made
to be universal, and more toward larger/deeper tanks. This17 gallon
tank was only 5
1/2" deep, which when the float was fitted, it could not have the needed full float
arm movement to do a even somewhat accurate reading. And trying the old sender unit with the new gauge only
showed 3/8 full, because these systems use a resistance to register the correct
reading, therefore these two were not compatible. Lots of time wasted and
MANY trips in and out of the boat.
The main power switch in the console uses a inline 10 Amp spade fuse
on it's outlet wire, and it's wires are long enough that this holder can be
withdrawn enough from under the dash for the fuse to now be
replaced without removing the instrument panel. To facilitate finding it
up underneath, a short cord attached to a foam key fob makes it more
identifiable and accessible.
This type of wiring is not what I like to see but because of the limited
space up under this dash, it would be about impossible to use a fuse block with
individual fuses as there is not enough room for access. To do it this
way, the only way
would be to prewire it on a board, then attach the board inside/under the dash,
Then the issue would be if a fuse would blow, it would be near impossible to replace
it without removing the instrument panel (6 screws), and also near impossible to even
identify which fuse was blown because of the limited access. What I
have done was to identify (label) each hot wire (red or white) going to a
cluster at a large red wire nut. For the ground, all wires are black
and again using a wire nut, but green. These wires are not neat,
but just poked in with some semblance of necessity to hide them up and under
this dash and out of the way as much as possible.
On wiring the instrument panel, I have four toggle switches.
each operating (1) main power to dash, (2) bilge pump, (3) navigation
lights, (4) docking or bow lights. There is a blue indicator light above
main on switch and green for both the bilge pump and bow lights.
On the upper part of this instrument panel is also installed a fuel gauge and a
tachometer.
Here is an experience that I am hesitant to share.
In installing the 4 switches in the new instrument panel, I thought I had
positioned all of them with the OFF position was UP. When I got all the
wires ran to the switches, I could not get power when I turned on the main
switch. I fought that for maybe 2 days, then finally ran a jumper wire
from the battery to the panel. Ground wire made no difference, then when I
ran the hot wire jumper, it was hot. I figured the new hot wire was
possibly defective. So I cut all the zip-ties on this wiring bundle, pulled the
(bad) hot wire and shorted it to the battery. SPARK. It was Okay ???
I pulled it back into the panel, connected all the hot wires using a (temporary)
electrical wire nut. Got power to the Sonar. What had gone wrong?
Had that input hot wire not made good contact in the wire nut connecter? Then I
noticed my main power switch on the panel was positioned in the OFF position.
What I had done was not positioned it (the switch) in the same orientation as the others.
I had the wiring right for 2 days, but was flipping this main power switch to OFF,
thinking I was turning it ON.
One of the hardest wiring parts was to rewire up under the small bow deck. Who ever did this must have been a triple elbowed midget, (as the access was through a 7 1/2" X 11" rear facing hatch). Then to compound the issue, the wires were cut short. Trying to reach in at arms length, with minimal lighting, trying to connect these short 3 wires into a electrical wire nut by feel was conducive to muttering a few fowl words. Here the previous owner had installed bow/docking lights, but he had wired them into and in conjunction with the navigation lights, something I was not happy with. So I had to run a second set of wires and an individual switch for them.
Among the things that I also added to this console was a USB cell phone charger
outlet. This can also be used to recharge my VHF handheld radio.
I also added a CB/VHF hanging clip for
the handheld VHF radio on the dash just left of the steering wheel, so it will
be secure and readily accessible.
And it just so happens that my large fishing tackle box just fits under
this console, leaving the floor more open and uncluttered.
I also added a small wooden base made from 2" X 4" wood which a 1
1/2" hole was drilled 90% through to allow a mini size Freon horn a home,
screwing it onto the outer side of the console. Also in that area,
near the throttle/shifting controls and front on the seat base,
but out of the way, I added a cup holder.
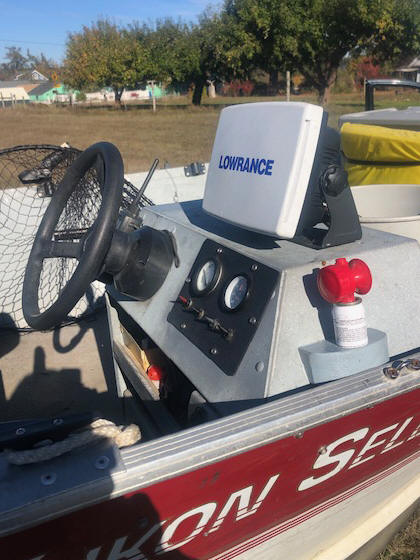
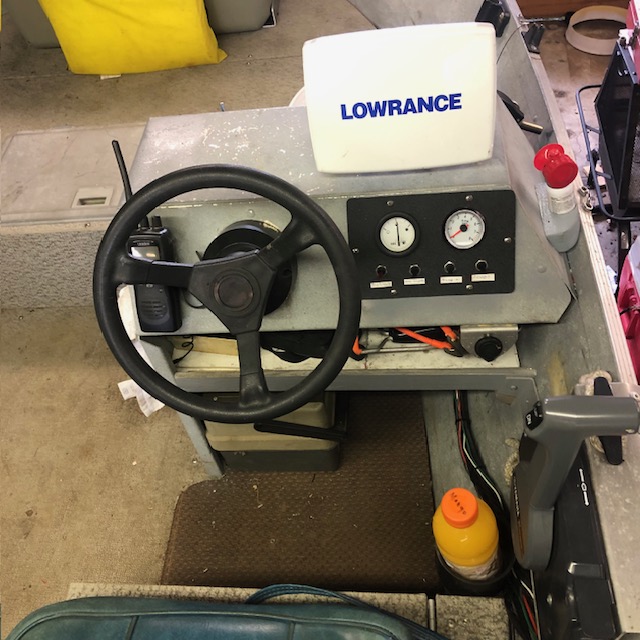
Sonar/GPS ;
Here I was gifted two Lowrance units, an older HDS 5 that was off a live
aboard sailboat had never been
updated, and a newer uploaded, HDS 7 Gen 2 where the previous owner upgraded to a
new style Garman, which is the one I had picked for this boat. It took me a while of being in brain fog, initially I
was concentrating to transferring the data off my North River's HDS 7, then it hit me, why
not just swap these units. This way I have all my old data without
the bother of transferring, and the new owner when I sell that boat to may not fish the areas I had.
And for my newer type of fishing, I will probably set the shallow
water alarm at 3'.
| Here you see the finished console. Notice the shelf underneath |
 |
Fish Box ; And there were no provisions for a fish-box of any
kind. So in my looking for a fish-box, I found that a Coleman 70 quart cooler
which fit
pretty well on the forward semi-deck up against the shorter bow deck. This is held in
place by a long bungee cord around the upper section and between some aluminum angle
on the forward deck to help it's sideways stability. It can also be
used as a seat for someone if need be.
Throwable Life Preservers ; Then to be in USCG compliance, each boat has to have a throwable life cushion/preserver readily available. Okay, why not place one on the rear side of the cooler and use the bungee cord to hold it in place also? This would make it out of the way and about as readily available as possible.
In the photo below, you can see the fish-box cooler/required cushion, rear view of the Columbia River anchor which is attached to the bow. And the rear of the (black) docking bow lights.
| Here you see the fish-box / throw cushion |
 |
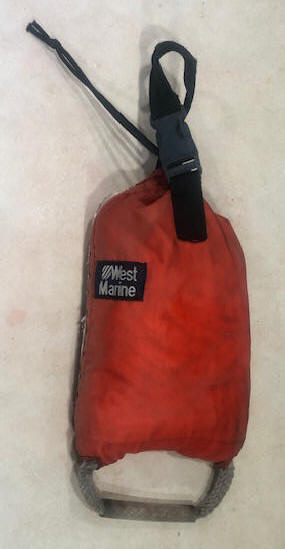
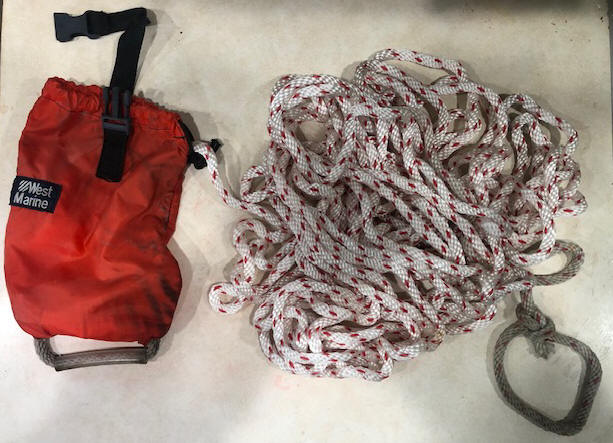
Then later I remembered that on my North River boat, I had a better more compact throw line,
which I snatched for that boat.
This
is a 'Rescue Throw Rope' sold by West Marine.
It comes all contained in a small Nylon bag,
stuffed with 50 feet of 3/8" rope with a small float inside and secured
using a draw string with a spring loaded lock. Also on
this float bag is a handle, for use for a grab handle if you are throwing it to a person in the
water. The
protruding rope end has a loop that you slip over your wrist (preferably your
non throwing hand). You throw it underhanded like throwing horseshoes.
It is heavy enough making it easier/more accurate to throw, AND
retrievable.
In the photos below the black strap is a 1" Nylon strap which uses
a standard push button Nylon strap buckle. This is so you can attach
it to a convertible boat top frame or whatever, for quick usage and use it for a
throw handle.
| Here you see a rescue throw rope bag |
Here you see a rescue throw rope bag with
the rope exposed |
 |
 |
One thing when you re-stuff the rope back into these throw bags, be sure that you straighten out the loops or possible knots.
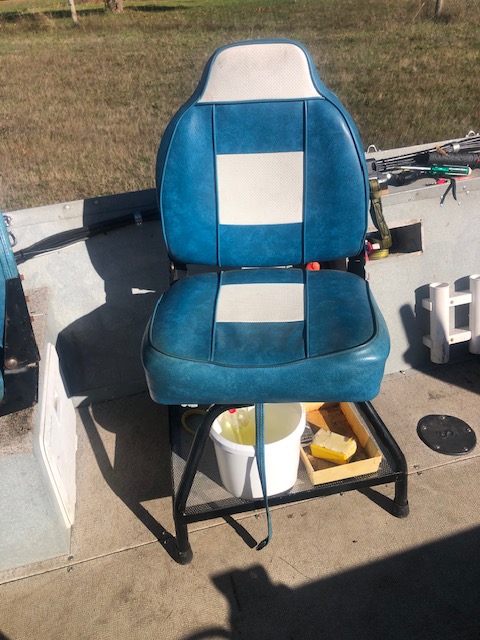
Swivel Fishing Chair ; The rear swivel seat was originally stationary, which I removed and
attached this folding seat (seen below) onto a swivel base 4 legged chair that was designed
for this. In doing this it left a 3" hole in the floor. On
the opposite side there was a 5" plastic cover the same hole where this
seat could have been installed on the starboard side. I copied a
plywood cover off the plastic one. Then later I found two
other plastic covers under the mid seat boxes, which I simply swapped
out for the plywood one.
On my previous swivel chairs, I have welded a 3/4" angle iron frame onto the legs up about 5 ", and installed a stainless or aluminum expanded metal bottom, so that no water would accumulate. This also is again a close catch-all during fishing. Needless to say I did the same to this chair base.
| Here you see the new swivel chair catch-all tray |
 |
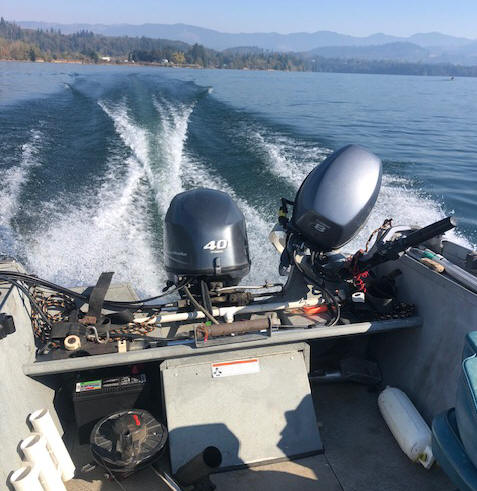
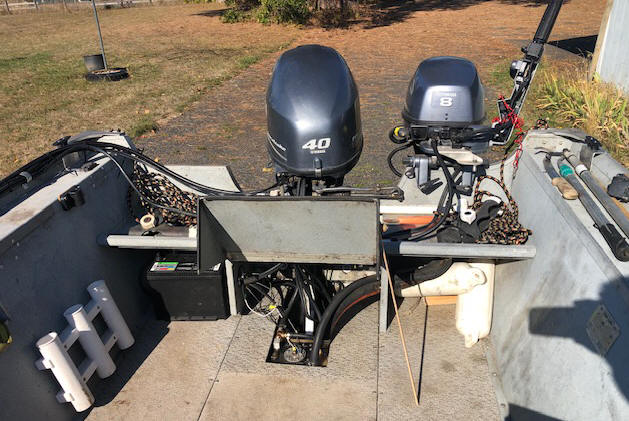
In the photo below you see the inner rear parts of this boat,
with the center hinged lid raised for access to the bilge pump and fuel gauge
sender. The series 24M marine battery is on the left. On the right is the fuel
line filler and vent hoses.
| Here you see the transom area with the motors and with the center lid raised |
 |
Rod Holders ;
Here, the rod holders were not placed in convenient
locations for my type of fishing, or if they were, they were
scantily secured. The Fish-On bases were possibly mounted fine for trout fishing at anchor, but
woefully in wrong places for salmon trolling. And most of them were
only retained by two self-tapping #14 screws into the gunnel. I solved
that by securing them with all (4) 1/4" stainless steel bolts and nuts. I had lucked out
at a yard sale a few weeks before, purchasing 3 sets of these same rod holders (complete with
bases) for $6.00 total. They normally sell for about $25 for each
set.
This boat came with a triple vertical rod rack mounted on the starboard inner rear panel rearward and below the old instrument pane, which I tried to remove and reinstall forward on the inner side of the console, but it was SECURELY glued in place, so I left it there, but found a dual rack for that forward installation.
| Rod holders |
Downriggers ;
There were bases of a unknown brand for downriggers installed, which were mounted in the rear
side shelf, but not enough forward for the fisherperson to stand
rearward of them to operate effectively. I had let my Scotty electric model
downriggers go with my larger boat when I sold it, but
I had picked up a couple
of used Scotty manual versions as backups, so these will find a home here when that time comes, as I
have installed bases to accommodate them.
For these bases, I have added Cannon low profile swivel plates under the
Scotty bases, which provides easy access to multi positioning the downrigger
in any position at deployment time or rotated rearward while landing a
fish or moving from
one location to the other. Here I had to add a 3/8" aluminum adapter
plate between the two, to accomplish this.
| Here you see one of the manual downriggers mounted. Note my nylon tether in the slot of the base adapter | Here you see the tether attachment welded onto the downrigger adapter base |
 |
 |
I always wear an "Offshore" inflatable life vest when I am on the water.
These vests have double Dee rings (one on each side) in front where, when
fishing alone, I snap a 10' Nylon web strap which has a quick release onto
these Dee rings. As an afterthought, I then made a shallow 1/4" aluminum U shaped anchor point that
was welded onto this downrigger aluminum adapter plates, (as seen in the RH
photo above) that will be my tether anchor to
the boat, as seen in the above photo. This way it (this anchor slot) is out of
the way, permanent and can be
used even if the downrigger was being used.
Launching Solo ;
When launching solo, there are issues that are completely different than with a
partner. Who holds onto your bow line at launch time? I have developed a
method where my bow line is at least 6' longer than the trailer. I connect
this bow line to the boat's bow eye, I have
installed a larger mooring cleat to the trailer winch upright, to which I attach
the other end bow line to at launch time. Here, after removing the winch hook, I back down the ramp,
remove the trailer safety chain, back farther, submerging the boat enough to where most of it is
floating, keep backing a bit more, hit the brakes, and float the boat off the trailer.
Now I gently pull ahead, taking up the slack in this bow line which of course is also
attached to the bow of the boat. As the floating boat reaches the end of the line, the boat
stops it's rearward motion and follows the trailer back to the waters edge of
the launch like
a well trained puppy. I can then secure it (the boat) to the bank (with a
small river anchor) or tie it to the dock
and drive up and to park the trailer.
One thing that I found was THIS bow line was NEW 3/8" hollow
core Polypropylene, of which you can open up the weave and insert the tail of the
eye into the hollow weave, which then acts as a Chinese finger stall, making a
neat eye splice. However this particular line was stiff enough (or
the weather was cooler) that
it did not grip the tail well enough (being so new) so that under strain, the eye pulled out.
Luckily not before it had stopped the rearward motion of the boat and started it
back slowly toward the launch. My remedy was to heat it up enough to allow
it to become more pliable (in the colder winter months) and also use a couple of small Zip ties
into and through both the inner and outer parts of the line, further securing this eye
better.
|
Here you see the solo bow line retainer
cleat with the white line attached to it |
|
 |
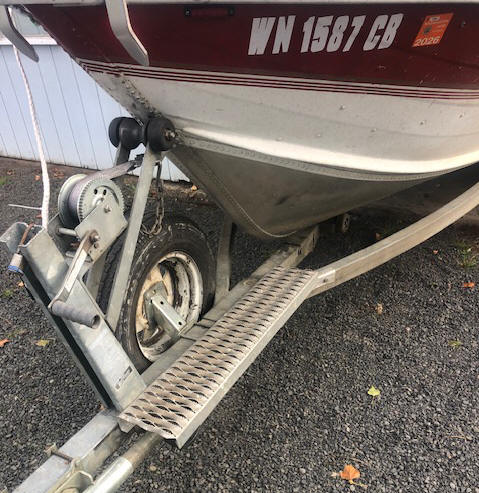
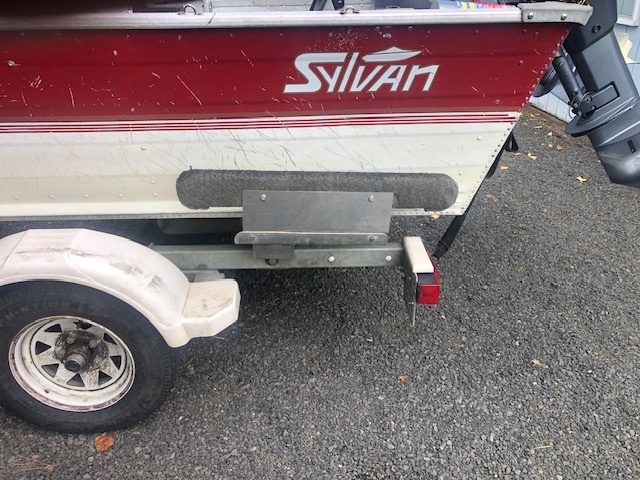
The Trailer ;
The trailer's passenger side had been backed into and the
taillight assembly was held in place by a small dia. cord. And it's
metal mounting bracket was badly bent forward. Both sets of wires at
the lights needed to be trimmed enough to get a better connection and
slightly greased before adding twist lock wire nuts to secure and
somewhat waterproof the connections.
Along with the boat was sitting too far
forward by possibly 5", (either caused by this accident or power loading) to where the winch mount
needed to be repositioned rearward. At this time, I also relocated the tongue
mounted crank farther forward of the winch mount.
With this repositioning, I now mounted on the port side of
the tongue a 6" X 34" aluminum expanded metal catwalk that I had salvaged
from a machine shop scrap bin. This catwalk was attached to the tongue using existing bolts
that secure the winch support and the spare tire bracket on the front
and middle. There had to be a front support brace installed
but fabricated to clear the tongue jack when it was folded back for
traveling. This was made of mild steel, but painted with a "Cold
Galvanizing" spray paint. The rear section lays on top of the trailer side frame
and is bolted to it. This catwalk can be used to help in loading if need
be.
| Here you see the trailer expanded aluminum catwalk | Here is the front outer brace support for the catwalk |
 |
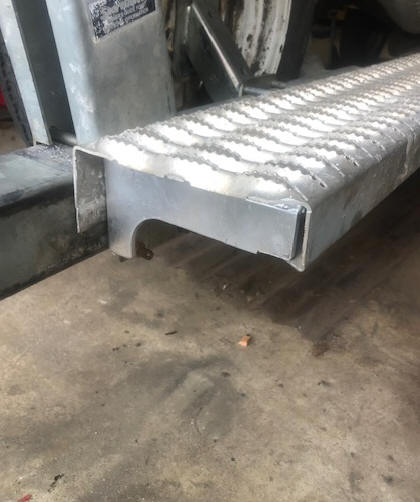 |
Early on, I noticed something
wrong in how the boat seemed to sit on the trailer, more on one side than the
other according to the fender gap. Further investigation, the boat was sitting right
on the trailer, because it had
slightly protruding bottom ribs that had to fit exactly between the trailer bunk rails,
guiding it in place, which were right and doing their jpb. However what the issue was the
fenders were mounted wrong (and apparently by the
factory) but why in it's 32 year life that no one noticed OR cared. One
fender only had 1/2"
clearance between it and the boat's hull, while the other had possibly 4" clearance
and this one was protruding outward enough that the tire had worn a large hole (4" X
8" long ) in
this plastic fender on the inside. It just happened I had what was
left over of a 1/16" Nylon sheet from a previous outboard clutch repair.
Pop rivets to the rescued, and seal it with latex caulking.
| Here you see the patched fender |
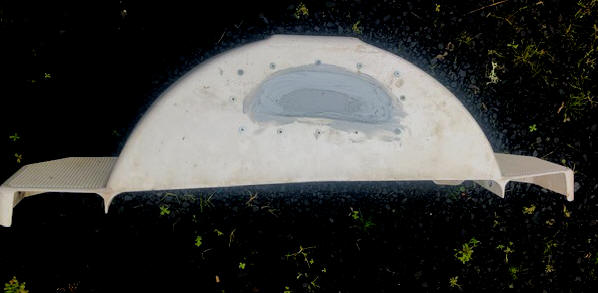 |
Okay, pull the wheels and find a happy location for each and reposition the fender bolts so we had a more equal space. This was NOT ANYWHERE AS EASY as I had hoped. With two 3/8" bolts on each end, holding the fender on, 1/2 of which were so seized that I had to cut the nuts off with a angle head grinder using part off stone, but in a very confined space. Finally with the fenders off, I was able to locate the fenders so that if there was 2 1/2" of boat to fender clearance, and centering the fenders on the tires with the tires inward far enough to not have any water spray. The next day I realized that crawling around under the trailer (even on a creeper) has revived some old low back issues.
32 years later the trailer was finally right, in fitting the boat. I
actually believe that this trailer may have been designed for a wide a boast to start with.
Which also tells me that the previous owners thought they may have been
fishermen but without a doubt not
an observant mechanic.
I use this fender gap distance when loading a boat onto the trailer
for proper sideways alignment.
The black painted
axle has no rust on it like the springs did, indicating that it was considerably
newer. The axle and hubs were and made in China. In
pulling the hubs and looking, these bearings looked like they had just been
replaced, but with minimal grease packing, so in all
probability the whole axle with bearings and hubs were replaced in the not so
distant past, and the bearings were never greased beyond what came from the
factory.
And of course in preliminary measuring, the axle was centered on the frame as it
should be.
Bunk
Guides ; The rear bunk side loading guides were
originally short and rather low, creating a loading
issue if in a cross wind or tidal current if the trailer happens to be
a little to deep in the water. Some guides are 3 times this long,
depending on the boat or trailer involved. These were a single
mount on the rear trailer cross-frame and were guide pas was only 26" long.
After sleeping on finding a solution, I decided to simply raise the
guides by adding a spacer between the base and the guides. In
searching for a metal, I found a scrap 3/16" X 18" aluminum plate that I
was able to make two 7" high plates, which raised the guides by 5".
But the base was not at a
true perpendicular angle for some reason, (tipped outward a bout 10
degrees) so I had to add a slight bend
in these plates pulling the guide closer to the boat to compensate, this method was a lot easier than
removing and bending these
bolt on bases.
These guides are especially useful when loading at a launch where there is no
dock, and Or with a current or wind blowing. In use with the trailer backed into the water, usually with
the fenders 3" showing about above the water. When bucking a wind or
current, it is about impossible to power load coming in straight onto
the trailer. You have to compensate for the wind, this is
done by coming in from downstream
at a angle, then turn onto and straight with the trailer (timing is
critical, not an easy
task). With these higher side guides, you slowly nose the bow into the wind and inward against the
upstream guide. Ease in with little power against this side guide
which allows you to then pivot the boat's bow more in line with the trailer,
and then when more aligned, add some power to partly load.
If you find the right combination, these guides effectively guide the boat more aligned onto the
trailer. Once it is straighter, more power and you can run
it up farther forward, even into the trailer bow Vee nest. If you need to straighten it a bit
at the rear, just use the
motor to compensate slightly pivoting the stern on the trailer, centering it,
more power and into the Vee on the winch stand. Then you can get
off the boat, attach the winch hook to the boat's bow eye and tighten it
into the Vee, attach your safety chain and drive up the ramp.
After using this boat in launching/recovering at both a dock
and a river (where the current was running) these extended guides help
tremendously.
| Here you see the new raised trailer side bunk guides |
 |
Tires ;
In when I was checking the tires for air pressure, I found
that the spare tire had no valve stem core. So it would have been
completely flat if it was needed.
Then the wheel bearing covers were just that (just the "dust cover" type on it) are not "Bearing Buddy" type which are way better in lubricating the bearings. Time to look at the bearings and at the same time adding the Bearing Buddys that I just happened to have a used set.
pare.
Guess what, the old spare that was missing the valve stem core, (which I
replaced) well
that was not all that was wrong, after airing it up and now on a wheel,
it was flat again a week later. Time to head for a tire shop before a flat
happens on
the road.
When I got it to the tire shop it (the tire) was still swished flat on
one side, and when they aired it up, they could not find any leaks ????
Possibly a badly seated core.
This tire is brand new, as it still has the small rubber needles
protruding on the tread along with a blue stripe around the center of
the tread. It matches the other two tires so apparently all three were
replaced at the same time. The ones on the axle have not
been ran a lot as they still have LOTS of tread.
The rims needed a paint job, along with one being an odd-ball, so it is
now the spare. As a FYI on repainting the rims, instead of masking off the tires, I
found an old lampshade, cut it off so there was about 3" left on the
lower edge, which allowed me to fit it on the tire outside of the rim,
where I could get a good paint coverage with no overspray.
And during this trailer repair, I found that the lights are
sealed beam, which is a good thing.
So needless to say it took me more than a couple of weeks, (like
nearer to 6 months before being completed)repairing and
remodeling before I got it close to getting it wet, and even before I got the
registration changed.
Shakedown Cruse ;
OKAY, 2 1/2 weeks of remodeling/fixing, I finally had it fishable enough
for a shakedown cruse.
I am pretty happy with the outcome, however we did find a few modifications
were needed (like the one rod holder that I had not moved), really needs to be
moved forward enough to accommodate the tiller handle of the T8 trolling motor.
This main motor had no out of the hole power, as the previous owner was looking for speed, where I am looking for utility, so his highly pitched prop will have to go.
His sonar would not function, even though I had tried it previously, (possibly a
bad/broken wire at the alligator battery clamp) so time to
replace it with the Lowrance HDS7, off my North River boat.
And on this trip, we had what appears to be a intermittent lack of
fuel supply issue on the main motor. squeezing/pumping the primer bulb while this
was happening did nothing,
indicating the fuel pump was probably not the issue. But when I got it
home, I removed the onboard fuel filter, which did not look really that bad, but I
ordered two off eBay (for $10.49) and have now installed one. I begin to
wonder if that may be what the previous owner sold the boat, thinking the motor
was going bad.
And I even caught a Coho salmon on this trip, christening the
new to me boat properly.
Second Trip ;
OKAY another month had passed.
Needless to say, this boat took a lot more work
on than I had expected. OR maybe I am getting older to where I need
frequent rests. However I am told that I am a perfectionist and do not do
anything only half way. And repairs like this seems to be something that I do enjoy,
being able to finding an issue, and then being able to solve it, along with it keeps me
busy. And at my age, the chase seems just almost as important as the catch. I
just wish I had kept track of the number of times that I climbed aboard in
doing these repairs.
This second trip was more of a test run to verify the
starving for fuel issue with the main motor was just a plugged fuel filter
(which I had replaced). I took it to a nearby electrical power reservoir,
and gave it a 20 minute run. It ran at all speeds without any hiccups.
This partly convinced me that the previous owner was probably also having
starving issues also but had not thought (or knew) about the filter.
However what really
solidified this thought was I later remembered when I bought it, there was a new
fuel line coupler that he gave me, saying "you might be able to use this
sometime". That added to the rest that I now know has convinced me
he had issues and thought maybe the fuel line coupler to the motor may have been
sucking air also, especially when I primed the fuel filter (using the primer bulb), I
got a few drips of gas at this old coupler. He had possibly been
there, and again, very likely had been having this fuel issue also. I am now
pretty sure that is one reason that he sold the boat.
Thinking back, of all the boats that I have owned, VERY FEW
did not have some kind of an issue at the time of the purchase. And
here I
am not counting any improvements that I made afterwards.
I am very happy with the final results of this boat. It
handles like a dream, and for being 2 feet shorter, it actually has more fishing space than
my longer North River. There are a few things yet to get up and going, like the
fuel gauge and the tachometer, but it is now USCG compliant and totally fishable.
These other issues will be addressed during the winter. And I may pull the floor over the fuel tank and inspect it
as there are two unknown wires protruding from under it at the rear. Along with maybe adding
a small Plexiglas windshield to the console.
By now you have probably decided that I don't go part way in
rigging my boats and that it is important to have even small things operational. Also
in
my boat repairs, all screws, bolts and nuts are stainless steel.
Some smart person once said "95% of successful fishing is done the night before". In my mind this also pertains to having your boat totally ready, "everything has a place, and in it's place".
Miscl & Other Helpful Things ; Here you will/have seen little things that I add to my boats which assist me during an outing.
(1) As shown above the movable swivel chair with a catchall tray underneath.
(2) A removable foam leader spool holder.
(3) A removable aluminum catchall tray used in conjunction with #2.
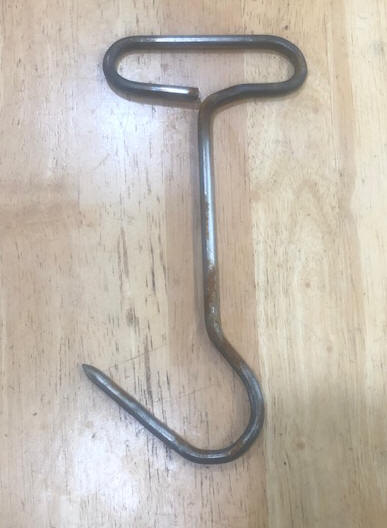
(4) A mini gaff type hook that is used to secure salmon after they are on the deck, and to carry them to the fishbox.
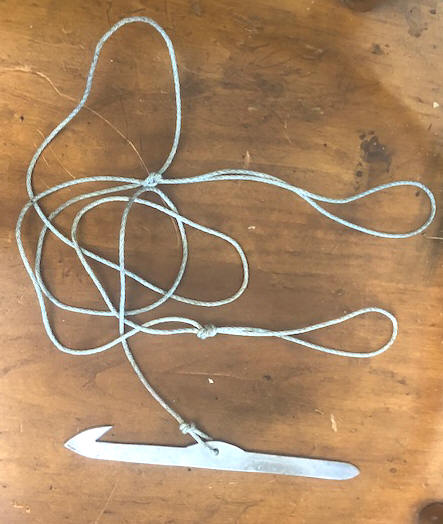
(5) A tuna cord fish bleeder line using a combo toggle arm on the lower end that also functions as a gill cutter as seen above on the right.
(6) Scent bottle holders in the rear side trays.
(7) A push pad that attaches to the removable hook end of a extendable boat hook. Anyone who fishes the bays who says they never run aground is lying to you, just look at their props. This 2" X 4" wooden pad simply mounts on the boat hook threads. Beats climbing overboard.

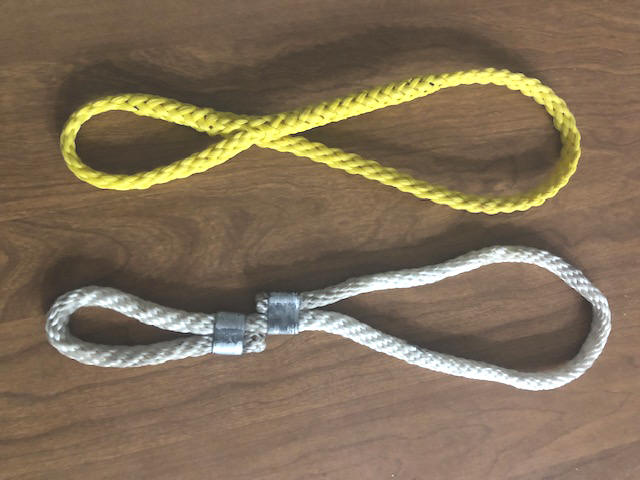
(8) Quick docking tether for mid mooring cleat. Here a simple figure eight slightly made of Poly or Nylon, over 12" long with the small end to slip over and usually remain on your mid mooring cleat (of which side you will be tying up to at that time, or one on each side). The large loop is large enough to fit easily and quickly over most dock cleats. Just slip it over the dock cleat and you are tethered temporarily.
(9) A net minder for the landing net.
(10) salmon net cradle for use when netting solo.
After leaving the at the marine repair for over a month, in outside UNCOVERED storage, (I should have used the cover) I found that all the center forward storage was VERY DISMAL in being waterproof. Everything got wet (however we had LOTS of rain during that time frame. I am going to have to see if on the forward deck storage to see if I can seal the deck to sidewall hull. And use smaller dry boxes. For the box seats, probably nothing other than, anything that could be damaged will have to be in tied bags. I will not get caught again in "OUT OF SIGHT - MIND". It also gave me incentive to use a waterproofing spray on the insulated Camo jackets and Nylon rain pants. And he left the ignition switch on, running the battery down.
| Here you see the reaults of over 6 months of climbing in & out |
After all this 6 months of working on this little gem, I am beginning to question myself. "Am I crazy, I MEAN REALY CRAZY"? At age 89 I see MANY of my friends and neighbors who are younger than I am by quite a bit, selling their boats. Lost interest, no time now, medical issues, lots of back pain, wife to sick, not fished it for a while, etc. I must be a freekin lunatic thinking I am invincible or what? My mind thinks I am 40 again and my body tells me I am an idiot.
I have made one request to my family that upon my death, that they transport my ashes IN MY BOAT, behind my pickup, to the cemetery for my internment. -- ONE LAST RIDE --
Copyright © 2025 - 2026 LeeRoy Wisner
All Rights Reserved
Back to the Main Ramblings Page
Originated 08-30-2025, Last updated 03-22-2026