| here are some alrger screws packed upright for a better hardening of the heads | Top view |
 |
Heat Treating and Case Hardening
of Gun Parts
In making replacement parts for about any firearm, (or any machine) will probably require it to be hardened in some manner in order to make it out of a soft metal (to be able to machine it) and then have it hard but strong enough to stand up to any usage.
Heat Treating :
This operation may be simple up to very complicated depending on the
desired hardness needed and the steel that is to be used.
Essentially, the steel needs to be soft enough to be machineable using
conventional machinery and with common economical cutters.
Briefly, steel is made in different degrees of composition,
(mainly carbon content). There are other alloys that can be mixed in
but for this purpose we will only deal with Carbon. To identify each
different grade, there is usually a color code painted on the ends of this
steel. The most common lowest one would be 1018 equating to .18% of
carbon. 1040 would have .40% etc. etc, up to 1090 with .90%. These
numbers for 1018 are .18, or about 3/16 of 1 percent.
They usually are supplied in an Annealed (or soft form). 1018 would
be common flat or angle steel and used for general construction and can be
easily welded. As the Carbon content goes up, weld ability goes
down. On the other end of the spectrum 1090 has a high enough Carbon
content that it can be heat treated into the making of a finished spring.
To Heat Treat steel, it has to have a high enough Carbon content. You can not Heat treat common1018 steel, as the Carbon content has to be probably above .50 or .60. The old method Blacksmith method to heat treat a medium to high carbon steel was to watch the color of the material as it was heated in a forge. Normally when it reached a Cherry Red, they pulled it out of the coals and then quickly quenched it in a quenching material. This could be oil if he wanted a tough part, or cold water if he wanted a harder part. The reason for the difference was the rate of cooling, water being faster. This temperature was critical, but more critical was the eye's concept of the desired color and whether it was in a dark shop or sunlight as the color was perceptive.
For small parts in modern times, a simple method would be using the same method, but heating the steel with a Oxygen/Acetylene torch to a Cherry Red and again if you wanted it hard, quench in water. If you wanted it more of a spring quench it in oil.
For the average gunsmith where you may be only making one or two parts, a simpler tempering method can be used. Find a "Baby Moon" hubcap in a auto wrecking yard, and some quenching oil. For years I have used transformer oil, (called insulating oil). Essentially that oil burned hot enough and quantity, long enough to attain the desired effect. Take your part, lay it in the dished hubcap and pour enough oil over it to cover the part. Using a propane torch, light the oil on fire. Let the fire burn until it goes out. Your part is ready to use. This oil burns at the at a near enough temperature and by filling the oil to just cover the part, which adjusts the burn time to equal the size of the part. I have tried many other oils, but some are hard to ignite, or leave a gunky residue on the part. Automatic Transmission Fluid will work, but is not ideal.
Case Hardening : Another method of hardening steel, but using softer steel is Case Hardening. In the old days Cyanide was used by heating a machined part to red, quenching it in Cyanide a few times, then again heating it up and then quenching it in water. This was tricky in that the person doing it had to be very careful and in a location that was well ventilated, otherwise the side effects were deadly. Later a non-lethal replacement called Casenite was used.
A more precise method is to induce carbon
into heated steel at a controlled rate using a electric furnace. Here, the standard method is to
use a steel crucible that can be somewhat airtight lid. The size of the
crucible will depend on the size of the furnace and/or quantity of the parts.
This furnace will need to be capable accepting your crucible and of achieving
temperatures upwards to 1800 degrees Farenheight.
Here the principle is to induce Carbon as a gas into heated
metal. The temperature has to be at least 1650 degrees Farengheight.
The Carbon here comes from Charcoal, like in Carcoal Brickets used for Bar-B-Queing. These brickets are made by using starch as a binder to hold them as the brickete. Break them apart into small pea sized chunks. If you are doing a lot, simply soak them in water, dissolving the starch, rub what is left over a 3/8" piece of hardware cloth, the dry them.
The secret here is this Charcoal, when heated to the required temperature will turn into a gas vapor, AND the steel at the temperature to where it will readily accept the absorption of this carbon gas. Knowing the rate of absorption, allows you to calculate the formula as to how long to leave it in the furnace.
Now sprinkle a layer of this Charcoal in the bottom of your crucible, add a layer of your metal parts, another layer of Charcoal, etc. until you run out of room or parts. Now, on top of the Charcoal lay a small chunk of wood, and install the lid. What this wood does is as the temperature raises, the wood burns, using up what Oxygen may be inside the crucible.
| here are some alrger screws packed upright for a better hardening of the heads | Top view |
|
|
Turn on your furnace, set it to the desired temperature and wait until it reaches that temperature.
Calculate the time needed at the
selected temperature. This is done by calculating how deep you want the
carbon to penetrate the hot metal. Typically .010" per hour of soak time
is a good average. If you only want a hard skin on (like a
screw), an hour or less may be sufficient. However if you want to make a
old Winchester rifle mainspring, that may be .100" at the large end, you will
need more penetration. You do not want it all the way through
however, giving the inner part a softer tougher section. You may
choose to penetrate 1/2 of the material (1/4 on each side). So
possibly 2 1/2 hours (.025" per side) soak time will work here. You might
have to experiment a bit to get the desired outcome depending on your equipment
and procedure.
This is also the method of achieving a multi colored outer
surface on some firearms, especially the old Colt SAA revolver frames and
screws. However here the hardness is designed to only be skin deep, so
less time and possibly different quench material.
In the RH photo below you will notice the LONG handled tongs being used to handle the crucible.
| Here the cricible is ready to be removed from the furnace | Here it is being removed from the furnace |
 |
 |
Quenching :
Have your quench barrel needs to be outdoors and away from anything
burnable, It needs to be large enough and have enough quantity of water to
not readily heat up. This water should not be city or well water with any
contaminates. Best would be rain water. But inside this barrel, you
also need a screen type basket that can be readily retrieved. You will
need long tongs to be able to reach in to your furnace and retrieve the
crucible. You will also need some method of getting the lid off the
crucible in a timely fashion, as speed is of the essence here. And
there will be a lot of heat.
You also need to place your quench barrel in a location
where IF THE WIND IS BLOWING, that the hot flames/ashes produced in this quench
are not close to anything combustible. AND for you to be sure that you are
standing on the UPWIND side when you actually quench.
At the proper time in the
furnace, open it, remove the crucible, carry it OUTDOORS, remove the lid and
very quickly dump the contents into the barrel of water.
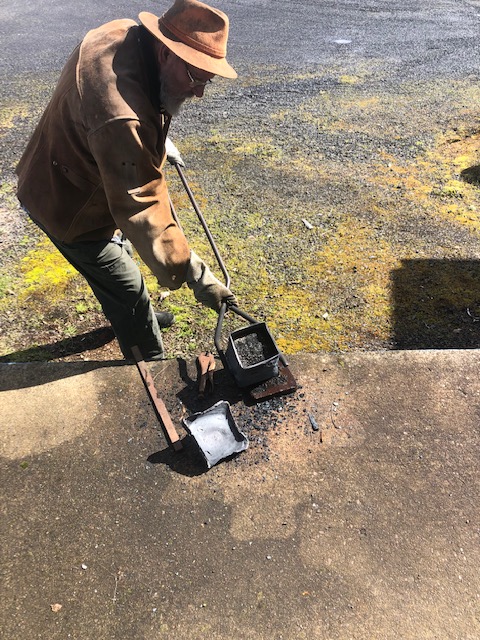
You will notice the HEAVY leather jacket, large brimmed hat
and leather gloves being used here.
| Here the lid has just been removed | Here the crucible is near and parts ready to be quenched |
 |
 |
You will have a LARGE flame/shower of sparks raise in high the air. Be sure that you are upwind from your quenching barrel. It is also ADVISABLE to wear heavy leather gloves and a welder's leather jacket, a broad brimmed hat and a possibly a plastic face mask.
| Here the initial quench has begun | Top view |
 |
Oh yes, in the quench barrel, you will need a screen type basket about 6" below the water surface to catch the parts and separate what is left of the charcoal.
Once The quench is done, pull the screened basket and wash/separate any ash/charcoal from the parts. Remove your parts and let them dry.
If you are making the above mainspring, do not try to bend it now as it will break as it is too brittle.
| Here the separtating the parts from the residue using a magnet | Here the parts have been separated and washed |
 |
 |
Drawing Back: Once the parts are dry, replace them in your crucible, no Charcoal or wood. Set your furnace to a temperature of 650.
.
| Side view | Top view |
Since there
Back to the Main Ramblings Page
Copyright © 2023 LeeRoy Wisner All Rights Reserved
Originated 02-15-2023, Last updated
03-25- 2023
to contact the author click here