|
|
Rifle Sight In 101 |
|
FIREARMS INFORMATION
First off, before you get into the actual sight in, you need to verify that your barrel is squeaky clean, the scope mounts are tight and aligned, your action is bedded and tightened properly AND you have the proper ammo for the firearm.
There
seems to be a mystical part about sighting in rifles. Here I will make an
effort to try to
unravel some of these in simple terms.
Any firearm needs some form of aimament
that correlates the bore/bullet with where the bullet will actually hit if it is
to be effective.
This method of aimament will be sights in some form or another. The most
simple iron sights on a rifle are a Vee notch rear sight a tapered post type front
sight. In use when properly aligned, by looking over the Vee rear sight
and
at the front sight, (either a post or a bead) and when the two are in alignment
and properly adjusted,
the bullet should strike where the sights look for any given distance.
This is called sighted in.
Usually both iron sights will be installed into the barrel in dovetailed grooves
thereby holding in the sights while at the same time allowing horizontal
adjustment. Later rifles tend to have the sights, (both rear and front)
screwed to the barrel. Many front sights can be dovetailed into screwed on bases or
ramps. Vertical adjustment is gained by either using a front sight
the proper height and/or a long tapered, notched rear sight elevator or the top
part of the rear sight as a slider up a incline.
This type of sights have been around since rifles were invented, but has some
drawbacks. For those of us that belong to the "Over the Hill gang" it is
hard to focus on 3 object as the same time. (1) the rear sight, (2) the
front sight (3) AND the target. Plus the fact that if the person who sighted
it in used a course bead (saw the whole bead in the rear notch) and the person who
may be shooting it at any given time is used to taking a fine bead (seeing less
of the round front bead) the point of impact will be lower.
Enter receiver rear sights (sometimes called peeps). Here the same front
sight can be used but the rear sight is removed off the barrel and and replaced
with a different type a sight farther to the
rear. This type of sight will have both windage and elevation (horizontal
and
vertical) built into the base or the over arm. Also instead of a Vee notch
it has a small round hole that is looked thru called an aperture.
This simplifies aiming as it then only requires seeing 2 objects as your eye
naturally centers what ever it sees as you are looking through this round aperture hole. It can
also be more accurate since it being closer to your eye, you only have to
concentrate on seeing the front sight as your eye will naturally place the front
bead in the center of this "peep" hole.
Optical scopes take this to a upper level. Here you will usually have a magnifying effect. Normal modern rifle scopes can be had in 4 power, (normally written as 4X), 6X, for fixed power or 1 1/2 X 5, 2X7, 3X9 etc. if a variable. Many will also be labeled as say 3X9X32 or 3X9X40. This last number is the diameter of the front lens in millimeters. 32MM would be the standard, where the 40MM would be larger, many times requiring a higher set of mounts to have this larger front end clear the barrel. When using a scope, the optics place the alignment on one plane helping those of us with older eyes.
Things That Effect Sighting In ; Since gravity effects all things on this planet, even if a bullet is traveling downrange at possibly from 1800 up to 3000 FPS (Feet Per Second), it will start falling as soon as it leaves the muzzle. This is called trajectory. Therefore you will have to decide at what point that you want your rifle sighted in for. A 22 RF tin can/ rabbit rifle will normally be sighted in for say 50 yards or less, while a hunting rifle will usually be at 100 or 200 yards. What this really means is that this is the point where your line of sight crosses the falling bullet's path.
Now let me back up a bit as your sights will be above the barrel and you will need to adjust the sights so that the barrel is pointing slightly upward otherwise the bullet's drop out any distance will be enough that it would be hard to compensate enough to hit anything out there. So in reality you will have the bullet crossing the line of sight twice, once close to the muzzle and again at where you hopefully have it sighted in for. This closer crossing is called Point Blank Range. It can be useful to a deer hunter in that there is the possibility of encountering a grouse at very near this PBR. Knowing this, it is possible to shoot the grouse's head off with a big game rifle, which may be from 25 ' to 50'. Iron sighted rifles will have a closer point blank range that a scope sighted rifle because the scope will be about 1 1/2" above the bore while iron sights will only be about 1/2". And a slower moving bullet (like 30-30 Win.) will have more of a arc than a faster bullet like a 300 Win. Mag.
So in reality the bullet will be making a long arc, with it being flatter closer to the muzzle because the bullet is going faster here than out there, since the farther it goes the slower it is going hence dropping faster due to gravity, as it slows down. Now mixed into this formula will be rifle ammunition usually comes in different weight bullets. This to take advantage of possibly needing a lighter bullet to effectively shoot a deer as compared to a larger elk where more penetration is needed. All cartridges are loaded to safe levels of energy set by SAMMI, therefore lighter bullets will go faster than heavy bullets.
To take advantage of this, say you had a 30-06 150 gr. bullet and anticipate that your MAXIMUM range to be 300 yards. Using known trajectory charts, you may want to adjust your sights so you are hitting 2" high at 100 yards, which will put you about dead on at 200 yards and then possibly 9" low at 300 yards. Using this bullet drop information, for a deer sized animal, your "dead on hold" will be out to about 250 yards, but you may have to hold higher like possibly to the top of the back at 300 yards. Here 250 yards is called Maximum Point Blank Range. The real secret here is RANGE ESTIMATION on your part when you get beyond that 250 yard mark. And that is where the lazer type rangefinders can come in handy.
A rifle sighted for this 150 gr. ammo will not hit the same place of impact as with 180 gr. ammo. Even changing brands of ammo using the same weight of bullet may make for different impact points. Each needs to be sighted separately, unless you have an exceptional rifle.
The bullet path above the line of sight is known as Mid Range Rise. With True Zero at the intersecting point of the bullet path and line of sight.
| Trajectory of a hunting rifle |
 |
In any accurate shooting, you need to
squeeze the trigger in a manner that you will not be able to anticipate when the
shot will go off. If you jerk the trigger there is a VERY GREAT chance
that you will also move the rifle<(even so slightly), thereby throwing the gun's
bullet off the target when fired.
You should learn to be able to "Call The Shot". This is when the shot goes off,
you need to have concentrated enough so that you can, in your mind "See" the last
location the sight was when the shot was fired. This will also help you
later during actual hunting where you can identify where the sight was and where
the animal was hit.
How to Sight in a Rifle ;
BE SURE THE GUN IS UNLOADED
(1) Adjust your sights as close as
possible before you get to the range. This can be, if a bolt action rifle
remove the bolt, look thru the bore at an object some distance away.
Center your looking to coincide with the CENTER of the bore. Now
using the sights look at the same object. Adjust the sights to coincide
with the bore. An optical bore-sighter scope can be also used on iron sights as
described below.
If your rifle has a scope, do the same or
use an optical bore-scope. You will be able to see your rifle scope's
reticule superimposed on the bore-scope grid. These bore-scopes usually have a
grid of lighter lines and heavier lines in the center. All this equates to 100 yards.
Using a optical bore-scope, everything you see here is backwards, which means
what if you see your scope reticule low and right, it would actually be high and left.
Then depending on the bore-scope brand, most
of the individual grids equal 4" at 100 yards.
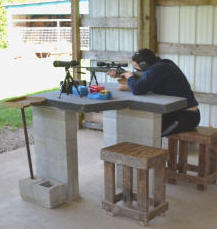
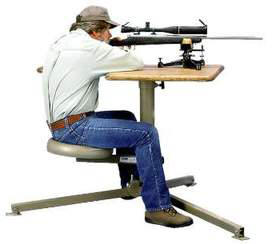
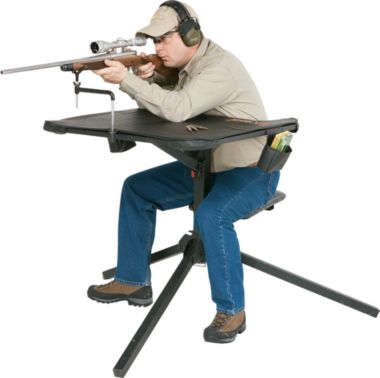
(2) Use a rest off a bench or sturdy table, log etc. Do not shoot
offhand to start. Sandbags work great. You will need 3 sandbags, 2 in front under
your forearm and 1 under the butt-stock. Sandbags can be made from old jeans
pant-legs or get ahold of a friend who trap shoots and see if you can con them out
of some used birdshot bags as these are about the right size. Other than
that, there are numerous mechanical adjustable rifle rests that work great.
| Note the ear protection |
 |
Also beneficial would be a pair of
GOOD
binoculars or spotting scope to be able to see your bullet holes with otherwise
if you are on a public or even private range, if other shooters are present, you
will have to wait until they
call a halt so all can go forward to inspect/change targets in safety.
(3)
WEAR HEARING
PROTECTION.
(4) It is best to not start shooting at the 100 yard
target. But one at 50 yards first. The reason is if you miss the 100
yard target, (unless you have a large backing paper behind it) you may fire a lot of ammo
and still not know where the rifle is
hitting, but if you start closer, your chances are better to at least hit the
paper thereby giving you an indication where you will need to move the sights
to.
(5) Once you have a hit, fire a couple more to verify that the
rifle is indeed shooting close to where the first round hit. Shoot for a
group. A group fired from a iron or open sighted rifle will be
considerably greater than one from a scope sighted gun simply because with the
scoped gun the shooter can see better. A 2" group may be good for a scope sighted hunting
rifle, varmint hunters will not settle for anything less than 1". And
match shooters are unhappy if all the holes are not touching. Here a 2"
group at 100 yards would equal a 4" group at 200, and a 6" at 300.
Here now you can use your bore-scope.
If you see your rifle reticule to the right by one grid and high by two grids, you
need to adjust the rifle scope to be in line with the bore-scope. Now
since using the illustration above for the 30-06, where you want your rifle 2"
high at 100 yards, you will want your rifle scope to be on the heavy vertical in
the center of the grid and 1/2 a grid LOW below the horizontal heavy center line.
Or adjust the sights so to match your intended point of aim. For iron
sights, this means tapping the sights right or left. If you need to move
the point of impact to the right, move the rear sight to the left. And if
you need to shoot higher, move the rear sight elevator higher.
Method A ;
Scopes will have a turret cover that when removed will allow you to adjust the
internal adjustment in the scope. Most scopes will have turret knobs in
the center of the scope, covered by threaded caps. The top turret is for
up/down and the right side turret is for right/left movement. They will
usually have marks on this turret adjustment ring. Some will also have
click adjustments. Most will have marked somewhere under the cover just
how much each mark or click equals. Most hunting type scopes will equal 1/2"click at 100 yards.
Target scopes may have 1/4" adjustments. Some hunting type scopes do
not have clicks, but a friction adjustment. These will have marks on the
knobs usually referencing the 1/2" adjustment.
So if you have a hunting scope,
you need to move your point of impact 2" in this case that would be 4
clicks or marks. By looking at your point of impact on the target and making
this adjustment, then shooting again to verify that you are right, you can sight
your rifle in. One suggestion is that before you make a adjustment on the
scope turret adjustment ring that you either make a slight mark at where zero is
so that if you went the wrong way, that you have a reference point to return to.
Some of these rings are held on by slight friction or small screw and can be re-zeroed instead of
marking or remembering.
Fire 3 or 4 rounds to confirm your new setting. Do not
shoot so rapidly that the barrel warms up
as this will effect the point of
impact as it gets hotter. When you are
finished remember to pick up your scope turret covers, as many are lost in this
manner. And most scope manufacturers do not use a universal diameter or
thread.
Method B ; Another method is after you have
identified where bullets are hitting, is to place the rifle back in the rest,
line it up exactly where you were holding when you shot, (like on the bullseye).
With the turret covers off if a scope sighted rifle, using a screwdriver and
without allowing the rifle to move, adjust the scope knob TO WHERE THE PREVIOUS bullet
hit the target or in relationship to where you want it to hit from where you
aimed. It is easier to do this for the vertical adjustment than the
horizontal as you need to put some side pressure on that turret knob. But
this is a faster, more reliable method and usually can be done with lesser shots
fired.
Once you are satisfied with how your rifle is sighted in off the bench, you might consider trying a few offhand shots. Simply because you can get in a situation where there is nothing for you to rest on out in the field. It is a whole lot different than shooting off a solid bench. However my suggestion would be to do more practicing offhand with a 22 RF simply because of the ammo expense.
Get As Steady As Possible When Hunting; If you do your sight in offhand, that may be OK if you only hunt the brush and shots will be less than 50 yards, but you get the chance at a NICE buck at 200 yards, your chances of hitting him greatly diminishes if your do not really know where it hits at that range. There are 2 rules in hunting, If you can get steadier, -- get steadier, if you can get closer -- Get closer. That being said, what if you do have a longer shot but can not get closer and have no cover to hide behind, or rest off of.
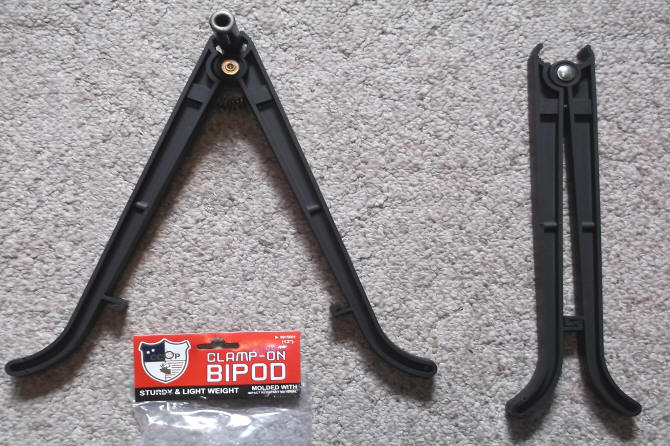
Some hunters attach a folding bi-pod to the rifle forearm to gain stability when shooting prone, but this adds weight and bulkiness. Your next best thing would be get steadier using a detachable bi-pod. On the internet, I stumbled onto a detachable commercial improved copy of the military M-16 bi-pod that is made of Nylon/plastic for a price of $7. This unit is made in either 9" or 12" heights and can be carried in a backpack or even inside a vest pocket, and can be brought into play very quickly. It is retained in the closed position by a built in hook system and is spring loaded so when unhooked, the upper parts snaps onto the barrel and spreads out at the bottom ready for deployment. It is sold on e-Bay by a company called CCop, #9915001 and is simply called a "clamp-on Bipod", which is shown below.
| Here is a simple removable Bi-pod, deployed & snapped together for transportation |
 |
Things That Can Effect
Accuracy :
If you can not hold a group of at least 3"
at 100 yards with a scope sighted rifle, something is wrong. Most modern
hunting rifles are capable of at LEAST doing 1 1/2" 100 yard groups, if the
shooter does their part. If worse than that it could be
you flinching, or the following.
Scope
Mounts So Far Off that the Scope Cannot be Aligned ?
Sometimes if the scope runs out
of adjustment, it may not be the scope, but the drill/tapped mounting holes,
ESPECIALLY if it is on a converted military rifle where a gunsmidt may
have drilled some of the holes off center to the bore.
A method commonly
used by accomplished gunsmiths is to SHIM the mounts. This can be
done with thin steel or even thin cardboard like business cards. Here the
shim does not go under the whole scope base, but only on one side, as you are
trying to tip/pivot the scope one way or the other. In bad cases, 3 or
more business cards would not be unreasonable. BUT the secret is to
shim these bases on different sides, like on the LH side of the rear and RH side
on the front. Meaning you twist the rear one way and the front the
opposite.
One your shims are in place, tighten
these bases TIGHT, lightly mount
the scope, loosen the ring screws so that the rings now will realign with the
new positions of the bases. Once the scope reticule is square with the
action, retighten the ring screws. Now you can resume your bore sighting.
If it does not solve the issue, add more shims and try again.
Once you get it to where you have adjustment in the scope, take a sharp knife
and cut the excess paper off at the edges of the base down to the receiver.
Now you can use a black felt marker to color the paper shims, and then add a few
drops of gun oil to that paper. RETIGHTEN the base screws.
Scope Mounts
Loose ?
If
you are chasing your tail in trying to sight in your rifle, are the scope mounts
loose? This would be the number one thing to look at. It could be
either the scope base screws into the receiver being loose OR the ring clamp
screw.
Scope Loose
Internally?
If you happened to take a hard fall,
the scope could be broken internally. The simple quick check here is to
remove the scope from the rifle and shake it. If you hear a rattle, send it
back to the manufacturer.
It could also be the scope is
sticking internally and not responding to your adjustments like it should.
When this happens, you have adjusted it to where you think it needs to be after
firing some shots. OK, but now the shots are in a different location than
you thought they should now be. You readjust and the same thing happens.
Time to send it in for repairs if the company is still in business.
Scope Focus ;
All scopes also have a focus adjustment. Not everyone has the same
eyesight. You may see thru the scope and it could be clear at close range,
but fuzzy farther out. You need to turn the adjustment ring so that it is
in focus for YOU at all ranges. but longer ranges would be more desirable. This means if you pick up a friends rifle, you may not
be able to effectively shoot it accurately. Also even if you have not used your old
standby rifle for a number of years and you have not taken into account that your
eyesight may have changed. You may be able to see the country side but the
crosshairs are fuzzy enough that you can not define your point of aim (I have
personally witnessed this happen). Did
you get your glasses changed or had cataract surgery? Either of these
could effect your vision enough that you should at least check or if need be to refocus your scope.
Rusty Bore ;
It goes without saying that the bore which is the heart of any rifle's accuracy
and needs to be meticulously clean and free of corrosion or copper fouling.
Copper fouling can be because of a rough bore and then firing ammo which was
imbedded into the rust pockets. If this is the case, then time for a good
bore cleaning with a solvent type bore cleaner.
Dented or Bad Muzzle
Crown ;
The exit of the bore at the muzzle is
important in that if is not true, when the bullet exits, there can be more
gasses being pushed on one side than the other thereby setting up a wobble in
the bullet. If you suspect this, take it to a good gunsmith.
Some Ammo Just Not
Compatible With Your Gun ;
Yes, not all ammo may shoot accurately
in all guns. Some rifles may have been fitted with a barrel that was
intended for lighter varmint type bullets, these barrels can not stabilize
heavier bullets. One caliber in particular would be the 244 Remington,
Which was designed basically as a varmint cartridge.
The factory recognized this, changed the barrel to a faster twist, then renamed it the 6mm
Remington. Others may be rather finicky and like only one weight of bullet
or brand of ammo to shoot accurately. One old time but good military
cartridge, the 7X57 was designed to stabilize a 175 gran bullet. If
you try to shoot 120 grain bullets out of it, your accuracy will be dismal as
that lighter bullet is not stabilized.
Excessively Heavy
Trigger Pull ;
If the trigger pull is excessive, it will be hard to
precisely pull the trigger. Usually a good crisp hunting trigger will be set at about
4 1/2#. A gas operated semi-automatic trigger may be slightly more
for safety's sake because of the sharp jarring when the action is operating.
A varmint rifle could be near 3#.
You Are Flinching ;
If you have been shooting a high powered, heavy recoil gun for a while, you may
be flinching (afraid of the recoil). This being that you are anticipating the heavy recoil
and are
either jerking the trigger or closing your eyes as you pull or BOTH. This
can be beneficial to the game you are after as you probably will not hit
anywhere near where you are looking.
I know one hunter who hunted with a group
of friends who all carried 300 Weatherbys. The story told on him was that
they spotted a elk across the canyon, (a long ways, but within range). He
laid the rifle across the hood of a pickup, the others were watching thru
binoculars. One of his buddies was watching the shooter and he closed his
eyes, AND
jerked the trigger. Missed by a mile. Their hunting expedition
was really an excuse to get out with the boys. OK, what ever tweeks your
tweeker works for me.
I know another hunter who just had to use a 340
Weatherby, who professed his hunting skills, but he would never sighted it in himself. Always some excuse.
RECOIL WAS THE PROBLEM. Both of these guys could have had some form of recoil reduction done to their
rifles IF they would have recognized the problem and confided in a good gunsmith.
Stock Bedding Loose ;
If the metal parts of a
rifle are loose which then
trends to wobble around in the stock, even slightly, this can also effect
accuracy. Check the action/trigger guard screws for tightness. Or
have a gunsmith glass bed the action, so it does not shift from shot to shot.
Stock Does Not Fit You ; If the stock is to short and or the scope is mounted to far too the rear, you may crawl the stock, you can be subject to being scope bit. That is if you are too close to the scope, and under recoil the gun will come rearward. As the result of this, many shooters have become well acquainted with their scope by it hitting them in the eyebrow. This can be a nasty circular cut. And it WILL bleed.
Humans are not all built the same, some of us are tall and lanky, while others
are short and stocky. Us stocky guys usually have short necks, who
need a stock that fits us, along with forward/rear placement of the scope needs
to be precise. The tall lanky guys seem to be able to adapt a lot
easier as they can crawl the comb in a long stock, where the short necked guy
may need a shorter/higher combed stock. You need to be comfortable
if you are going to shoot accurately.
And a Combo of Many
of the Above Can Drive You to Drink ; It would not be impossible for
you to have a rusty bad bore, loose scope mounts, incompatible ammo and a sticky
scope adjustments. As a gunsmith since 1959, I have Been There - Seen That - Done That. This usually takes some time at the
range and lots of ammo for you to sort out.
Copyright © 2010 - 2023 LeeRoy Wisner All Rights Reserved
Back to the Main Ramblings Page
Originated 11-26-2010, Last updated
01-29-2023